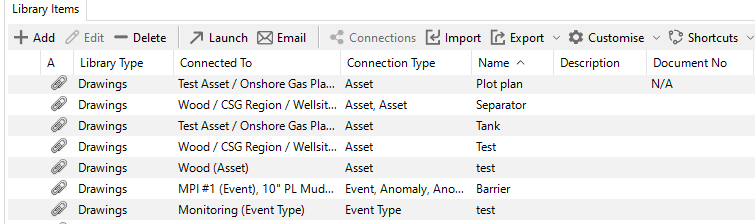
Library
The Library pane shows all the library items attached to:
The asset currently selected in the asset tree.
The event currently selected on the Event Listing (Workpack) pane.
Library items are electronic documents that can be linked to data and data types in NEXUS IC using connections (see Library Connections).
The electronic documents can be uploaded directly into the NEXUS IC database, or can be referenced using URL or UNC paths.
Manage Library Items
You can manage library items from several screens within NEXUS IC, including:
Library Items tab on the LIBRARY screen (see Library)
Library tab on the ASSETS screen (see Library)
Library tab on the INSPECTION screen (see INSPECTION)
Library tab on the ANOMALIES screen (see ANOMALIES)
Library tab under
Library tab on the Edit Asset Type dialog under
Library tab in various dialogs where library items can be managed for the relevant record, including the Edit Anomaly, Edit Table Definition, Edit Task and Edit Workpack dialogs
Example
If you upload company piping specifications to the NEXUS IC Library and assign it to the asset type “Pipework”, the piping specifications will be available from the Library* tab of the ASSETS screen whenever the active asset is of type “Pipework”.
You can also manage library items on the Library pane of IC-Inspection.
You use the standard toolbar functions on the Library/Library Items tab to add, edit, delete, import, export library items or customise the grid layout. For more information about these functions, see Using the Grid.
Note
You can edit the properties of the selected library item from the toolbar, but not the document itself.
Deleting a library item will also delete all its associated connections.
The Export option only exports the grid contents, not the actual library documents.
See below for more information about some actions you can perform on library items:
Add Library Items
To create a new library item, proceed as follows:
Start adding a new library item in one of the following ways:
On the Library/Library Items tab, choose Add from the toolbar.
Drag files from your file explorer onto the Library/Library Items tab.
Note
Drag-and-drop is not supported in remote environments (e.g., Remote Desktop).
Depending on the screen from which you accessed the Library tab, you may be prompted to select a connection type. You can connect a library item to different types of data records:
Screen
Connection Type
ASSETS
Asset
Asset Type
INSPECTION
Asset
Asset Type
Event
Event Type
Workpack
ANOMALIES
Anomaly
Asset
Note
If you’re adding a library item from the LIBRARY screen, you add the connection to a data record from the Connections tab after you have created the library item. For more information, see Add Library Connections.
In the Add/Edit Library dialog, select the library type, enter a name for the library item (mandatory) and enter other parameters as required. For information about filling in all the parameters, see Add/Edit Library Dialog.
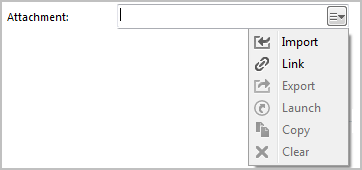
If the document is to be uploaded into NEXUS IC, then click on the Attachment button, else enter a Hyperlink location.
When adding an attachment, you can either Import or Link it:
If you import, the item will be saved to the database. If you subsequently change the original on disk, the item in the database will not change to match.
If you link the item, then when you change the original on your disk, the next time you view the item within NEXUS IC, you’ll see the updated item.
Note
NEXUS IC still loads a copy of a linked item into the NEXUS database. This ensures that if the original is unavailable (for example, because you are away from your network), NEXUS IC can display the cached copy.
When you view the item, if the original has been updated, the database cached copy is updated too. You can’t link items that are on your local hard disk, only items on network drives can be linked. The Link feature is designed to keep you up-to-date with items that may have been changed by others, and that is not possible on your local drive.
If you drag and drop multiple files, they will be added, and then multi-selected in the grid. You can then click Edit to multi-edit them (see Multi-Edit). Drag and drop will import items, not link them.
Click OK.
On the LIBRARY screen, you can view the details of the library item by selecting it and checking the Details tab under the Library Items tab.
Edit Library Items
To edit an existing library item, proceed as follows:
On the Library/Library Items tab, select the library item.
Choose Edit from the toolbar.
In the Edit Library dialog, update data as required. For more information, see Add/Edit Library Dialog.
Click OK to save your changes.
Delete Library Items
To delete an existing library item, proceed as follows:
On the Library/Library Items tab, select the library item.
Choose Delete from the toolbar.
In the confirmation dialog, click Check Connections if you want to review any connections to this library item before deletion.
If you want to proceed deleting the library item, click Delete, else, choose Cancel.
Launch Library Items
Use the Launch toolbar button to launch library items on the local machine. By default, NEXUS only launches files with the following extensions: doc, docx, xls, xlsx, jpg, png, jpeg, jfif, bmp, tiff, gif, mpg, mp3, wav, ppt, pptx, txt, pdf, emf, zip, dwg, avi, rtf, mp4, csv.
Hint
Use the Space Bar on your keyboard to launch the currently selected library item.
Note that if the local machine does not have an associated viewer for the document type (for example, AutoCad viewer for DWG type), then the document can not be launched.
Email Library Items
Use the Email toolbar button to send an email message with the selected library items attached to it. You can select multiple library items to be sent in the same email message. Note that you must have properly configured your email settings (see Set Up Email) for this option to function.
Warning
If the size of the attachment exceeds your organization’s attachment size limit, you may get an “Out of memory” error message.
Import Library Items
You can import library items using the standard Import toolbar option (see Import). You can download the MS Excel Import Template, which shows the required format for importing library items.
You can also import the Connections in the same import as the library items, so in addition to the Library Import columns, you can additionally define the Connection information using the following column headings:
Library Connection.Connect To
Library Connection.Workpack
Library Connection.Asset Type
Library Connection.Asset
Library Connection.Event Type
Library Connection.Event
Library Connection.Anomaly
Library Connection.Risk Model
`Library Connection.Function
Note that the Connect To column should only contain one of the following text items:
Anomaly
Asset
Asset Type
Event
Event Type
Function
Risk Model
Workpack
Double-click
The first time you double-click on a library item, NEXUS asks you whether you want to launch the library item in an external editor, or edit the library item. If you want your choice to become permanent, tick the Always do this checkbox. Note that if you hold down the Alt key while double-clicking, you will be asked again.