Create Table of Data for Anomaly Actions, Use Style Prefix
In this step, you create a Table of Data to list the anomaly actions and you want to use a Style Prefix to apply a specific colour to even rows.
For that, you create the following:
A level-2 Section Heading to be included in the output before the table
A Simple Source for the Anomaly Actions system table, from which the Table of Data can retrieve data
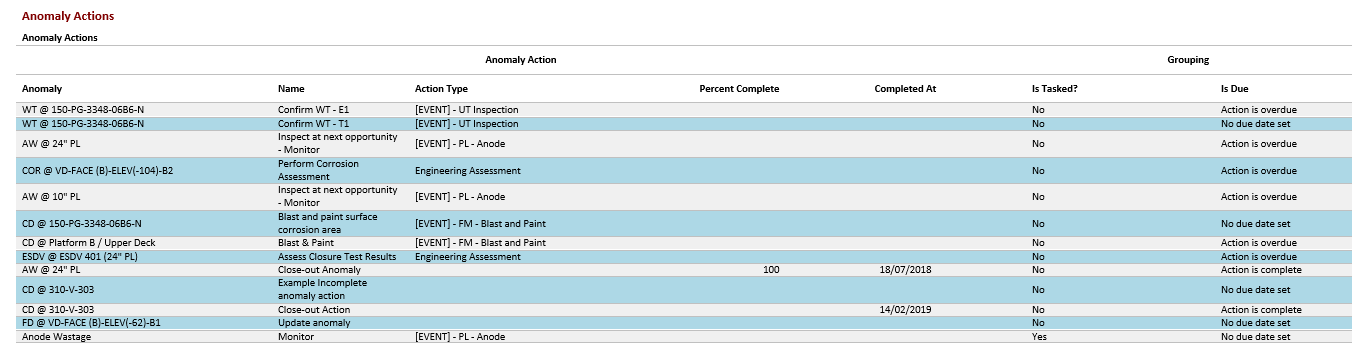
The actual table of data for the Anomaly Actions applying a Style Prefix to it
See the detailed steps below:
Prerequisites
You have completed the following steps:
Process
In this example, you work in the same Anomaly Tables Element Group that you have created in the previous step.
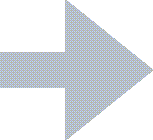
1. Insert a level-2 Section Heading for the list of anomaly actions.
Add a Section Heading element to the Report Layout structure so that it is included within the Anomaly Tables element group.
Double-click the element in the structure to edit it.
Enter a name that identifies the element in the structure, for example, Anomaly List Heading 2. This text does not appear in the actual report output.
Enter the text of the heading that you want to see in the output in the Content field. This time, we just want to use the heading Anomaly Actions, but you can use right-click in this field if you want to add a variable.
Select the Include in Table of Contents checkbox to have this section heading appear in the Table of Contents.
In the Default Style field, select Heading 2, which is a preconfigured style that can be applied for level-2 section headings. If required, you can set up your own style and apply that instead (see Styles).
Click OK.
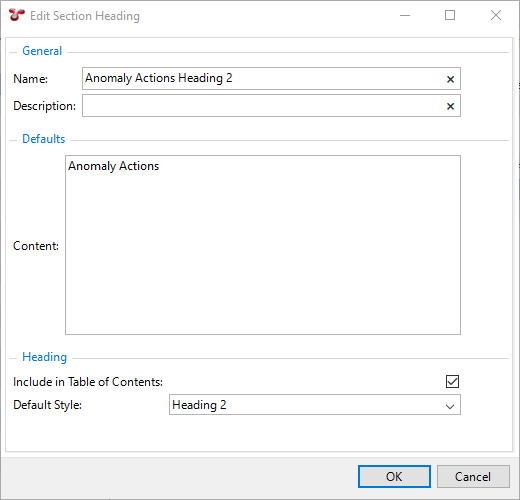
2. Insert a Simple Source for Anomaly Actions.
This simple source will be used as the data source for the anomaly actions Table of Data that we are going to create.
Add a Simple Source element to the Report Layout structure so that it is included within the Anomaly Tables element group. The Simple Source element is located under the SOURCES node within the Template Definition section of the dialog.
Note
You must insert the simple source within the element group, else, you cannot refer to it from the other elements of the element group.
Double-click the Simple Source element in the structure to edit it.
Specify the name Anomaly Action* for the simple source.
In the Table field, click the ellipsis
to select the System Table Anomaly Action.
Click OK.
3. Insert a Table of Data element for Anomaly Actions.
Add a Table of Data element to the Report Layout structure so that it is included within the Anomaly Tables element group and it is below the Section Heading element that you created for Anomaly Actions.
Double-click the element in the structure to edit it.
On the Properties tab, make settings as follows:
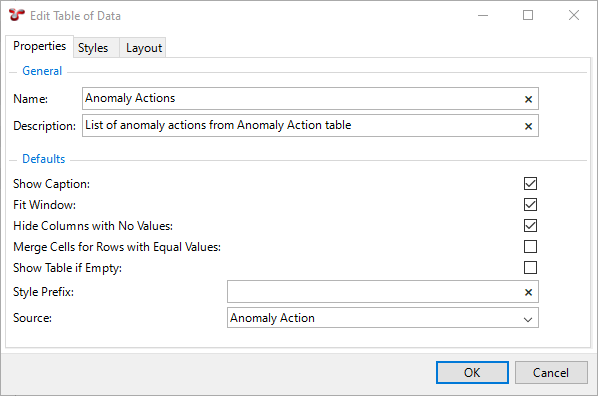
Name: Enter Anomaly Actions
Description: Enter a descriptive text, such as List of anomaly actions from Anomaly Action table
Tick the following checkboxes:
Show Caption
Fit Window
Hide Columns with No Values
Source: Select the Anomaly Action source from the drop-down list. The available values in this field are retrieved from the sources that have been created under the current element group.
On the Layout tab, you can hide columns or rearrange the layout as required, see the previous example for more information.
Click OK.
4. Create a new style for even rows.
The default colour for odd rows is white and for even rows, it is grey. In this example, you want to change the colour of even rows to light blue. To do that, follow the steps below:
Click OK to save your changes to the report template and go back to the Configuration - Templates dialog.
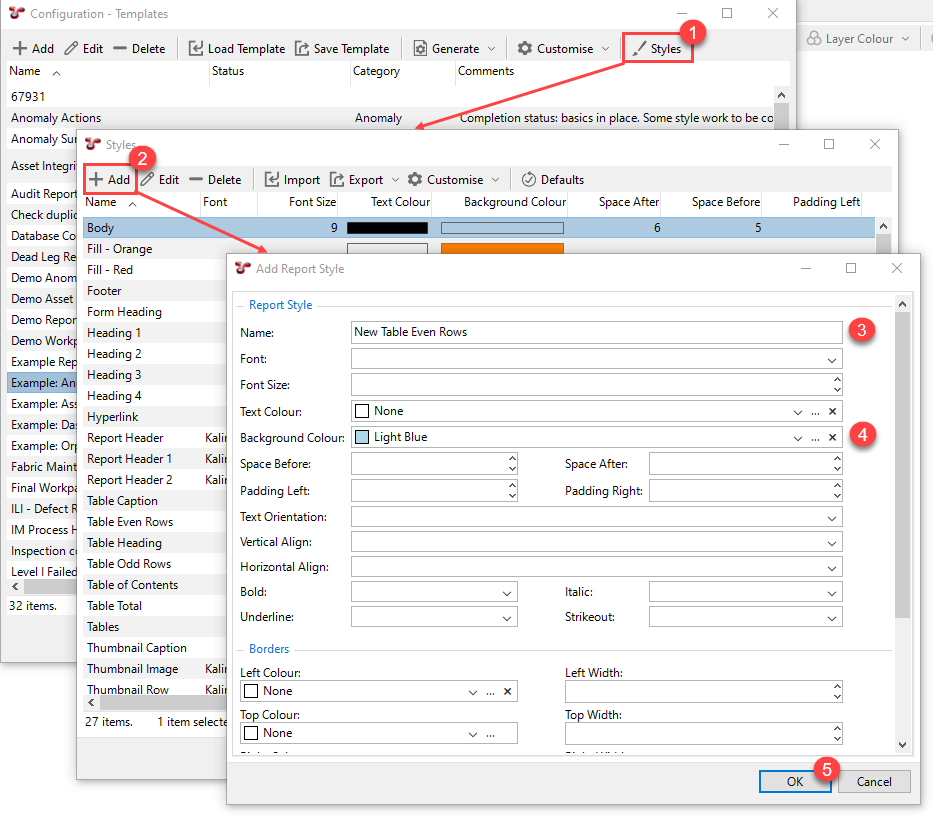
Choose the Styles toolbar button.
Choose Add to define a new style for even rows.
Specify a name, which includes the name of the default style plus a prefix, for example, “New Table Even Rows”.
In this case, the prefix is “New” and “Table Even Rows” is the same as the name of the default style.
In the properties of the “New Table Even Rows” style, change the Background Colour field value to a light blue colour.
If you do not change the other values, the default “Table Even Rows” style will be applied for the rest of the settings.
Click OK.


5. Apply the New style prefix to your Table of Data.
Double-click your report template to edit it again.
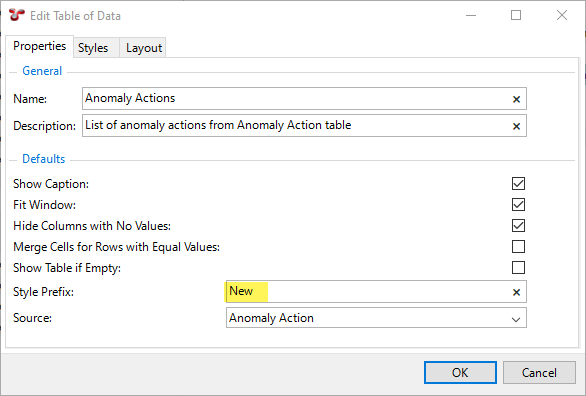
Edit the Anomaly Actions Table of Data, to which you want to apply the new style (double-click it or select it and choose Edit).
Enter New in the Style Prefix field.
Click OK.
Result
When you generate the output, it now contains the table with the new style: