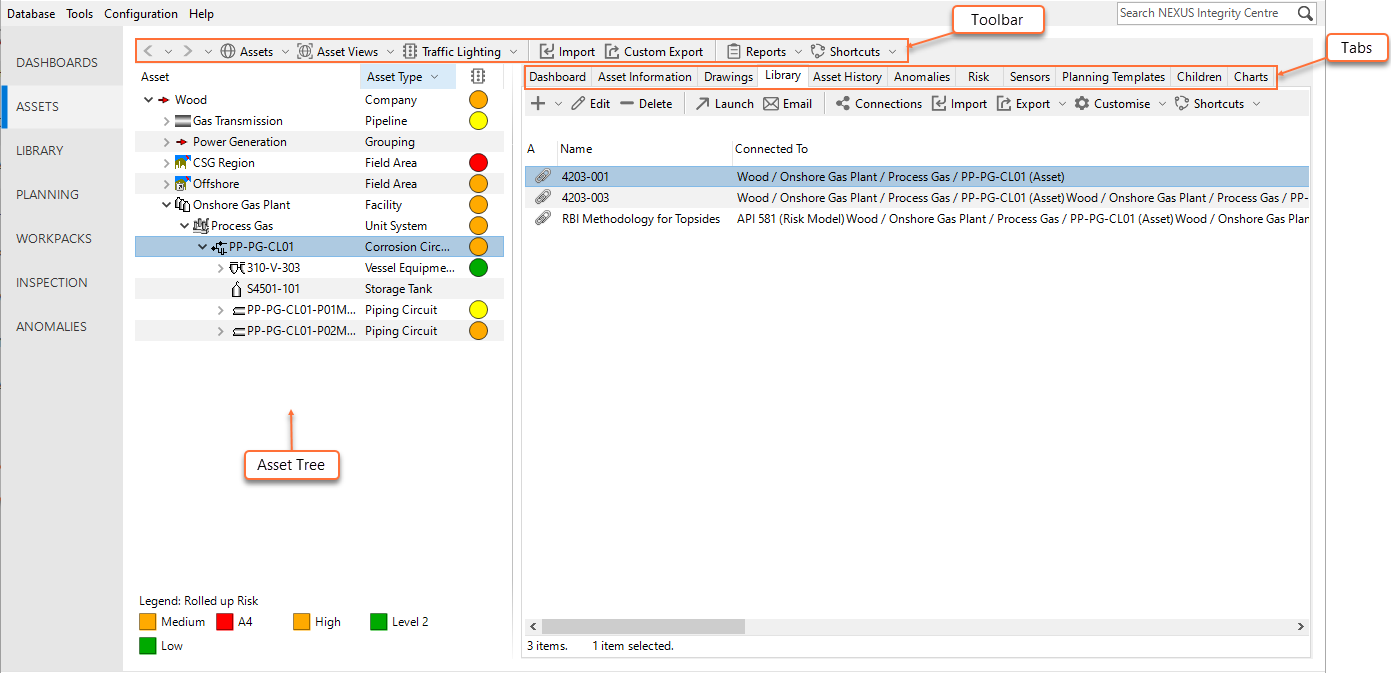
ASSETS Screen
The ASSETS screen is divided into three main areas:
Screen Area |
Description |
|---|---|
|
See Assets Toolbar. |
|
Displayes a hierarchical view of all your assets (see Asset Tree). |
|
Tabs show different types of information related to the asset selected in the asset tree. You can toggle the visibility of most tabs using the View option on the toolbar. The Asset Information tab is always visible and can be docked to the bottom of the screen. The following tabs are available:
|


Note
The asset selection is persistent between the ASSETS and INSPECTION screens, that is, if you choose an asset on the ASSETS screen and change the screen to INSPECTION, the same asset will be selected and vice versa.
If you exit out of NEXUS and open the application, it will reopen the application on the same location that you exited last time.
Assets Toolbar
Elements of the Assets toolbar are available from multiple screens and dialogs in NEXUS IC.
The Assets toolbar provides options to add, edit, delete, move and manage assets in the hierarchy, as well as navigation and filtering functions.
Toolbar Option |
Description |
|---|---|
Returns to assets previously selected in the asset tree. |
|
Returns to assets selected before using the Back option. |
|
Adds a new child asset to the asset currently selected in the hierarchy. |
|
Adds a new root level asset into the active Asset View. A root level asset is an asset that does not have a parent asset. |
|
Adds a link to an existing asset including all its children. An asset tree will be displayed to allow selection of the asset to link as a child to the currently selected asset. |
|
Adds a link to an existing asset, without any of its children. An asset tree will be displayed to allow selection of the asset to link as a child to the currently selected asset. |
|
Changes the name or asset type of the currently selected asset or adds/removes the Primary Asset flag. |
|
Allows you to edit the asset type of the currently selected asset, for example, change its name or change what AIGs, event types and survey types it is associated with. |
|
Deletes or unlinks the selected asset. If the asset exists in multiple places, it removes only the asset at the current location, it doesn’t delete all locations where the asset exists. Click on the Connections button to view dependant records of the current asset. |
|
Toggles the display of the asset type in the hierarchy. |
|
Expands all subnodes (children, grandchildren) of the selected asset. You can also press the * key on the numeric keypad. |
|
Collapses all subnodes (children, grandchildren) of the selected asset. |
|
Copies either the asset name or full hierarchy location of the selected asset to the clipboard. |
|
Moves the selected asset and inserts it as a child under the node that you select in the asset hierarchy. |
|
Repositions the selected asset in the asset tree so that it becomes a root asset. |
|
Shows a list of drawings that have this asset as a layer. Click on a menu item to go to that drawing. If the drawing name has “(Different Asset)” after it, the drawing you will be taken to is not available on the current asset; thus, when you select the menu option, you will not only be taken to that layer on that drawing, you will also be navigated to the new asset. You can get back by using the Back toolbar button. |
|
Lists other locations in the hierarchy where the asset appears (including other Asset Views). Click on a menu item to navigate there. If this asset does not appear in any other locations, you will not see any items in this list. |
|
See Connections for information about the Connections function. |
|
See Set Up Anomaly Triggers for Assets for information about the Anomaly Triggers function. |
|
Allows you to define the baseline coordinates for survey points relevant for the asset. You can define coordinates for several survey points. In this case, on the INSPECTION screen, on the Map tab, a line is displayed, which connects the survey points defined. |
|
See Retire Equipment for detailed information on this function. |
|
See Rotate Equipment for detailed information on this function. |
|
See Asset Views for detailed information on the Asset Views toolbar option. |
|
See Traffic Lighting for detailed description of the Traffic Lighting toolbar option. |
|
Toggles visibility of tabs on the screen. All tabs can be shown or hidden except Asset Information, which is always available and can be docked to the bottom of the screen. |
|
See Import Assets for detailed information about the import function. The MS Excel Import Template details the required format for importing library items. |
|
See Custom Export Assets for information about exporting assets and asset information data. |
|
See Reports for information about the Reports toolbar option. |