Add Multimedia Thumbnails with Element Group, Page Break, Section Heading
In this step, you add a Multimedia Thumbnails element to your report template, to insert the images associated with the relevant asset into the report. For that, you create the following:
An Element Group to include the Multimedia Thumbnail element with a parameter that allows excluding this part of the report during report generation
A Page Break element with 1 column
A level-2 Section Heading to be included in the output before the images
A Simple Source for the Multimedia system table
The actual Multimedia Thumbnail element
See the detailed steps below:
Prerequisites
You have completed the following steps:
Process
1. Insert an Element Group for the Multimedia Thumbnails.
Add an Element Group element to the Report Layout structure. It should be on the same level as the element groups you created for the other element groups.
Tip
If the element is not inserted to the right location in the element structure, use the Move Up or Move Down buttons in the toolbar to move them to the correct place.
Double-click the element in the structure to edit it.
Enter the name Risk Charts, which will identify the element in the structure.
Select the Allow Excluding Group from Export checkbox to enable a selection parameter during report generation. This allows users to exclude this element group from the report output when they start generating the report. This feature is particularly useful when you have numerous images that take a long time to generate, and you want to quickly review other parts of the report.
Click OK.
2. Add a Page Break element to place the images on a new page and set up its layout.
You want the multimedia thumbnails to appear on a new page. To do that, proceed as follows:
Add a Page Break element to the Report Layout structure so that it is included within the Multimedia element group.
Double-click the element in the structure to edit it.
Enter a name that identifies the element in the structure, for example, Page Break - 1 column.
In the Section Columns field, enter 1.
Under Page, select the Landscape for the Layout and A4 for Page Size.
Click OK.
3. Insert a level-2 Section Heading for the images.
Add a Section Heading element to the Report Layout structure so that it is included within the Multimedia element group.
Double-click the element in the structure to edit it.
Enter a name that identifies the element in the structure, for example, Multimedia Heading 2. This text does not appear in the actual report output.
Enter the text of the heading that you want to see in the output in the Content field. This time, we just want to use the heading Images.
Select the Include in Table of Contents checkbox to have this section heading appear in the Table of Contents.
In the Default Style field, select Heading 2, which is a preconfigured style that can be applied for level-2 section headings. If required, you can set up your own style and apply that instead (see Styles).
Click OK.
4. Insert a Simple Source for Multimedia.
This simple source will be used as the data source for the Multimedia Thumbnails element that we are going to create.
Add a Simple Source element to the Report Layout structure so that it is included within the Multimedia element group. The Simple Source element is located under the SOURCES node within the Template Definition section of the dialog.
Note
You must insert the simple source within the element group, else, you cannot refer to it from the other elements of the element group.
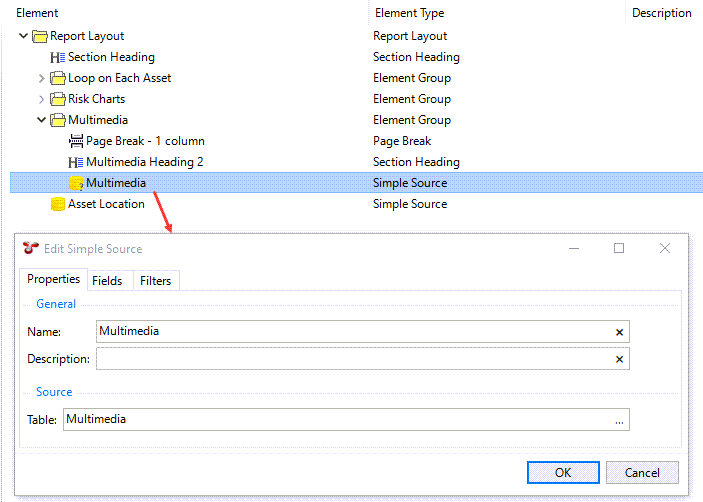
Double-click the Simple Source element in the structure to edit it.
Specify the name Multimedia* for the simple source.
In the Table field, click the ellipsis
to select the System Table Multimedia.
On the Filters tab, create a filter for user parameter VN_ID, following the same steps outlined in 2. Add an asset tree filter to the Asset Location simple source.. This will allow the user to select the asset hierarchy branch for which they want to include the associated images in the report output.
Click OK.
5. Insert a Multimedia Thumbnail element.
Add a Multimedia Thumbnails element to the Report Layout structure so that it is included within the Multimedia element group.
Double-click the element in the structure to edit it.
Enter data as follows:
Name: You can keep Multimedia Thumbnails or any name that identifies the element in the structure.
Source: Select Multimedia source
Caption Field: Select Name, which indicates that the caption text is retrieved from the Name field of the Multimedia table.
Repository Field: Select Image, which is the field that contains the image in the database.
Columns: Enter 3, because we want to get the image thumbnails displayed in three columns in the report output.
Thumbnail Width: Enter, for example, 320
Thumbnail Height: Leave it empty or 0. To maintain the aspect ratio of images, only set one dimension.
Click OK.

Note
When you put a multimedia thumbnail element in your report template, an additional selection parameter is added automatically. This is useful when you set up multiple columns to display images in the output but you have less images in the last row then the number of columns. In this case, you can select the Merge Last Row to Centre Images for Multiple Columns checkbox to merge the last row of the columns and display the images in the centre of the page.
Result
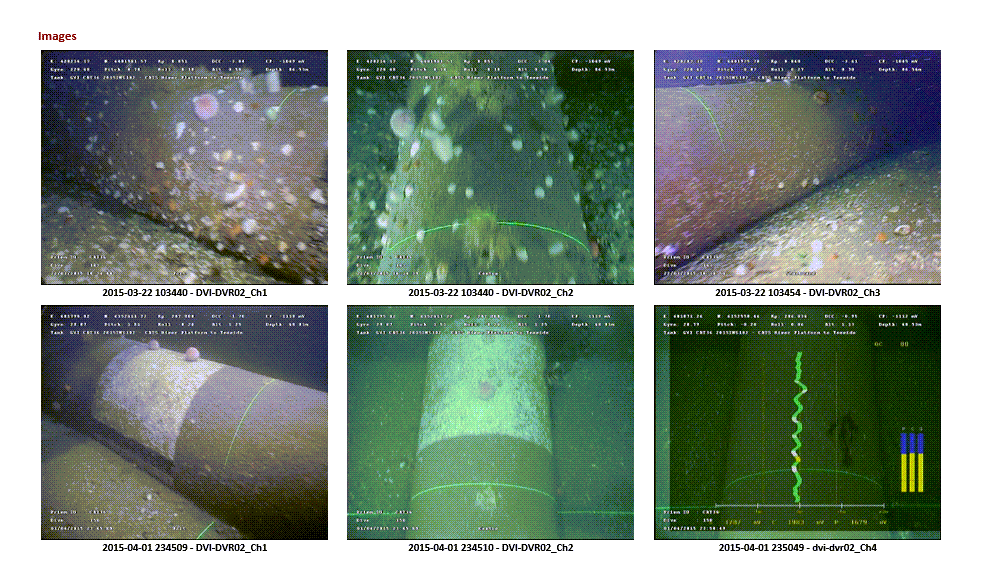
When you generate the output, you can see that multimedia thumbnails are inserted in three columns: