Configure Risk Models
The Risk technology within NEXUS IC provides a powerful framework so that you can configure formalised risk assessment and RBI methodologies (for example, API 581 BRD, DNV-RP-G101, AS 2885.1, AS 4360) or set up custom risk models of any level of complexity (that is, corporate risk models, internally workshopped models, or tailored/customised models to suit specific issues or situations).
You create and configure risk models under .
Once you have created a risk model, you can assign it to asset types (see Assign Risk Models to Asset Type and Assign Asset Types to a Risk Model) and then to individual assets (see Assign Risk Models and Scenarios).
You can see what assets have a particular risk model assigned by clicking on the risk model, then clicking the Connections button.
Risk Model Hierarchy
The concept of risk models is hierarchical: the final risk value is comprised of n Categories. Each Category value is comprised of n Factors. Each Factor value is comprised of n Calculations, Pass Thrus, Values and Factors.
Each of these entities (Category, Factor, etc.) is displayed in the bottom half of the Configuration - Risk Models dialog in a hierarchical structure tree, with each level expandable and collapsible.
A risk model is made up of three top-level categories:
Risk Model Category |
Description |
|---|---|
Risk |
This category contains the risk model functionality based on which the actual risk value is determined. Beneath Risk, you can add Factors, and below Factors, you can add Calculations, Pass Thrus, Values and more Factors. For each Factor, you set up a function and ultimately, the function assigned to the main Risk element combines all the factor functions beneath it. |
X Value |
Determines the location of the risk value on the X axis. |
Y Value |
Determines the location of the risk value on the Y axis. |
For detailed information about setting up a risk model, see the process below.
Create Risk Models
Prerequisites
You have defined a risk chart based on which the risk model can be set up (see Configure Risk Charts).
Process
Under , click Add at the top of the Configuration - Risk Models dialog.
In the Add Risk Model dialog, enter data as follows:
Specify a name that uniquely identifies the risk model.
Select the risk chart that you want to use for your risk model (as defined in Configure Risk Charts).
If required, select a model status (whether it’s final or in development) and categorise your risk model.
In the bottom half of the Configuration - Risk Models dialog, set up the three main risk model categories:
Set up the Risk category, which contains the actual functionality of your risk model and determines how the risk value is determined.
Define at least one factor under the Risk node by selecting the node and choosing from the bottom toolbar.
Under each factor, create children based on which the value of the risk factor can be determined. To do that, select the factor and choose the required child type from under the Add
toolbar button.
You can create the following types of children under a factor:
Another factor
A pass through field, in which case, you can select a field from an Asset Information Group (AIG) form and have its value passed through to the risk model.
A value, in which case, you can directly determine a specific value to be used in the risk model.
A calculation, in which case, you define a function for determining the value for the risk model.
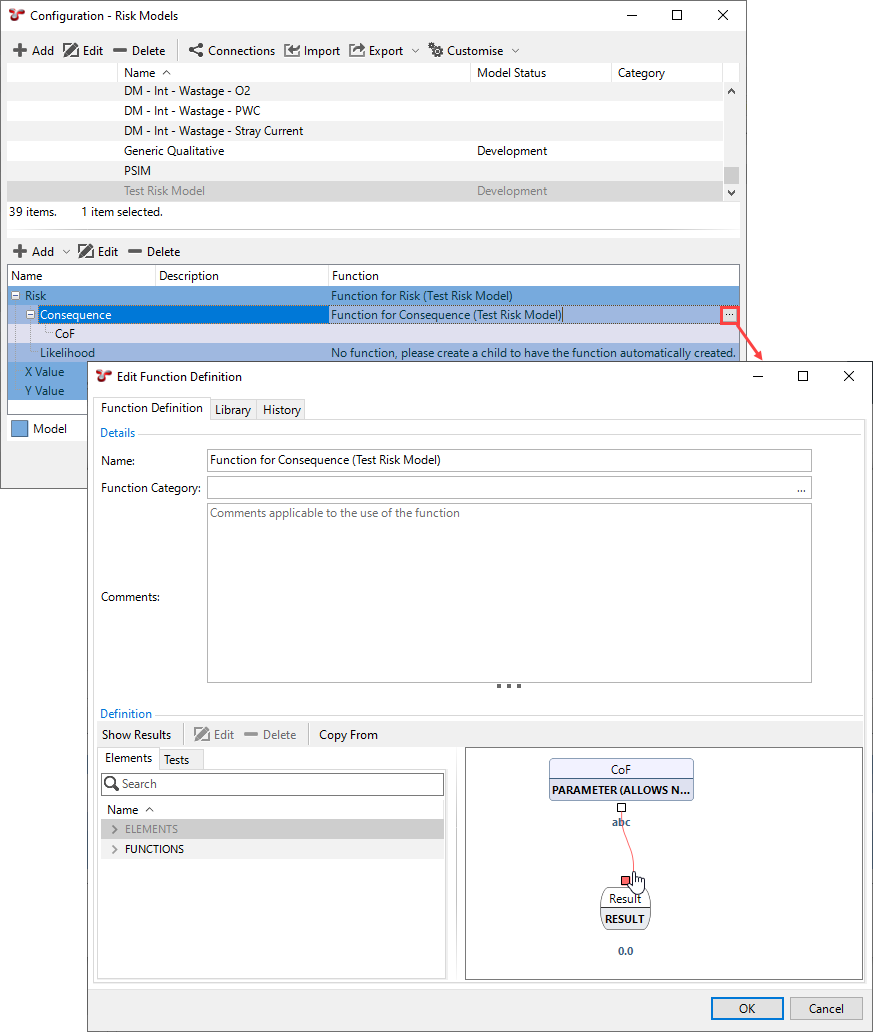
As soon as you create a child under a factor, a function is automatically assigned to the factor. To ensure that the result value is determined correctly, edit the function of the factor in either of the following way:
By clicking the function and selecting
at the end of the row.
By clicking the function and choosing Edit Function in the toolbar.
Ensure that you set up the connection between the function elements, for example:

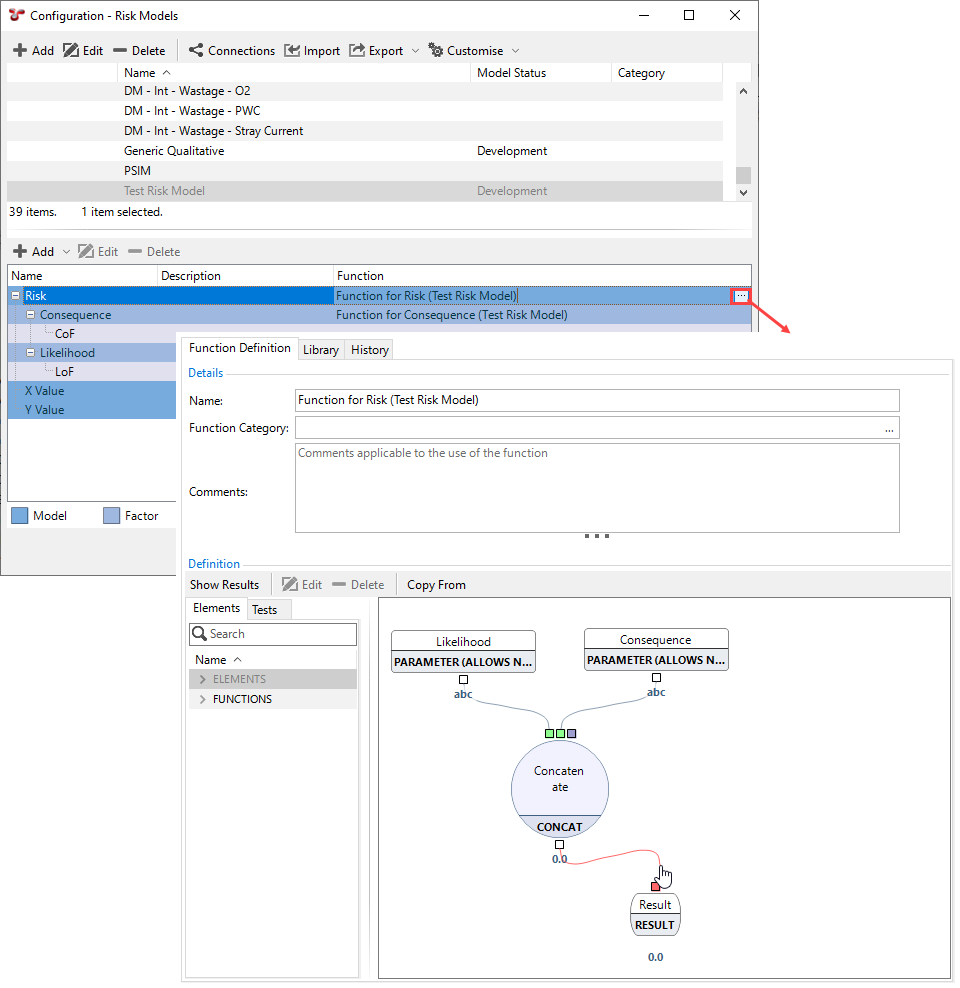
Once you have set up each factor under the Risk node, configure the function of the main Risk node too in either of the following ways:
By clicking the Risk function and selecting
at the end of the row
By clicking the Risk function and choosing Edit Function in the toolbar.
Ensure that you set up the connection between the function elements, for example:

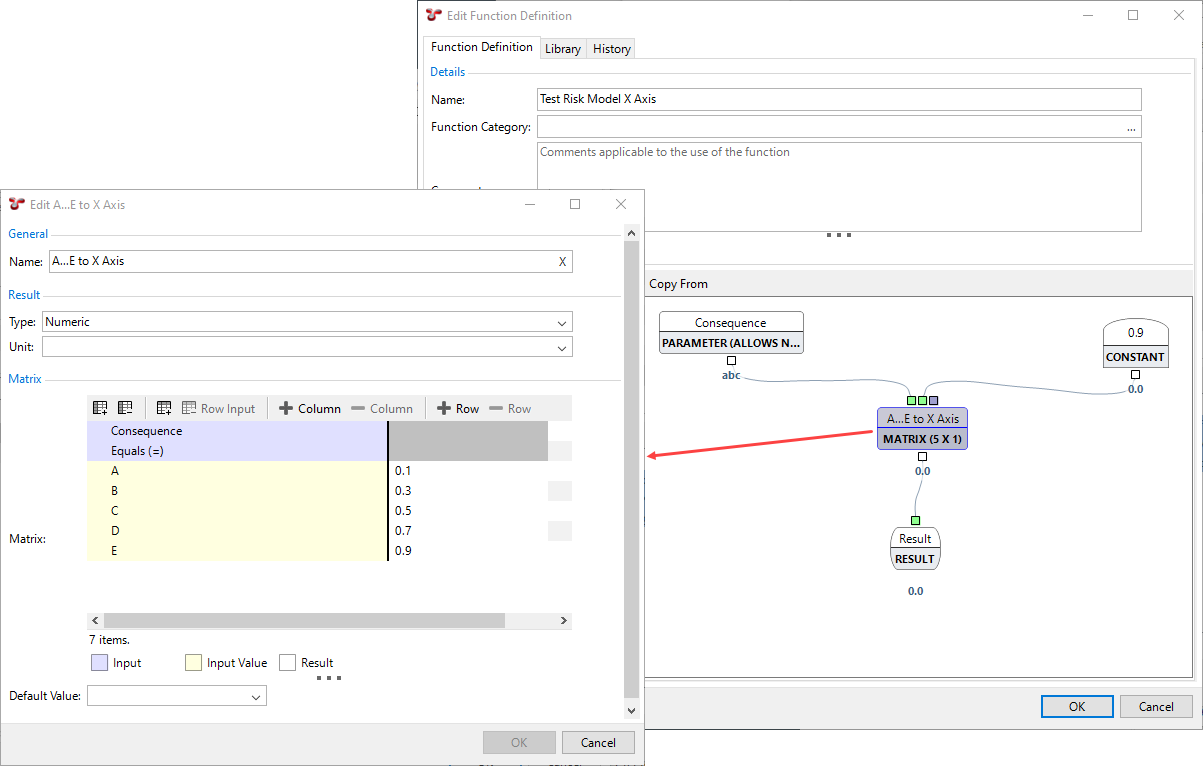
Set up the X Value category, which determines the location of the risk value on the X axis. To do that, edit the X Value row and assign a function that returns a value between 0 and 1 based on your requirements.
The return value 0 locates the risk value at the far left end of the X axis, and value 1 locates the value at the far right end of the axis.
For example, if based on your risk chart, you have the Consequence values A, B, C, D, E on your X axis, then you can assign a function that returns the values as follows:

Similarly to the step above, set up the Y Value category, which determines the location of the risk value on the Y axis. To do that, edit the Y Value row and assign a function that returns a value between 0 and 1 based on your requirements.
The return value 0 locates the risk value at the bottom end of the Y axis, and value 1 locates the value at the top end of the axis.
Assign Asset Types to a Risk Model
Once you have created a risk model, you can assign asset types to it, which allows you to restrict which asset types can have access to certain risk models. That is, on the ASSETS screen, on the Risk tab, when you click Assign to <name of asset>, you can choose only from the risk models that have been assigned to that asset type. For more information, see Assign Risk Models and Scenarios.
To assign asset types to a risk model, proceed as follows:
Under , select the relevant risk model in the top half of the dialog.
Choose Edit to launch the Edit Risk Model dialog.
On the Asset Types tab, select the required asset types.
Click OK.