Traffic Lighting
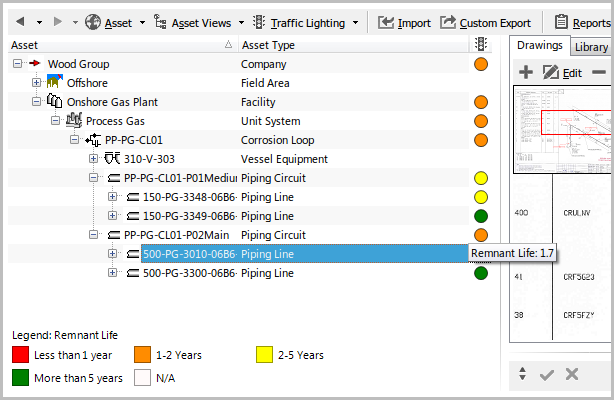
Traffic lighting shows pre-defined coloured dots next to each asset in the asset tree when a traffic lighting option is selected. To enable traffic lighting, you choose an option from the Traffic Lighting toolbar button. A legend appears at the bottom of the asset tree, showing the name of the selected traffic lighting rule and the meaning of each colour. Hovering the mouse over a traffic light displays a hint showing its value. For example:
Note
Traffic lighting requires the Traffic Light field to be calculated for every asset. As a result, NEXUS IC may respond more slowly when a traffic lighting rule is enabled. This typically occurs only the first time a group of assets is viewed, as NEXUS IC caches the results.
Traffic Lighting Toolbar Options
The Traffic Lighting toolbar button is available on screens that display the asset tree, such as ASSETS and INSPECTION.
The options under the toolbar button include all configured traffic lighting rules (see Configure Traffic Lights). If a rule has been assigned to a category, it appears under that category in the menu. Rules that have no category assigned appear under the No Category option, except for None and Active Workpack…, which always appear at the top level.
By default, the following options are provided:
Removes all traffic lights from the asset tree.
Indicates the number of anomalies for each asset, based on the Anomalies traffic lighting rules.
Highlights where incomplete tasks exist for the currently selected workpack. This option depends on the active workpack chosen under .
Shows the risk value for each asset, based on the Risk traffic lighting rules.
Shows the rolled-up (maximum) risk of each asset and all its children, based on the Rolled Up Risk traffic lighting rules.
Opens the Select Workpack dialog, allowing you to choose a workpack. This selection is used by the traffic lighting rule.
Traffic Lighting on Drawings
Traffic lighting can also be shown on drawings. If an asset has a defined region on a drawing and a traffic light colour is assigned to that asset, the region is displayed in that colour. You can toggle the display on drawings from the Layer Colour toolbar option on the Drawings tab.