Risk
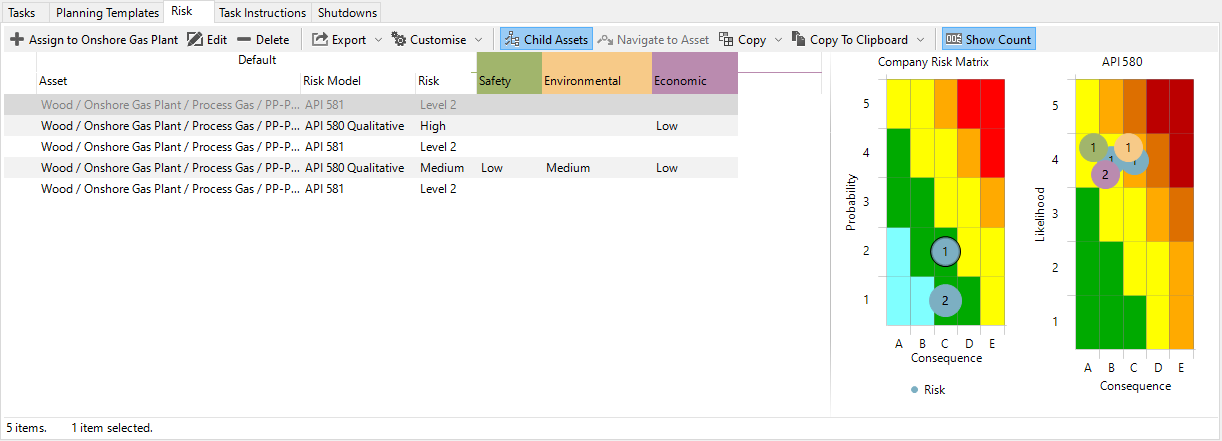
You can display risk assessment results on the Risk tab of the PLANNING and WORKPACKS screen:
On the PLANNING screen, you can display the risk assessment results for the assets that you have selected in the asset tree above, and, if you choose the Child Assets toolbar button, results are also shown for all that asset’s children.
On the WORKPACKS screen, you can display the risk assessment results for the currently selected workpack’s assets, and, if you choose the Child Assets toolbar button, results are also shown for all that asset’s children.
Results are graphically represented in pre-configured risk matrixes and in the data grid as shown in the example below:
Prerequisites
To enable displaying risk models for assets, you must have made the necessary configuration settings and assignments as follows:
You must set up risk charts and risk models (see Configure Risk Charts and Configure Risk Models).
You must assign the risk model to the asset type of the asset (see Assign Risk Models to Asset Type).
You must assign the risk model to the asset (see Assign Risk Models and Scenarios).
Display Options
When displaying risk models, note the following:
Where there are several risks at the same location in the chart, the dot will be shown larger.
Clicking on a row in the grid highlights that item in the matrix. Similarly, clicking on a result indicator in the matrix will highlight the relevant row (or rows) in the grid.
If you are using scenarios, each scenario will be shown in its own colour. Scenario dots may be offset within the risk square. In this case, this does not indicate a difference in risk, it is merely for legibility.
If you click on a scenario dot within the matrix, the relevant rows in the grid will be highlighted, and the relevant dots for those assets’ other scenarios will be highlighted in the matrix.
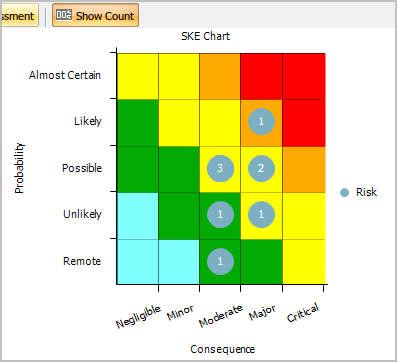
If you want to see the total number of risk assessments at the specific locations of the risk models, click Show Count.
Risk Toolbar
Toolbar Option
Description
Choose from the list of pre-configured risk models in the drop-down menu to assign a risk model to the currently selected asset. For more information, see Assign Risk Models and Scenarios.
Launches the Risk Assessment dialog. Any values in the risk assessment can be edited and saved from this dialog by clicking in the Value column of any Value type row (white rows). Note that Pass Thru and Calculation values can not be edited. Clicking on a Factor or Model row however, allows you to view the function and the function results that have been assigned to that row. From here you can also assign Scenarios to this risk assessment.
Deletes the currently selected Risk Assessment from the asset to which it is assigned. Note that the asset and all information linked to that asset will remain unchanged.
See Export for full description of the Export menu item.
See Customise for full description of the Customise menu item.
Select to include risk assessments on all this asset’s children.
Changes the active asset in the hierarchy to the currently selected risk-assessed asset. Note that this will filter the Risk grid so that only assessments for the active asset will be shown.
Hint
Use the Back toolbar button on the Assets toolbar to return to the previously selected asset.
Launches a dialog to copy risk assessment to selected assets dialog. From here, select the assets which you want to assign the currently selected risk model to. For more information, see Assign Risk Models and Scenarios.
Copies the risk chart to the clipboard as an image.
When active, the matrix will overlay the total number (count) of risk assessments at that location in the matrix, as shown in the following image:
See also