Manage Layers in Drawings
Layers are marked-up regions on a drawing that can show specific information or contain links to other data. The layers functionality allows you to:
Add links from parts of a drawing to assets in the asset hierarchy
Add links from parts of a drawing to other drawings
Display captions with specific text on a drawing
Highlight parts of drawings with colours or add traffic light colours to them
Display Asset Information Group (AIG) field values for specific parts of the drawing
Create Layers
You can add a new layer to a drawing using one of the following methods:
Create Layers from the Toolbar
On the ASSETS screen, select the asset in the asset tree that contains the drawing to which you want to add layers.
Go to the Drawings tab and select the required drawing.
From the toolbar of the Drawings tab, choose or right-click the drawing and choose Edit Layers from the context menu. This step opens the layer editing mode with additional toolbar options. These new options are also available from the context menu when right-clicking the drawing.
Select the required tool from the new options and draw the layer to the drawing as required. For information about the available tools, see Layer Tools.
If you’re creating a polygon or line region, once you have added all the points of the region, press Enter or right-click and choose Create Layer from the context menu. This step is not required for the other layer types.
In the Add Layer dialog that appears, specify the parameters of the new layer. You can define the type, colour, and opacity of the layer, add a caption to it and add links to assets, relative assets or other drawings as required. For more information, see Add/Edit Layer Dialog.
Click OK.
Once you have created all the layers for the drawing, choose from the toolbar of the Drawings tab.
See the video below for the complete process:
Create Layers Using Drag & Drop
On the ASSETS screen, select the asset in the asset tree that contains the drawing you want to modify.
Go to the Drawings tab and select the required drawing.
In the asset tree, locate the asset for which you want to create a layer. Drag and drop it onto the drawing canvas at the desired location.
In the Add Layer dialog that appears, specify the parameters of the new layer (see Add/Edit Layer Dialog). The selected asset is automatically populated in the Asset and Caption fields.
Click OK.
A new layer is added to the drawing with a rectangular region.
Tip
To create a layer with a different shape, first create the layer using the toolbar method described in Create Layers from the Toolbar. Then, add the direct asset reference via drag and drop (see Add Asset Reference Using Drag & Drop).
Adjust the position and shape of the layer as needed.
Choose from the toolbar to save your changes.
See the video below for the complete process:
Create Layers by Extracting from PDF
If a PDF drawing contains comments or annotations, you can have NEXUS automatically create layers for them using the Extract Layers function. To do that, follow the steps below:
Select the PDF drawing on the Drawings tab of the ASSETS screen.
From the toolbar of the Drawings tab, choose .
In the dialog that appears, select one of the following options:
Choose All Layers if you want to create layers for all the texts that NEXUS finds in the PDF drawings.
Choose Asset Exists if you want to create layers only for those texts that exactly match the name of an existing asset in the asset tree.
Result
The layers are automatically created for the annotations of the drawing. If the system could find an asset with the same name as the annotation text, it automatically adds a link to the asset as a Relative Asset (see Relative Asset Reference). If you selected All Layers and the system couldn’t find an asset with the same name, the layer will be created without links to any assets.
If required, you can edit the properties of the layers (see Edit Layers).
Choose from the toolbar of the Drawings tab to save your changes.
Edit Layers
Edit Layer Properties
You can edit an existing layer on a drawing as follows:
On the Drawings tab, select the required drawing.
Hover over the drawing layer that you want to change.
From the toolbar of the Drawings tab, choose or right-click the layer and choose Edit Layers from the context menu. This step opens the layer editing mode.
Select the layer and from the toolbar of the Drawings tab, choose or right-click the layer and choose Layer Properties from the context menu.
In the Edit Layer dialog that appears, update the parameters of the layer as required. For more information, see Add/Edit Layer Dialog.
Click OK.
Once you have finalised your changes, choose from the toolbar of the Drawings tab.
See the video below for the complete process using right-clicking:
Add Asset Reference Using Drag & Drop
You can add a direct asset reference (see Direct Asset Reference) to an existing layer by dragging and dropping an asset from the asset tree onto the layer:
On the Drawings tab, select the drawing that contains the target layer.
In the asset tree, locate the asset you want to reference and drag it onto the layer.
In the Edit Layer dialog that appears, update the parameters of the layer as required (see Add/Edit Layer Dialog). The selected asset is automatically populated in the Asset and Caption fields.
Click OK.
To finalise your changes, choose from the toolbar.
See the video below for the complete process:
Link from Layers to Assets
You can link to assets from a layer when you create or edit layers (see Create Layers or Edit Layers).
You can create asset references in two ways:
Direct Asset Reference
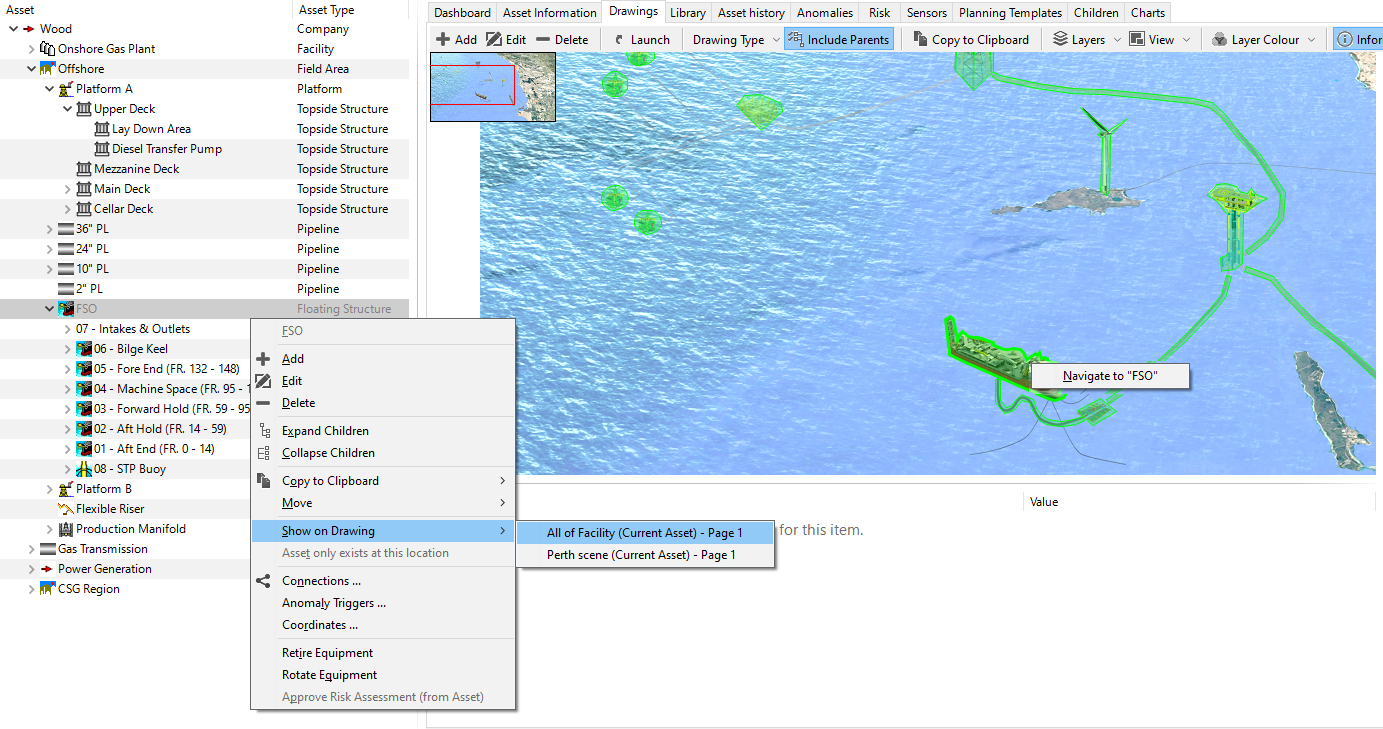
In this case, the asset is specified in the Asset field of the Add/Edit Layer dialog (see Add/Edit Layer Dialog). When you use direct asset reference, you can directly navigate to an asset in the asset hierarchy from the layer of the drawing and vice versa, you can navigate from the asset in the asset tree to the actual layer of the drawing from the context menu (right-click) of the asset:
Relative Asset Reference
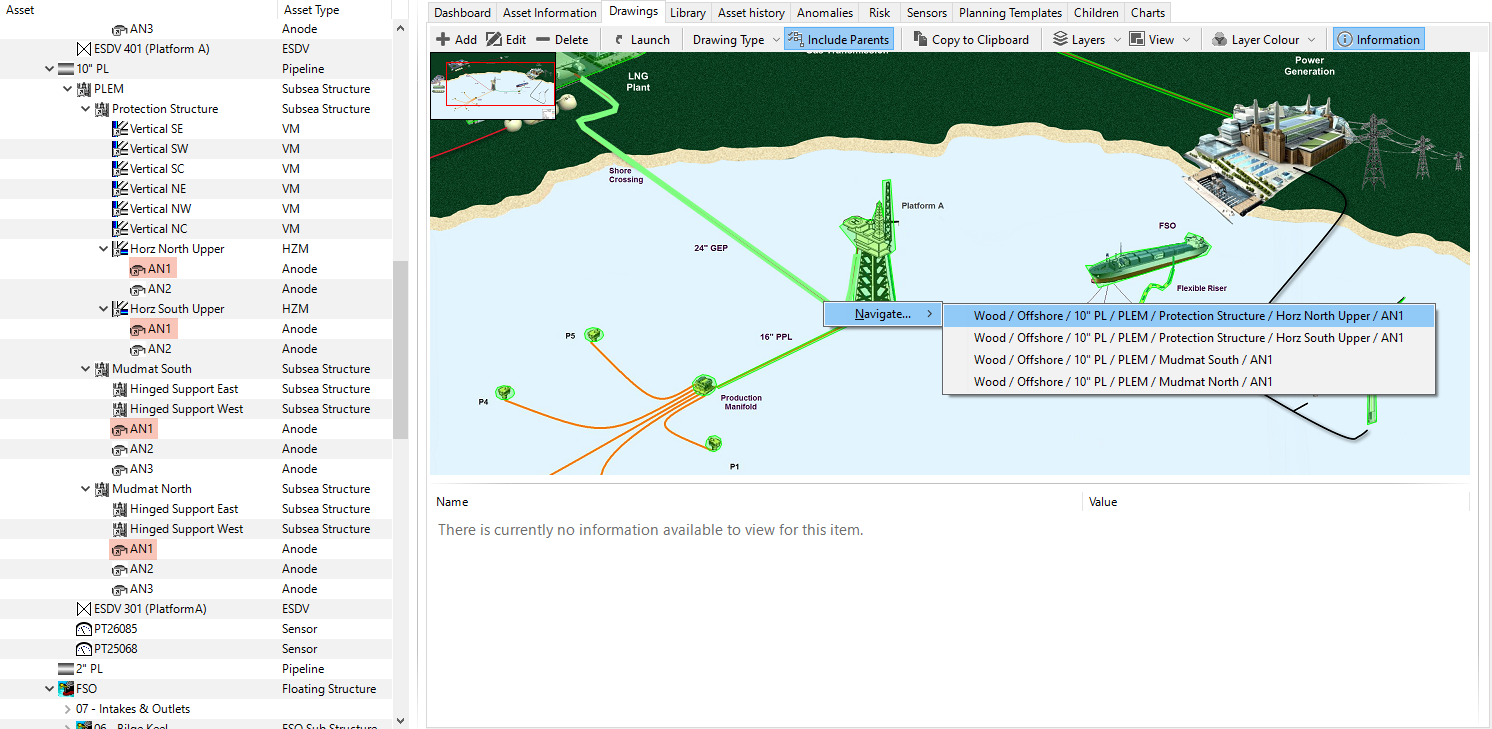
In this case, instead of specifying a particular asset, a text is defined in the Relative Asset field of the Add/Edit Layer dialog (see Add/Edit Layer Dialog). NEXUS searches for child assets that match that name under the asset for which the drawing is displayed for. In case multiple assets are found, the user can navigate from the layer of the drawing by selecting the relevant asset from the context menu (right-click) of the asset. However, in case of relative asset references, you’re not able to navigate from the asset in the asset tree to the drawing layer. Also, you cannot display AIG field values on drawing layers if the layer has only a relative asset reference.
For example, if you specify AN1 in the Relative Asset field, and you have several child assets with the name AN1 under the relevant asset, you’ll have the following navigation options when clicking the layer on the drawing:
Note
In case you extract layers from a PDF drawing, the layers are assigned relative asset references and not direct ones.
Link from Layers to Drawings
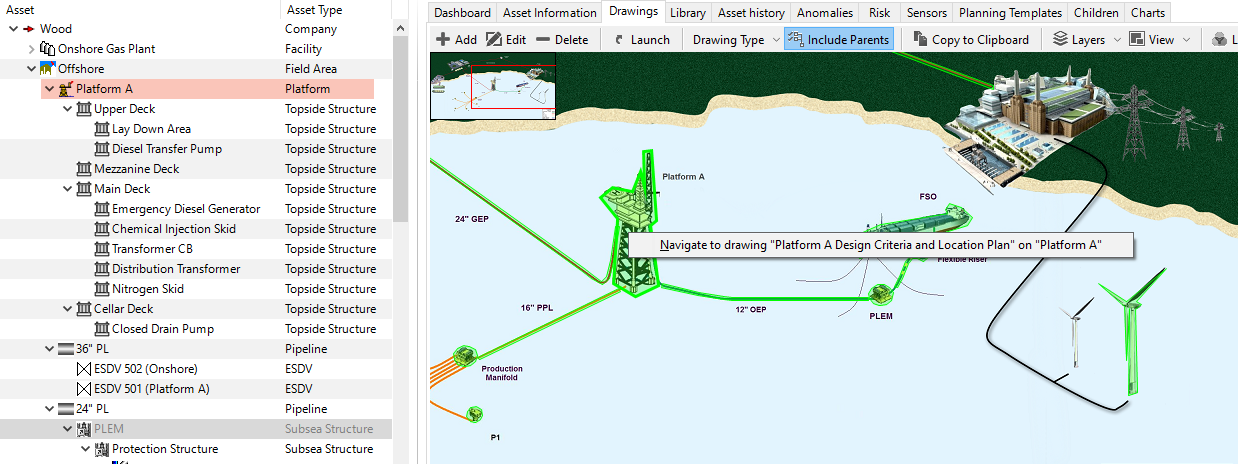
You can link to other drawings from a layer when you create or edit layers (see Create Layers or Edit Layers). This option is available if you have also set up a direct asset reference (see Direct Asset Reference) and you have specified the asset that has the drawing you want to link to. In this case, the Associated Drawing field becomes available in the Add/Edit Layer dialog (see Add/Edit Layer Dialog) where you can select the required drawing.
When navigating to the other drawing, you’re also directed to the relevant asset in the asset tree.
Display AIG Field Values on Drawings
You can display actual values of specific AIG fields as a caption of drawing layers. This option is available if you have set up a direct asset reference (see Direct Asset Reference) and you have specified the asset that has the AIG field whose value you want to get displayed.
You can display AIG field values on drawings in one of the following ways:
You can select the AIG field in the Associated Field field of the Add/Edit Layer dialog when you create or edit layers (see Create Layers or Edit Layers). In this case, the Asset field must contain the asset that has the AIG with the associated field.
If you have specified a direct asset reference to a layer, you can display the value of any of its AIG fields by right-clicking the relevant field label on the Asset Information pane, and selecting Display on drawing:
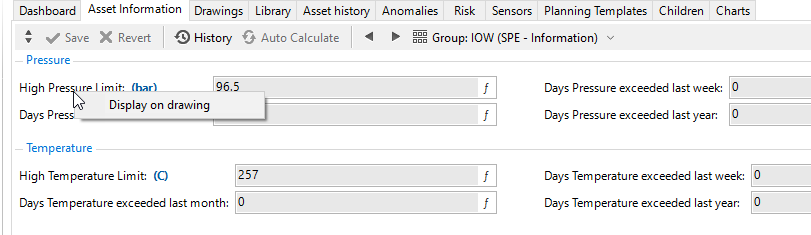
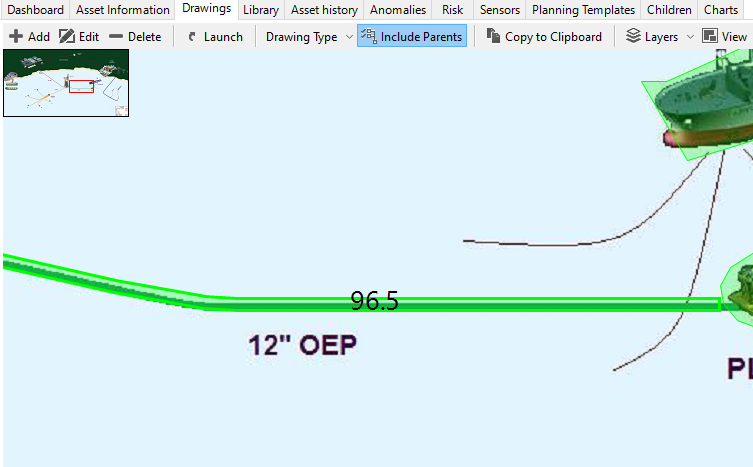
The value of the AIG field is now indicated on the drawing:
Change Layer Colours on Drawings
By default, the system displays the colour that you have set up for the layer when creating or editing the layer (see Create Layers or Edit Layers). You can change the default layer colours by selecting the required option from the Layer Colour toolbar menu. You have the following options:
Display the currently selected traffic light colours on drawing layers
Display the layer colour only in the outline of the layer, instead of filling it with colour (transparent layer)
Display unknown assets, in which case, layers that have an asset are shown in the Known Asset Colour, and layers that don’t have an asset assigned are displayed in the Missing Asset Colour. You can configure these under Properties.
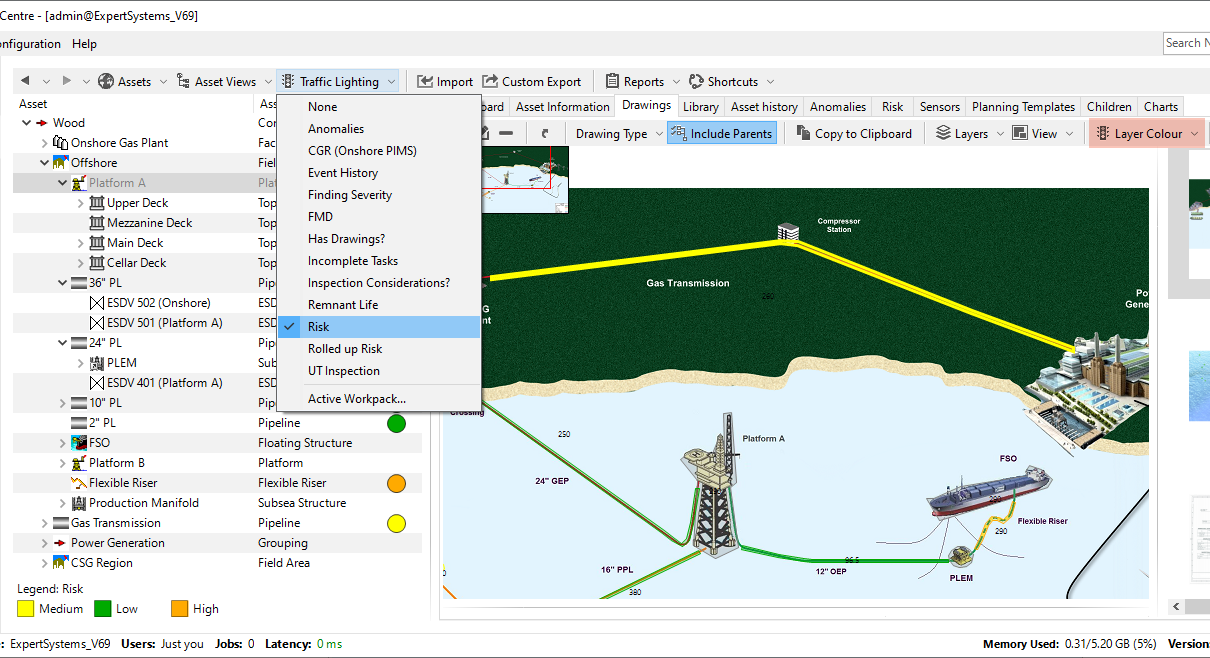
For example, if you want to have traffic light colours displayed on the layers of the drawing, select the relevant traffic light from above the asset tree on the left and choose from the toolbar of the Drawings tab. The layers of the drawing get the colour of the selected traffic light:
See also