Reports
The Reports functionality allows you to export data from NEXUS IC into RTF, HTML, Excel or PDF files.
You can generate reports using the Report toolbar button, which is available on multiple screens throughout NEXUS IC. The report generation workflow is consistent across all screens.
Note
Selecting large datasets may increase report generation time. If performance is an issue, consider running the report over a smaller dataset.
Each report template is assigned to a report category. Although additional categories can be configured (see Configure Report Categories), a standard NEXUS IC database includes the following default categories:
Anomaly
Archived
Asset
Miscellaneous
Risk
Schedule
Workpack
Two additional special categories are available:
No Category – Displays report templates that are not assigned to any category.
Favourites – Displays report templates you have marked as favourites.
You can configure which templates appear in Favourites under Your Profile.
Prerequisites
Before generating reports, ensure that the following prerequisites are met:
Report templates have been configured (see Configure Reports and Dashboards and Configure Report Templates).
If you intend to send reports by email, email account properties have been configured (see Set Up Email).
For Software as a Service (SaaS) customers, these settings are preconfigured as part of the service.
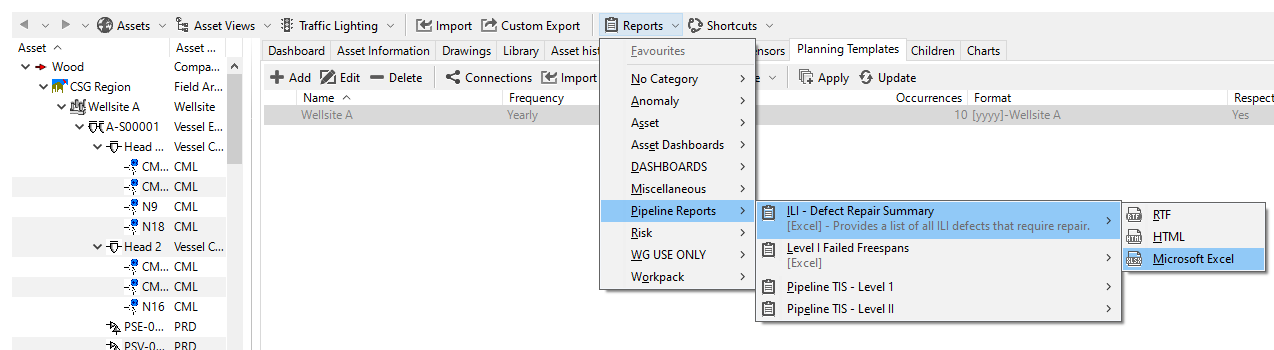
Generate Reports
To generate a report, follow these steps:
On the relevant screen, select:
where:
Report Template Category and Report Template are defined in your configuration (see Prerequisites)
Format is one of RTF, HTML, Excel or PDF
In the dialog that opens, select where you want to export the report.
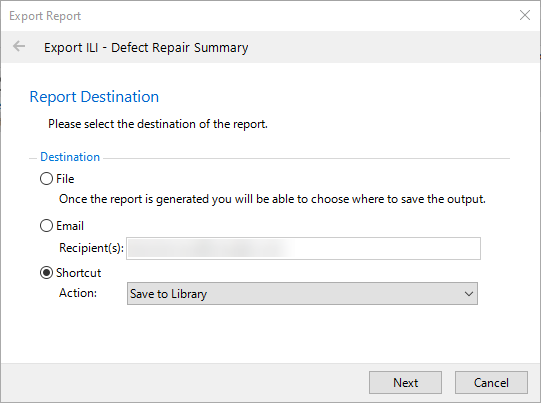
You can choose one of the following options:
Save to local drive
Save the report to your local drive. Once generated, the report is available for download from the bottom of the screen.
Send by email
Send the report to one or more email addresses. By default, the system proposes the email address associated with your user account, which you can modify if required. To change the email address linked to your account, see Set Up Email.
Note
If you do not receive the report by email, check that the job has completed in the job banner and review your junk email folder. Delivery may also fail if the report exceeds your organisation’s email attachment size limit.
Use a configured shortcut
If additional shortcuts are configured (see Configure Shortcuts), you may be able to perform actions such as Save to Library. When saving a report to the library, you must specify:
The library type
The NEXUS element to which the report will be linked
Reports saved this way are available from the LIBRARY screen in NEXUS IC.
Note
If your report template includes additional selection parameters, you may be prompted to provide further details before generation. These parameters default to the values selected the last time you ran the report and are stored in your user profile under Report category (see Your Profile).
Select Generate.
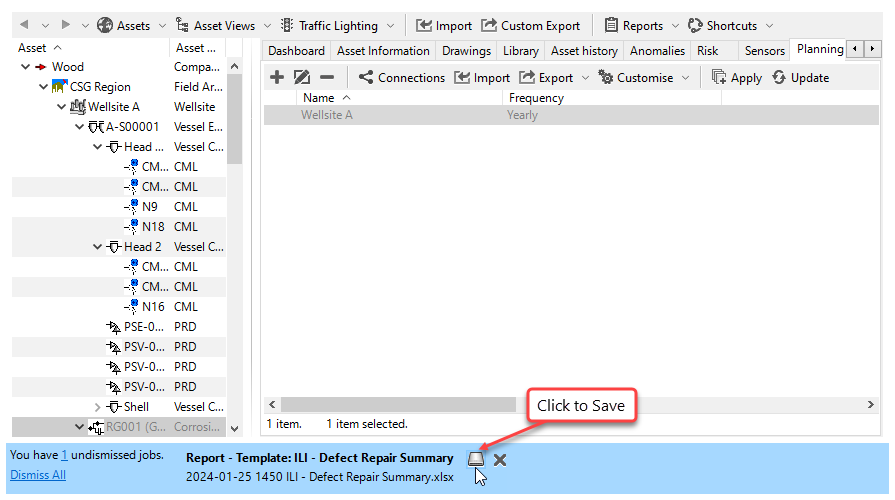
Result
The report is generated and delivered to the selected destination.
All report jobs are listed in the Job Management Console, where you can monitor progress, review job history and download previously generated reports.
Worksheet Naming
When exporting reports to Excel:
The first worksheet name is derived from the report template name and is truncated to 31 characters.
If the report template contains a Page Break element, each page break creates a new worksheet.
The name of each new worksheet corresponds to the name of the associated Page Break element.