Manage Planning Tasks
You can create, update and delete planning tasks as described below:
Create Planning Tasks from Planning Templates
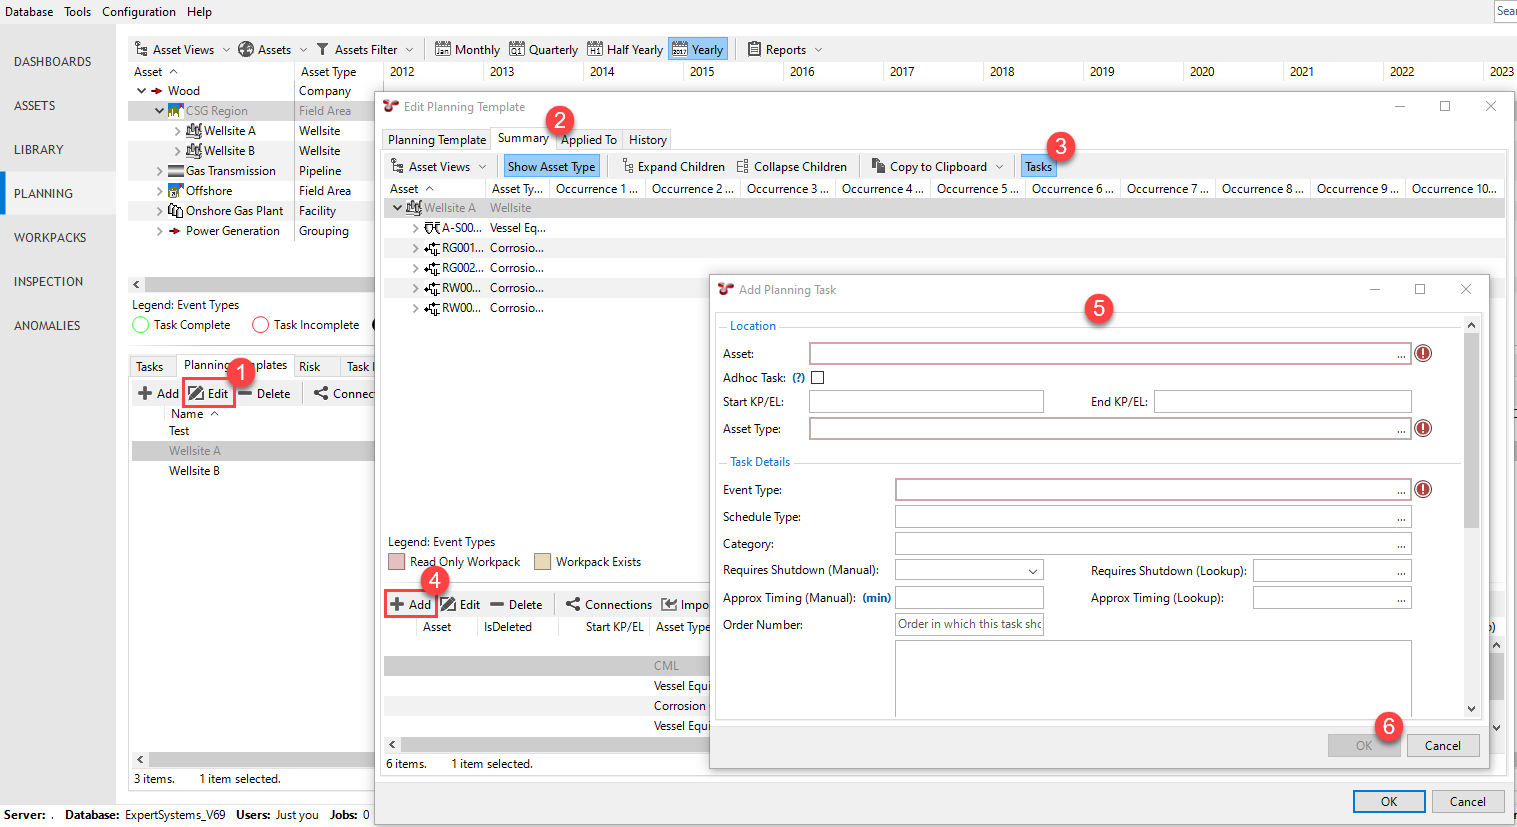
On the ASSETS or PLANNING screen, go to the Planning Templates tab.
Select the planning template to which you want to assign the planning task and choose Edit from the toolbar
 .
.In the Edit Planning Template dialog, go to the Summary tab
 and ensure that Tasks in the toolbar is toggled on
  .
.In the bottom part of the dialog, choose Add from the toolbar
 .
.In the Add Planning Task dialog, you must specify the following (mandatory fields):

You must define either the Asset or the Asset Type to which you want to assign the planning task. If you specify an asset type, tasks will be created for all assets of the specified type using the frequency.
You must select an event type. This can be an Event or a Continuous Event.
Specify other parameters as required. For more information about specifying the parameters, see Add/Edit Planning Task Dialog.
Click OK to save the planning task
 .
.Result
The planning task is created and displayed on the Summary tab of the Edit Planning Template dialog.
Create Planning Tasks from Anomaly Actions
In case a planning task needs to be created as a result of an anomaly action, you can create the planning task directly from the anomaly action. For more information, see Assign Planning Task to Anomaly Action.
Update Planning Tasks
On the ASSETS or PLANNING screen, go to the Planning Templates tab.
Select the planning template that contains the planning task and choose Edit from the toolbar.
In the Edit Planning Template dialog, go to the Summary tab and ensure that Tasks in the toolbar is toggled on.
In the bottom part of the dialog, select the required planning task and choose Edit from the toolbar.
In the Edit Planning Task dialog, make your updates as required. For more information, see Add/Edit Planning Task Dialog.
Click OK to save the planning task.
After each update of a planning task, you must update the relevant planning template as well. For more information, see Update Planning Templates.
Delete Planning Tasks
Deletion of a planning task works slightly differently to the deletion of other items within NEXUS. For all other types of items in NEXUS, clicking the Delete button deletes the item. However, if you have applied the planning task to create one or more tasks, the planning task is not deleted directly but instead, an IsDeleted flag is applied to the planning task. This ensures that NEXUS knows that those tasks were created from this planning task. Once all the tasks that were created from that planning task are deleted, the planning task will also be removed from the underlying database table.
Consider the case where you want to delete an event definition. First, you must delete everything that depends on that event definition. This includes planning tasks which use this event definition, but the way to remove those planning tasks is to remove the tasks that in turn relied on that planning task. Once this is done, you should be able to delete the event definition (which will delete all events of that type, and so on).
To delete a planning task, proceed as follows:
On the ASSETS or PLANNING screen, go to the Planning Templates tab.
Select the planning template that contains the planning task and choose Edit from the toolbar.
In the Edit Planning Template dialog, go to the Summary tab and ensure that Tasks in the toolbar is toggled on.
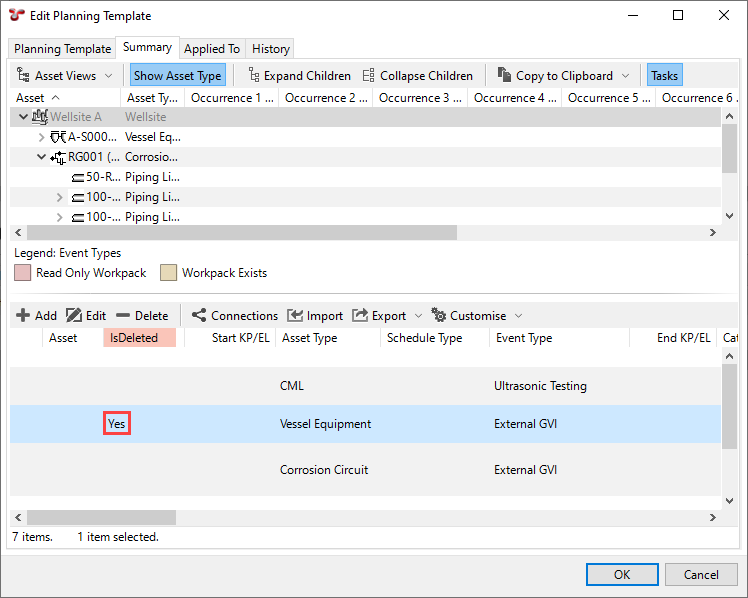
In the bottom part of the dialog, select the required planning task and choose Delete from the toolbar.
Result
If you have not applied the planning task to create one or more tasks, the planning task gets deleted. If, however, you have tasks created based on the planning task, the planning task gets the IsDeleted flag:
Assign Anomaly Action to a Planning Task
In case you have an existing planning task, you can link an anomaly action to it as described below.
On the ASSETS or PLANNING screen, go to the Planning Templates tab.
Select the planning template that contains the planning task and choose Edit from the toolbar.
In the Edit Planning Template dialog, go to the Summary tab and ensure that Tasks in the toolbar is toggled on.
In the bottom part of the dialog, select the required planning task and choose Edit from the toolbar.
In the Edit Planning Task dialog, in the Anomaly Action field, click
 to select the anomaly action as required.
Note
You can create a new anomaly and anomaly action from here or you can choose an existing one. You can only assign an anomaly action that is linked to the same asset.
Click OK to save your changes.
Note
You can also assign a planning task to an anomaly action when editing the relevant action on the ANOMALIES or ASSETS screen. For more information, see Assign Planning Task to Anomaly Action.
See also