Manage My Desktop
The desktop manager in IC-Inspection, and on the INSPECTION screen of NEXUS IC, works in the same way. It allows you to organise your screen to suit your workflow: you can show or hide panes, drag and dock them, and save your preferred layout as a desktop.
View/Hide Panes
You can show or hide panes by selecting or deselecting the relevant option under the View toolbar button. You can also close a pane by clicking the  icon in its top right corner.
Drag and Dock Panes
You can drag panes to different areas of the screen and dock them as required.
When you drag a pane over another pane, a pale blue highlight and/or a set of docking icons appears:
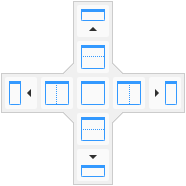
Dragging a pane over one of the icons shows the position and size it will take when dropped. Dropping the pane onto:
the centre icon adds it to the existing tab group.
the left, right, top or bottom icons splits the existing pane and docks the dragged pane accordingly.
If you drop a pane outside the main pane, it becomes a floating pane.
Empty areas with no panes are treated as a void. Dropping a pane into the centre of the void fills it, and you can then split that pane with further drops. Dropping a pane on the edges of a void splits it while leaving part of the void intact.
Pin/Unpin Panes
Click  to collapse a pane to the edge of the window. To restore an unpinned pane, click its name on the edge, then click
  .
.
Resize Panes
You can resize panes using the splitter between two docked panes. When the pointer is over a splitter, it changes to a  or
or  cursor. Drag the splitter to adjust the size of adjacent panes.
The difference between floating and docked windows is that docked windows will resize together. When you drag a splitter, one window will get bigger while another gets smaller. Thus, docked windows never overlap each other. Typically most or all of your windows will be docked.
Create/Save/Delete Desktop Layout
Different tasks may require different desktop arrangements. For example, structural inspections may require multimedia panes, while reviewing corrosion growth rates and thickness readings may need charts to view the trend lines. You can create multiple desktops and switch between them using the toolbar buttons on the top of the screen:

To switch between desktops, select the required desktop from the drop-down list available under the Desktop toolbar button.
To save the changes that you’ve made to the current desktop, click the toolbar button for Save the active desktop. Settings are not automatically saved when you close the program.
To create a new desktop, arrange the desktop as required and click the toolbar button for Add a new desktop with the current layout to save the current arrangement of panes. You can name the desktop as required.
To delete an existing desktop layout, click the toolbar button for Delete the currently active desktop.
To restore the desktop to the default layout pre-delivered with the system, click the toolbar button for Restore the default desktops. This option is available only in IC-Inspection.
Tip
If you use two monitors, you may wish to extend the application across both. You can do this by clicking the “Restore Down” button at the top right of the pane and then dragging the main application window larger, or by floating panes such as Drawings and then dragging the floating panes onto the second monitor.
In IC-Inspection, the following three desktop layouts are pre-delivered:
Setup Desktop: Layout optimised for setting up IC-Inspection, including visible panes such us Devices or Survey Values.
Pipelines Desktop: Layout optimised for the inspection of pipelines.
Structures Desktop: Layout optimised for the inspection of structures.