Options
Under , you can make some generic settings related to the applications.
All options and settings in this dialog are currently user-specific. The options and settings are stored in the windows folder: C:\Users\[USER_NAME]\AppData\Roaming\NEXUS
Under Options, you can make settings as follows:
Tab |
Settings |
|---|---|
General |
You can make configurations for database backup, specify the cache and export folders. For information about setting up the network path for backup and restore, see Setting Up Network Path for Backup/Restore. |
Spell Checking |
You can enable spell checking and specify the relevant dictionary to be used as well as any custom words that you want to add to the dictionary. These words are then ignored during spell checking. |
Inspection |
You can make settings for capturing videos during inspections (for example, specifying the image format, image capture naming or JPEG quality, as well as enabling automatically switching to video time and sync KP) and assign keybindings to actions to be used on the Inspections Review screen. For more information, see Setting Up Keybindings. |
Setting Up Network Path for Backup/Restore
You specify the network path for backing up or restoring data in the Network path for backup/restore field under .
This path must be accessible to both the database server and to NEXUS IC. This may be a UNC path (like ‘\\MyServer\MyShare’) or if the database server and NEXUS IC are running on the same machine, it may be a Windows path (like ‘C:\Database Backups’).
When the path is valid (that is, it is visible to both Integrity Centre and the database server) it will have no border. If the path is invalid, a yellow border will be shown around the field.
Example valid path: 
Example invalid path: 
Tip
The database server process must have permission to read and write to the folder. If the path is shown as invalid, check the permissions of the user account that the database server service is running under.
Setting Up Keybindings
Inspection keybindings allow the user to assign function keys and numeric keypad keys as shortcuts to common review actions within the INSPECTION screen.
You can define keybindings under .
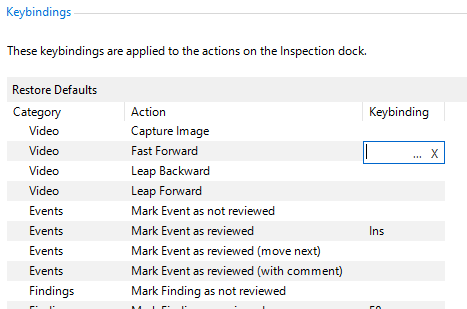
Click on the Restore Defaults button to pre-populate common keybindings.
To assign a keybinding to an action, proceed as follows:
Select the Action.
Double-click in the Keybinding column and click on the
Ellipsis button.
Press the key (or key combination) that you want to assign to the currently selected action. The keybinding will then be displayed in the grid.