Asset Information
allows you to create and configure Asset Information forms. Users can then use these forms to record data against assets.
Asset information forms with the same Category will appear grouped together. (Icon, Colour and Shape are not used for asset information forms, though they are for Event forms. ‘Allow Inheritance’ is not yet implemented.)
In the top half of this dialog, you can add, edit and delete forms. In the bottom half, you can add, edit or delete fields within forms.
To add a form, click Add in the top toolbar. To edit, click Edit. Once you do either of these things, you should see the ‘Table Definition’ dialog. (From NEXUS’s point of view, form data is stored in tables, which is why it gives the dialog that title.)
When you Add, you will need to select what type of form you are creating: Asset Information or Sub Asset Information.
An Asset Information form has a one-to-one relationship with an asset: a single asset has a single instance of this particular form. So Appurtenance #23 would have a single Appurtenance form for capturing its details. (That asset might have other forms of other types: Traffic Light, Inspection History, etc.; but it would only have one form of each of the types assigned to it.)
A Sub Asset Information form appears within one of the other four types of form, and can contain multiple records for a single instance of its owning form. For example, a “Licenses” Asset Information form might contain a field showing the date the asset was first licensed, a field showing the date its latest license expires, and a Sub Asset Information form showing the various different licenses the asset has held over time.
Table Definition Dialog
On the Table Definition page you can choose the form’s Name (as it will appear in the user interface), and an optional Description, Category, Icon, Colour and Shape.
If you tick Allow Security, then in the Database Security menu, you can control which users (and groups of users) will have what access to this form (no ability to view, ability to view but not modify, or ability to view and modify).
On the Library tab, you can optionally add one or more Library Items to this form. This might be useful if you want instructions for filling out the form to be stored in the database.
On the Asset Types page, you can select the asset types for which this form will be available. (By default, no asset types are selected, so this form won’t be available anywhere in the database.)
To move a field up or down in the form or grid, use the Field Order button in the Asset Information main toolbar. For example, if you want to place a field between two other fields in the form, select Form … from the drop down list, then a ‘Form Field Order’ dialog will appear. From there, you can move the field with the Move Up or Move Down buttons available in the toolbar.
Fields
Forms are only useful if they contain fields. Each field can contain data of a single type (except for fields of type Position Link and Table Link).
To add a field, click Add. That will bring up the ‘Add Field Definition’ dialog.
Field Definition
On the Field Definition page, you must give the field a Name and a Field Type. The remainder of the form will change, depending on the Field Type you select.
For Numeric fields, you can specify Unit, Format and number of decimal places or significant figures to display. (This can be helpful if a user chooses to display data in a different unit: an integer number of millimetres might be a non-integer number of inches.)
Global Table Link
A Global Table Link field enables linking of a global table to an AIG. NEXUS-IC will apply filters progressively (guided by the user) until the desired table row is linked to the AIG. The UI should display all values for the selected global table field, in a combo box for the user to select, similar to a lookup list.
When adding or editing a Global Table Link, it will be displayed as a pseudo form. This will be built based on:
- What fields are visible in the Global Table form.
- The order of fields visible in the Global Table form.
For each field, NEXUS IC will display a combo box with the distinct set of values for that field. The first combo box will allow you to choose from all values available to that field. Once this is entered, the second field will be all distinct values from rows where the first field value matches what the user has chosen, and so on. If a field list only contains one value, it will be preselected automatically. This process continues until the user has chosen a value for each combo box, and thus filtered the global table row that will ultimately have its value persisted.
When importing or exporting a Global Table Link, the fields will be represented in the document as data separated by ‘/’ characters. For example:
| Asset Location.Full Location | Asset Type.Name | Component Damage Global Table Link.Component Damage |
|---|---|---|
| Wood | Company | Material / Insulation Failure / Degraded |
Note that if a field called ‘Name’ is present in the global table, the values in that column will be used in place of the automated value for Importing, Reporting and displaying in the grid. If a ‘Name’ column is configured, it should be made invisible on the form via the Field Layout options.
See Worked Example for more information.
Field Layout
The Field Layout page has various section which control the display of the field in different modes.
Grid
Under Grid, you can set Visible to determine whether this field will be visible when the form data is viewed as a grid (e.g. on the Children tab for asset forms, or in the Event Listing for events).
You can set Order to control the column order within the grid — the column with the lowest Column Order will be at the left of the grid, and so on. (You can also set grid Field Order on the form as a whole — see above.) Grid order is also used to set the order of columns in a Custom Export of assets or events.
Text Alignment controls whether this field aligns left, centre or right. If you do not set an alignment, text fields will default to left, numeric fields to right, and date fields to centre.
Caption allows you to have a title on the grid column for this field that is different from the field’s underlying name.
Form
Similarly you can set Visible Form to control whether the field appears on the form itself.
You can set Category to group fields within a form. Setting Order controls the order of fields within Categories, and the order of Categories on the form: the Category that contains the field with the lowest Order will be displayed first. Within the Category, the field with the lowest Order will be displayed first. (You can also set form Field Order on the form as a whole — see above.)
Untick Show Caption if you want this field to appear without a caption next to it on forms.
Set Columns to control how wide this field appears on a form: if this is a two-column-wide form, setting this field’s Columns to 1 will cause the field plus caption to fill 50% of the width of the form; setting it to 2 will cause it to fill the full width. Forms default to two columns wide, unless you specify otherwise in a Category — edit the Category (click on the  button, then click Edit) and set its Columns. While editing the Category you can also set an image or descriptive text to appear at the top of this category. This might be instructions on how to fill in the form, details of how calculations on the form are worked out, etc.
Form Caption allows you to have a title on the form next to the field that is different from the field’s underlying name.
Report
Visible controls whether this field will be shown when the table is exported in a report template.
IC-Inspector
Visible means this field will be shown in IC-Inspector. If you set an event field to visible, it will be available to inspectors to fill in. If you set an asset information field to visible, it will be displayed to inspectors above any forms they may be filling out. Use this sparingly: a long list of visible asset information fields will fill the inspector’s screen and force them to scroll to reach the form they are trying to fill out.
Order and Caption work analogously to those in Grid and Form.
General
Editor Type controls what type of editor the user will see when they edit the value in this field.
If you set Blank Text, the text you set will be displayed greyed out whenever the field is empty. (You can see several fields with Blank Text set right here on the Field Layout tab.)
Hint
As you add (or edit) fields, you can see a preview at the lower right of the dialog, showing how the fields will appear on either a form or a grid. Fields that are selected will be shown with a
exclamation mark next to them in the form preview. If the field is a lookup list, you can drop down the lookup list to see its values. (You can also see and edit a lookup list’s values when choosing the lookup list: on the “Select Lookup List” dialog, click Edit, click Items.)
Edit
To edit a field, click Edit. That will bring up the ‘Edit Field Definition’ dialog. (This is the same as Add Field Definition, but has more tabs. This is because a variety of field settings are only available after a field has been created.)
If your field is of type Calculation, there will be a Function tab. This tab will allow you to choose a function for this calculation, and will also allow you to choose parameters for the function. You can either set “Parameters (Inputs)” or “Parameters (Values)” for each parameter. “Parameters (Inputs)” lets you choose some other field as the input for that parameter; “Parameters (Values)” lets you assign a constant. These are mutually exclusive — you can only fill one or the other for each parameter.
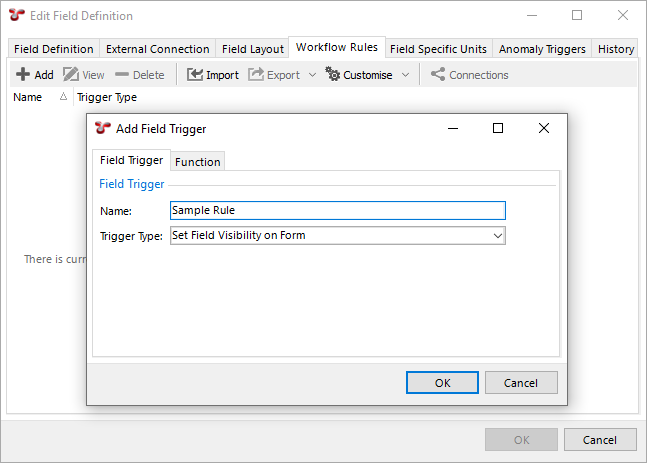
Workflow Rules
Sometimes you want a field’s properties to be controlled by other data. If you want, for example, a field to be visible only when some other field is filled in (or vice versa), edit the field and go to the Workflow Rules tab. Click Add, and under Trigger Type choose “Set Field Visibility on Form”. Then add a function, and parameters for that function. The function should return a Yes/No value. When it returns Yes, the field will be visible, when No, the field will be invisible. Similarly you can use Workflow Rules to set a field as read-only, or to mark a field as required. The remaining trigger type, “Clear Field Value on Form”, can be used to automatically empty out a field’s value when some condition is met — for example, it can be used to make two fields mutually exclusive, so that users can fill in one field or the other, but not both.
There are a set of system functions that you can use that mean you don’t need to create custom functions:
- Compare - Is Null
- Compare - Is Not Null
- Compare A = B
- Compare A <> B
Note that workflow rules are run when forms are viewed interactively, but are not applied during imports. If you have ticked the “Required” box on the Field Definition page, this will be enforced during imports — rows that are missing required fields will be rejected. But if a workflow rule makes a field required, this will not be enforced during imports.
Field Specific Units
This feature works in coordination with Unit Groups. Suppose you want Easting and Northing to display in metres, even when US Weights and Measures are selected — you can specify that here. (You’ll need to specify it once for the Easting field, and once for the Northing field.)
Anomaly Triggers
Here you can add anomaly triggers to a field.
When an anomaly trigger is violated, a yellow exclamation mark ( ) will appear next to the field. You can set lower/upper bounds to be constant values (so a field might trigger if it was outside, say, 1 to 9) or to pull from a field, on this form or on another form. So for example if this field is Measured Wall Thickness, it might trigger if its value is less than Minimum Allowable Wall Thickness.
For Lookup List fields, the comparison is done of the lookup list item’s Value, not its Comment. So if you have a lookup list titled “Anode Depletion”, and its first entry has value “25” and comment “0 to 25% depleted”, NEXUS will use the “25” for purposes of determining whether an anomaly trigger should be fired.
For Yes/No fields you can set the trigger to fire on any combination of Yes, No or blank; but you can’t compare to another field.
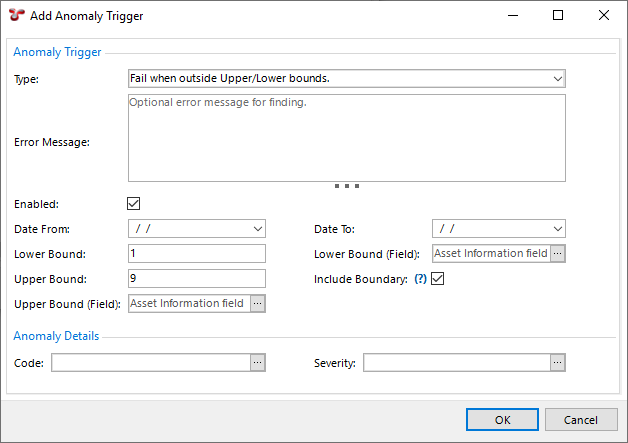
The Include Boundary tickbox controls whether exact matches cause the trigger to fire: if you have set a trigger to “Fail when inside Upper/Lower bounds”, your lower bound is 1 and your upper bound is 9, this is the difference between “1 < x < 9” and “1 <= x <= 9”.
You can optionally give an anomaly trigger a date range. If you set just a Date From, the trigger will apply only to event data from that date forward. If you set just a Date To, the trigger will apply only to event data from that date or earlier. If you set both, the trigger will apply only to event data within the specified range. In this way, you can change triggers to reflect new conditions, without causing spurious warnings on historical data. For example, if you decrease the operating pressure of an asset, this might decrease the minimum allowable wall thickness. Rather than editing the existing anomaly trigger, you can set a “To” date on that old trigger, and add a new trigger with a “From” date.
Caution
In most cases, Findings are generated at the time events are added or imported. There are however some scenarios in which the Anomaly Triggers utility should be run manually. These are 1) whenever anomaly triggers are edited; 2) when anomaly triggers exist on a calculation field; 3) before any Finding review sessions; or 4) after a bulk import of event data (particularly when anomaly triggers rely on events other than itself).
Triggers for a field independent of asset are found in NEXUS IC in Asset Information and Event Types. Anomaly triggers for specific assets can be configured in NEXUS IC by right-clicking on an asset and choosing Anomaly Triggers…. If you have both an asset-specific and a generic anomaly trigger on the same field, for assets with the asset-specific trigger, only the asset-specific trigger will apply. For assets with only a generic trigger, only the generic trigger will apply. Note that asset-specific anomaly triggers are specific to their asset — they do not automatically apply to an asset’s children.
A trigger can have an anomaly Code and a Severity, and you can have several different triggers on a single field, with different codes and/or severities. The dialog may also show a preview chart, showing which triggers apply at which KPs or depths.
(You may need to close and re-open the database for any newly added anomaly triggers to take visible effect.)
Auto-increment Fields
It’s possible to set a field to auto-increment. For example, if you wanted each new anomaly you created to automatically have an as-yet-unused anomaly number pre-populated, you would do this by setting the Anomaly Number field to be an auto-increment field. To do this, set the field’s Default Value to @autoinc. For system tables like Anomaly, you can’t do this through the NEXUS IC user interface, so you should ask support@nexusic.com for assistance.
Auto-populate date/time or user name
Similar to @autoinc, you can set a field to pre-populate with the date/time the record was created by setting its Default to @now. This works for any sub-event, AIG or sub-AIG field.
You can also set a field to pre-populate with the logged-in user’s name by setting its Default to @user. This works for any event, sub-event, AIG or sub-AIG field.
These default values are populated when the row is created. For an AIG, that’s when the asset is created. For an event it’s when the event is created. For a sub-event or sub-AIG it’s when the user clicks the ‘+’ to create the new sub-event or sub-AIG row.
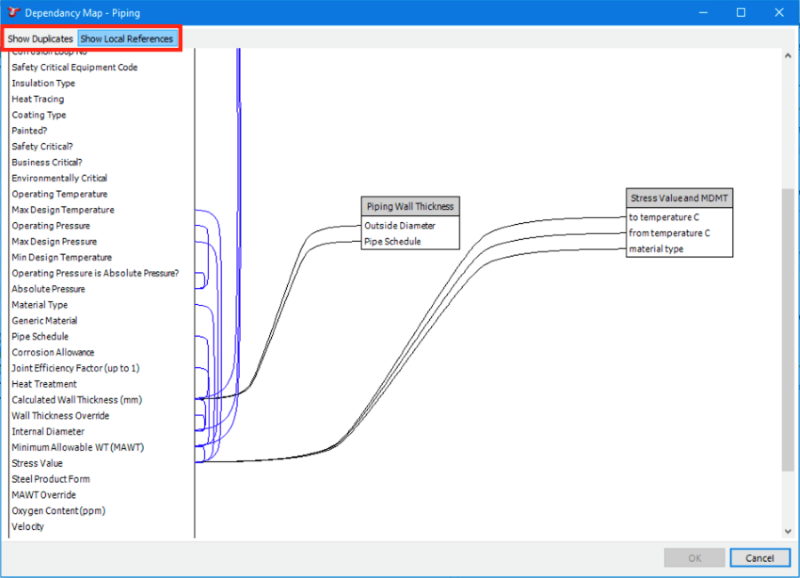
Dependency Map
The dependency map is a visual representation of an Asset Information Group or Event Type’s dependencies.
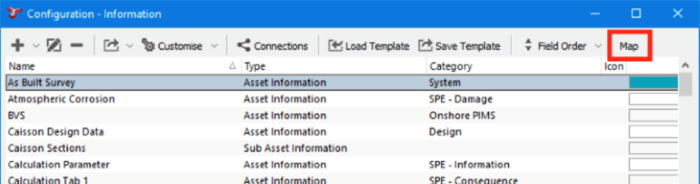
It can be found under Configuration > Assets > Information, or Configuration > Events > Event Types, selecting an item from the list and choosing Map in the toolbar.
The map is represented as a series of interlinked fields grouped in columns, each column representing the Asset Information Group (or Event Type) to which the fields belong.
The map is hierarchically arranged from left to right, with the target Asset Information Group (or Event Type) located on the left-most column, and its dependencies and sub-dependencies located to the right.
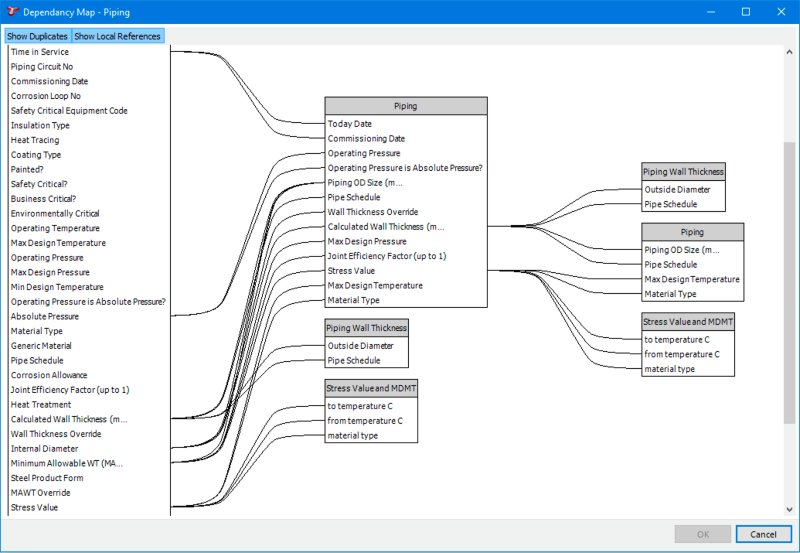
The above dependency map shows a link between Absolute Pressure in the Piping Asset Information Group, and Operating Pressure also in Piping. Looking into the field definition of Absolute Pressure, the function uses the Operating Pressure field from Piping (itself).
Displaying self-referential dependencies such as these can be switched off by toggling the Show Local References button in the map toolbar.
Toggling Show Duplicates off will show fields only once, so any self-referential dependencies will be displayed as a closed loop on a single column.