Database
- Connect
- Reopen
- Backup
- Subscriber
- Expert Systems
- Close
- Your Profile
- Change Password
- Audit Log
- Security
- Properties
- Export Repository
- Show Status Bar
- Exit
Connect
Use this menu option to connect to a database. (If you have connected to this database before, use Reopen, described below, instead.) For details, see Database ‣ Connect.
Reopen
Choose a database that you have opened in the past from this list to re-open it. If you have filled in Windows domain credentials (see Security, below) you should be immediately connected. If not, you will be asked for a NEXUS user name and password (which may not be the same as your Windows domain user name and password). Clicking the ‘eye’ next to the password field will temporarily reveal the text in the field.
Backup
Use this menu item to create a backup. Your IT department may have a system of scheduled backups that make this unnecessary on a regular basis. But from time to time when you are about to do something hard to reverse in a database, such as deleting data, it may be wise to take a backup first.
You will need to supply a Network Path. This path must be accessible to both the database server and to Integrity Centre. This may be a UNC path (like ‘\MyServer\MyShare’) or if the database server and Integrity Centre are running on the same machine it may be a Windows path (like ‘C:\Database Backups’).
When the path is valid (i.e. it is visible to both Integrity Centre and the database server) it will go black — until this point the text will be red. Note that the database server process must have permission to read and write the folder in question — if you can’t get the path to turn black, check the permissions of the user account that the database server service is running under. Similarly, the user account requires read/write permissions to both the share (for UNC paths) and the folder.
The next page lets you select a name for the backup file. The default is usually suitable. Click Next.
Once the backup is made, its name will be changed to include 32 hexadecimal characters at the end. This is an MD5 checksum of the database file. Before restoring (see above) Integrity Centre will check this hash against the contents of the file, to verify a match. This is useful for protecting against corruption introduced by e.g. copying the database backup to a USB3 hard disk and back onto a new machine. (Windows’ own file copy routines do not perform any integrity checks.)
Click the Open Folder button and a Windows Explorer will open with your new backup selected.
Subscriber
Database Synchronisation is based around the concept of Master and Subscriber databases.
A Master database is the primary database of an organisation. A Master database can create one or more Subscriber databases. Changes can be made to the Master database whilst there are active Subscriber databases.
A Subscriber database is created from a Master and can be edited offsite and subsequently synchronised back into the Master database. A subscriber database can only be synchronised with a Master database (i.e. you cannot synchronise two Subscriber databases together).
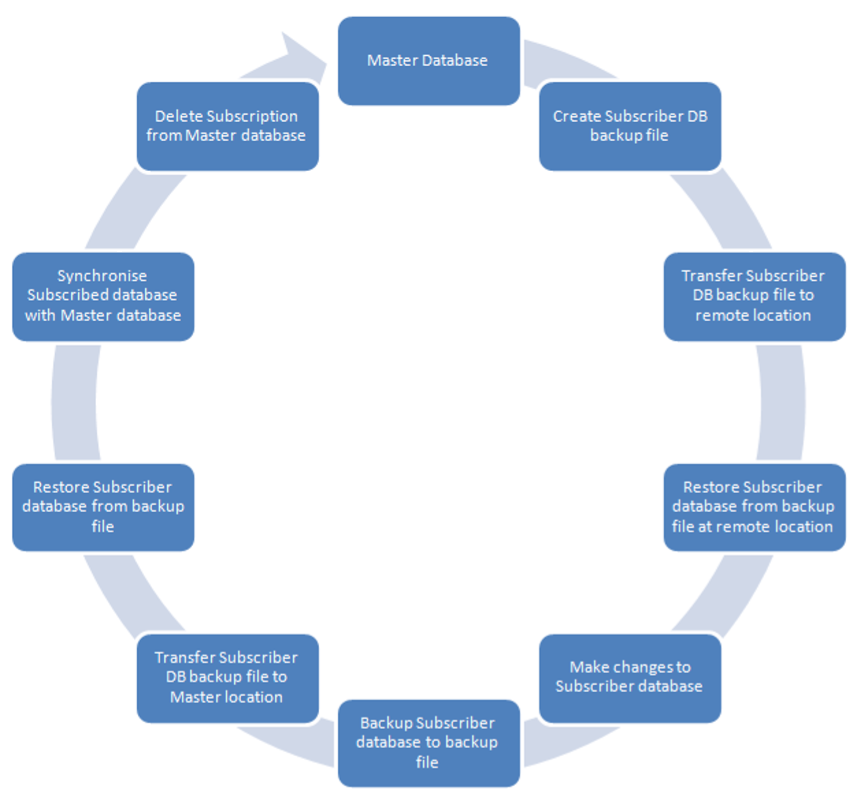
Create a Subscriber Database
A Subscriber database can either be created as a backup file, or via a direct connection to the offsite MS SQL Server. In most cases, Subscriber databases are created by the Backup File (Manual) method, the backup file is then restored to the offsite MS SQL Server.
To create a Subscriber database, select , and supply a name for your new subscriber database. NEXUS IC will create the subscriber as a database backup file. Once a Subscriber database has been created, it will appear in .
Synchronising a Subscriber
All changes made to a Subscriber database need to be synchronised back with the Master database. To synchronise a live Subscriber database, do the following:
- Ensure that the active database in NEXUS IC is the Master database.
- Click .
- The Database ‣ Connect wizard will appear. This is for the subscriber database. If your subscriber is already present on a database server then connect to it. If not, restore it under a different name from your main database — if you have the subscriber as a *.nexus-backup file, you must specify a temporary location to restore the backup to so that the synchroniser can work with it. Note that during synchronisation, no other users can be connected to the database.
- Resolve conflicts if required. In the below picture, an asset has been renamed from ‘10” PL’ to ‘10” PL m1’ in the master, and similarly renamed to ‘10” PL t2’ in the subscriber. The Resolve Conflicts dialog requires that we tell it which change we want to keep. You can click the Use Master or Use Subscriber buttons to resolve all conflicts at once, and/or resolve conflicts individually. Once you have chosen a resolution for all conflicts, the Next button becomes available. Click Next, then once the synchronisation is complete, click Commit. Other users may now connect to the database again.

Changes made to the following tables in a subscriber will not be synchronised back to the master:
- Report Schedule (hosted clients only)
- Map Server
Note
Ensure that none of the machines essential to the sync shut themselves down due to power management settings. This includes the NEXUS IC machine and the SQL Server machine. If you are accessing NEXUS IC via RemoteApp, similarly ensure that your client PC will not shut down. If you do lose connection to the RemoteApp instance, you (by default) have 15 minutes to re-establish it (from the same or from a different client machine).
If your network is subject to interruptions, try running NEXUS IC on the same PC that is running your SQL Server.
If your location is subject to power failures, try running NEXUS IC on a laptop.
If you are running Windows 10, try temporarily pausing Windows updates: , and set a “Pause until” date.
Expert Systems
The Expert Systems functionality allows you to export or import asset information groups, event forms, functions, report templates, shortcuts, etc. out of one database and into another.
The concept is that a central library of “base configuration” databases exist for NEXUS clients to subscribe to. The subscription allows for the clients own database to be periodically updated from the base configuration database. An example of this would be the Wood API 581 database which is maintained by a committee of Wood engineers. When new changes are made to the code, the “base configuration” database is updated and the changes to the configuration pushed out to all the subscribers.
This functionality also allows for configuration elements to be ported between databases using Template files without reliance on the subscription model.
Configurations of Asset Types (including Asset Information forms, Global Tables, Risk Models, Event Definitions, Reports, Charts and all referenced Functions) can now be ported/synchronised between NEXUS databases.
Configuration tables which are included as part of the template are:
- Asset Types and asset type icons
- Asset and Sub Asset Information Groups
- Event and Sub Event Definitions
- AIG and Event form and grid layouts
- Anomaly Triggers
- Workflows
- Global Lookup Tables and Items
- Lookup Lists and Items
- Boolean Types
- Unit Groups and Units
- Functions
- Charts
- Risk Models and Risk Charts
- Report Templates
See Worked Examples for step-by-step guide on how to configure and maintain and deploy Expert Systems configurations between databases.
Close
If you want to open a new database, Close the currently open one first. IntegrityCentre only allows you to have one database open at a time. (If you would like two databases open at once, launch a second copy of Integrity Centre.)
Your Profile
Go here to view and/or change details about your own NEXUS user account. If unit groups (e.g. metric versus US weights and measures) are defined on your database, you can select your preferred unit group here.
Here you can also choose Favourite Reports. Tick boxes here, and you will have quick access to the ticked reports via the Reports toolbar button.
Change Password
To change your own NEXUS password, use this menu option. If you are using Windows credentials, this option is not useful or necessary, and will be greyed out.
Properties
This dialog shows (and allows you to edit) a variety of values specific to your database. These include client name, client logo, a variety of default colours associated with drawings, and a variety of settings associated with 3D drawings.
You only need to set values that are useful to you and your use case.
Name and Details are not used anywhere.
Logo can be used in the headings of report templates, and is by default included in the Dashboards Page report and the Dashboards report.
Secondary Logo is similar, for when you need two different logos in the one database.
User Upgraded identifies the name of the logged in user which instigated the latest database schema update.
Date Upgrade is the date that the latest schema update was performed.
Require History Comment, if checked, means that when changing various data fields, including Asset Information, you will be asked to enter a comment describing the reason for the change.
Keep History (days) controls how long that information is retained.
Global Video Path is the root folder or UNC path for all inspection video which may be linked to inspection events in INSPECTIONS. This could also be an Azure SAS URL (https://docs.microsoft.com/en-us/azure/storage/storage-dotnet-shared-access-signature-part-1 ) which links to cloud based storage. See How does video playback work?
Temporary Inspection Video Path would normally be populated during offshore inspection campaigns for offline video review and where the video will be local to this instance of NEXUS IC. See How does video playback work?
Default Traffic Light Colour – If the currently selected Traffic Light does not specify a colour to go with the traffic light’s actual value on the asset for a drawing region or button, then that region or button will be shown in this Default Traffic Light Colour.
Known Asset Colour – in Drawings, when you select Unknown Asset under Colour, this colour will be shown for drawing regions and buttons where the region or button is connected to an asset. For regions or buttons not connected to an asset,**Missing Asset Colour** is used.
Unknown Asset Colour – 3D drawing Layer with an asset, but that asset isn’t found in the database.
North Layer Name – Name of the ‘True North’ layer for 3D drawings.
Asset Serial Number Attribute – in 3D DWGs, you can use a tag in the DWG to specify what asset this is. NEXUS IC will then match that tag to the field you specify in Asset Information . Here, you are specifying the DWG tag that NEXUS IC will attempt to match on. See 3D Drawing Setup Example for more information on how to configure 3D Drawings.
Missing Serial Number Colour – if you have specified an Asset Serial Number Attribute and an Asset Serial Number field (both described above), then when NEXUS IC finds an attribute in the DWG but is unable to find an asset with a matching value in the database, it will highlight the asset in the colour you select here.
Grid Size – Size of a grid cell at scale 1 for the 3D drawings.
Grid Colour – Colour of the grid for 3D drawings.
Anomaly Risk Chart – Anomaly Risk Matrix can be defined in Risk Charts and then to be be selected here to show the open and close anomalies in the defined Anomaly Risk Chart in Anomalies screen. System - Anomaly - Risk Score function which is a user defined function needs to be set up to calculate the Risk Score for any anomaly. The result of this function will be a number that is assigned to each square inside the matrix. The matrix must be defined to only have unique values in in each square.
The Email tab contains settings to allow NEXUS IC to send mail (e.g. to email a generated report or the contents of any of the grids). It is recommended that a NEXUS IC email account is set up by your company’s IT team and all email activities are generated from this generic account. Please speak to your IT department for information on the Host, Username, Password, Port and SSL settings.
The License tab contains details of your license key. As part of Software Based Licensing, this is where you will enter that license information.
Audit Log
Here you can see a list of user sessions. Each time a user logs in, a session is created, with a login time. When they log out, a logout time is recorded.
During a user’s session, they may edit data in the database. The Audit dialog displays a row for each data row they change. The ‘Table Definition’ column shows the name of the table that the change was made in. Some of these tables are ‘System’ tables — for example, if a user moves an asset, you’ll see a record for ‘Asset Location’. Some are ‘user’ tables — for these you will see the name of your Asset Information Group, Event, etc.
Under Changes, you may select and view changes from the list of changes that were made during the selected user session.
The left section lists in tabular form all changes made to a record:
- Operation - Insert indicates the creation or addition of a record, Update indicates that the data was changed from a pre-existing value to a new value, and Delete indicates the deletion of a record.
- Date Changed - Shows the date and time the change was made in the database. The table is ordered chronologically by default.
- The Table Definition column can be added via Customise to show which table the change was applied to.
The right section displays the name of the user, the form and the values of each field relevant to the change. Fields within the form that were changed are marked with a  blue highlight. For an ‘Update’, the following tabs will be displayed:
- Original Values - Makes visible the values as they were prior to the change, with the changed values visible by hovering over the
- Changed Values - Makes visible the values as they were after the change, with their original values visible by hovering over the
- Summary - The summary will show all changes within the change record in an easy to read, written format.
For changes with Operation type Insert, the following tab will be displayed in place of Original Values:
- Form - Shows the form and field values in the initial state, as it was created.
See also History.
Security
Here you can add/edit/delete users, and can set their permissions. Permissions in Integrity Centre 6 are on a table-by-table basis, rather than on a screen-by-screen basis. For example, if you would like a user to be able to add or delete assets, you should edit the user (or the user’s Group) and give them Read / Write permission on the system table ‘Asset’. If you would prefer that this user (or group) only view assets and not add or delete them, give the user (or group) Read permission.
Items inherit Security in two ways: from their parent security item, or from their corresponding item in all other groups. Each user has their own permissions, plus the permissions of any group they are a member of. ‘Inherited’ mostly means ‘No permissions applied for this security item, for this user/group’. Read and Read/Write are additive. Deny is subtractive and is applied last. To figure out the permission for an item, NEXUS retrieves permissions for the user, and all groups the user is a member of. If there are no resultant permissions set, then NEXUS finds the parent of the item and checks permissions on that. If necessary, a Special Permission will be counted as a parent — for example, if an Asset Information form has no explicit permissions (because it is set to ‘Inherited’), then NEXUS will use the Asset Information special permission.
Finer control over Asset Security is available.
- Set-up SSO - you can configure a user to use Window domain credentials to log in to Integrity Centre. This is smoother as users will not need to enter a separate password when they start Integrity Centre — instead Integrity Centre will query the domain controller to check the user’s credentials. To configure this:
- Edit the user and go to the Login tab.
- Click the
 button under ‘Windows User’.
 - In the resulting ‘Select User’ dialog, you may need to click Locations and select Entire Directory.
- Type the user’s full or partial Windows login name, and click Check Names, choose the appropriate name from the list and click OK.
Note that Windows domain credentials may not work when you are away from the Windows domain.
Tip
You can always bypass the automatic connection to the database using domain credentials by holding down the Shift key as Integrity Centre starts up.
- Force Reset - if you are not using SSO, you can force a user to reset their NEXUS password on their next login. (You would typically do this when you have just created a user account and have set a temporary password.) On their next login, the user will be required to enter their old password and then choose a new one before they can proceed.
Export Repository
Use this menu option to export all library items (including drawings) and event multimedia. (In previous versions, this option also exported survey data, but survey data in version 6 is no longer stored in the same way and is therefore not exported from this menu option.)
Show Status Bar
The status bar at the bottom of the main NEXUS IC window shows the database server you are connected to, the name of the database you are connected to, the number of currently connected users, the number of Active Jobs, and an estimate of how fast the connection to this database server is. In addition, the Memory Available, Memory Used, Software Version and Database Schema number are also displayed.
The Active Jobs status bar item refers to the number of imports or reports currently running in the background.
Hover the mouse over the status bar’s Users count to show a hover-hint with more information. Other status bar indicators also show hover-hints, including Jobs, Latency, and Memory Used.

When Memory Available is small compared to Memory Used, you are running low. In this circumstance, NEXUS IC may start clearing parts of its cache in order to avoid running out of memory. You can force a complete emptying of cache by closing the application and restarting.
You can toggle the status bar on/off using the Database > Hide Status Bar option.
Note
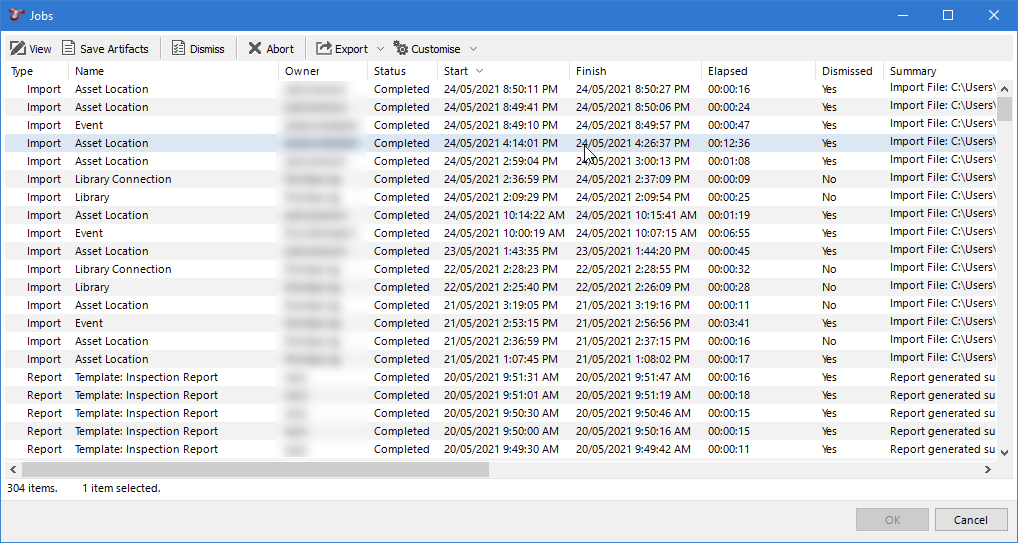
Job Management Console
Double-clicking the Active Jobs number in the Status Bar will summon the Job Management Console. From here you can view more detailed information on each job’s progress, including jobs that are currently running or have been dismissed. A job may include an import or report.
The following items will be shown for each job: Type, Name, Owner, Status, Start, Finished, Elapsed, Dismissed, Summary.
SaaS Clients can have their jobs offloaded for generation on another server. These jobs are visible in the Job Management Console. Reports will be generated in the cloud and downloaded from the Job Management Console after their completion.
The Console’s menu provides the ability to interact with jobs. The behaviour of the menu buttons differ for Reports and Imports. See the table below for a breakdown of the functionality:
| Report Jobs | Import Jobs | |
|---|---|---|
| View | Allows the user to download the generated report. | Shows the import summary, errors, and/or warnings. |
| Save Artifacts | Does not have any artifacts. | Allows you to save the source import files (csv or xlsx) |
| Dismiss | Hides the blue pop-up banner at the bottom of the NEXUS IC window. | Hides the blue pop-up banner at the bottom of the NEXUS IC window. |
| Abort | Aborts the report job if possible. | Aborts the import job. The import job saves data incrementally, so aborting will only stop further data from being imported into the database. |