Asset Information
Asset Information forms retains asset specific information for the currently selected asset. The Asset Information screen is available in two locations in NEXUS IC, from the ASSETS screen and the INSPECTION screen. Functionality in both areas is the same.
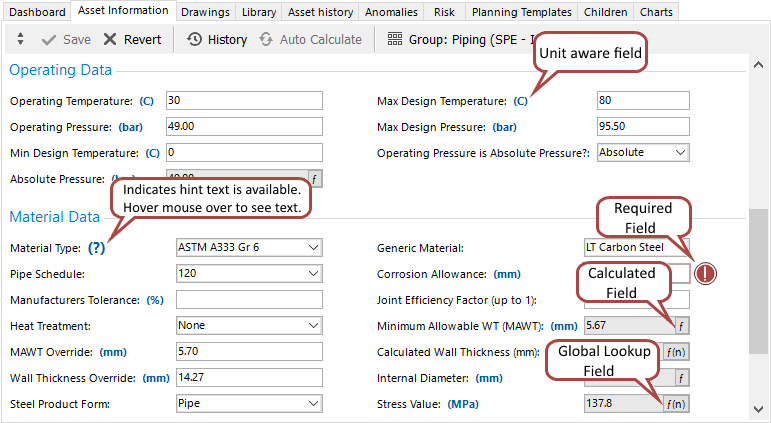
An example asset information form is shown here:
Not all Asset Information forms are relevant to all Asset Types. You can configure the relationship between Asset Information forms and Asset Types from Asset Information or Asset Types.
To select a different Asset Information form, click the Group menu button. If you have many Asset Information forms available on this asset type, you’ll see a menu with submenus for each Category of form; if you have only a few, you’ll see a single menu listing all your forms. Select a form. (Some forms may take a moment to display, depending upon the amount of calculation that must be done.)
Tip
If you are navigating through the Asset register and not concerned with the Asset Information, you can select a different tab, such as Library. This will prevent asset information from being loaded, which can be useful if the Asset Information is performing many calculations.
Toolbar
Use the  button to toggle the Asset Information tab between two different locations:
- Amongst the other Asset tabs (Dashboard, Drawings, etc.)
- At the bottom of the window, below the other tabs.
This lets you easily view asset information at the same time as viewing other data; or lets you fill the available window space with the data you’re interested in.
Once you have made changes,  Save and
  Revert will become enabled, and you can use these to save or discard your changes. (If you select a different asset without clicking Save or Revert, your changes will be saved.)
Use the  button to show a dialog with the History for this asset information form on this asset.
Ordering forms
The order of Asset Information forms determines which form is shown by default. When switching to a new Asset in the Asset screen, the previously active form will remain active if it also belongs to the new Asset. If the previous form is no longer applicable, the default AIG (ordered highest on the list) will be shown.
To change the order of the Asset Information forms, go to Asset Types. Edit the asset type in question, then select the Asset Information Groups tab. Use the up and down buttons to set order for forms.
The following sections detail functionality available to the user from an Asset Information Group form.
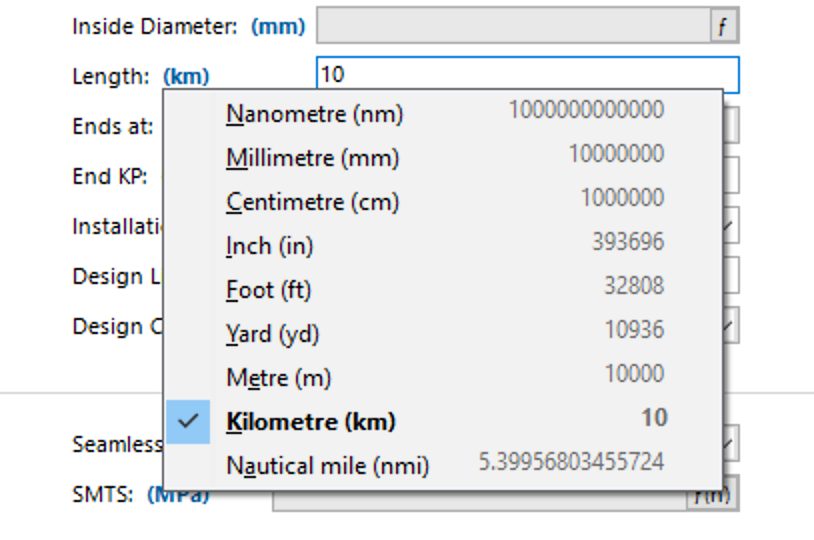
Unit Aware Numeric Field
When Numeric field are configured in an Asset Information Group, you have an option to define a base unit type for that field. By default, the base unit type is displayed to all users, however, each user has the option to view the numerical value in that field in a different unit type. The menu item in bold indicates the default unit.
Unit aware numerical fields are identified by the label after the field name which states the unit type in blue text.
To view a different unit type in the Asset Information form, click on the unit label, choose an alternate unit type from the popup menu. Please note that NEXUS IC will “remember” your preferred unit type and display that next time you login to NEXUS IC.
Calculated Field
Calculated fields are those where the value displayed is derived by a function which has been configured in the database.
Calculated fields are identified by the ![]() icon.
icon.
To view the function for the calculated field, click on the ![]() icon to launch the View Function Calculation dialog.
icon to launch the View Function Calculation dialog.
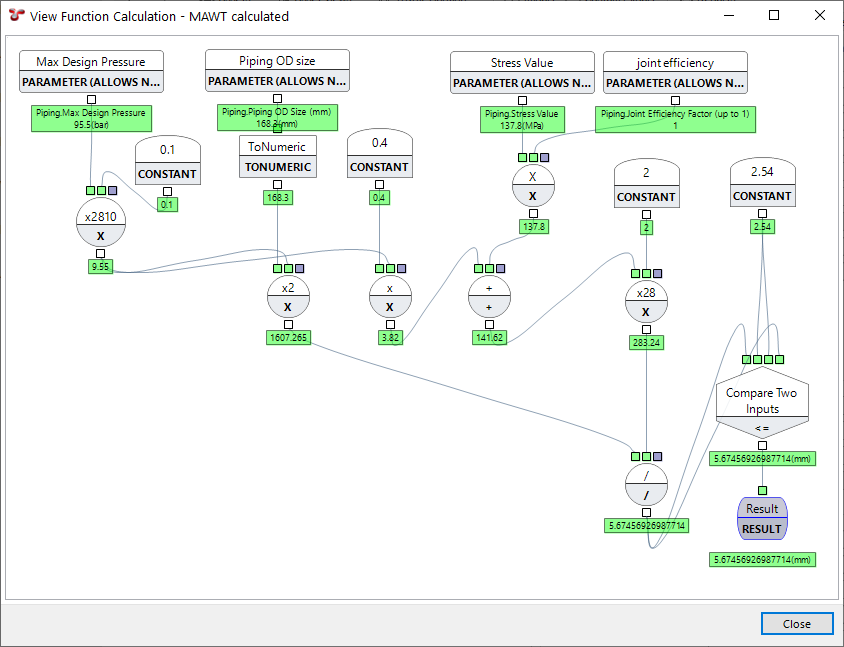
Please note that the function can not be edited from this dialog. You can, however, right-click on any element and select View to view its internal details.
Hint
When focus is on a calculated field (by clicking in it with the mouse or tabbing into it), any other fields on the same form which are inputs into the function, are highlighted a darker grey colour. You can also see a function’s inputs by clicking on the ![]() icon — an input parameter will be labelled “Source - Constant” if it is being given a constant value rather than a value from a field; or “Source - Field” followed by the table name and the field name.
icon — an input parameter will be labelled “Source - Constant” if it is being given a constant value rather than a value from a field; or “Source - Field” followed by the table name and the field name.
In the example shown below, the ‘Adjusted Safety Consequence’ calculated field has inputs from ‘Asset Area Location’ and ‘Safety Consequence’.

Passthru Field
Passthru fields show data from another field on the same asset. A passthru field will have a ![]() icon at its right-hand side. Clicking this button will show a dialog telling you what form and field the passthru is pulling information from.
icon at its right-hand side. Clicking this button will show a dialog telling you what form and field the passthru is pulling information from.
Global Table Link Field
A Global Table Link field enables linking of a global table to an AIG. NEXUS-IC will apply filters progressively (guided by the user) until the desired table row is linked to the AIG. The UI should display all values for the selected global table field, in a combo box for the user to select, similar to a lookup list.
When adding or editing a Global Table Link, it will be displayed as a pseudo form. This will be built based on:
- What fields are visible in the Global Table form.
- The order of fields visible in the Global Table form.
For each field, NEXUS IC will display a combo box with the distinct set of values for that field. The first combo box will allow you to choose from all values available to that field. Once this is entered, the second field will be all distinct values from rows where the first field value matches what the user has chosen, and so on. If a field list only contains one value, it will be preselected automatically. This process continues until the user has chosen a value for each combo box, and thus filtered the global table row that will ultimately have its value persisted.
When importing or exporting a Global Table Link, the fields will be represented in the document as data separated by ‘/’ characters. For example:
| Asset Location.Full Location | Asset Type.Name | Component Damage Global Table Link.Component Damage |
|---|---|---|
| Wood | Company | Material / Insulation Failure / Degraded |
Note that if a field called ‘Name’ is present in the global table, the values in that column will be used in place of the automated value for Importing, Reporting and displaying in the grid. If a ‘Name’ column is configured, it should be made invisible on the form via the Field Layout options.
See Worked Example for more information.
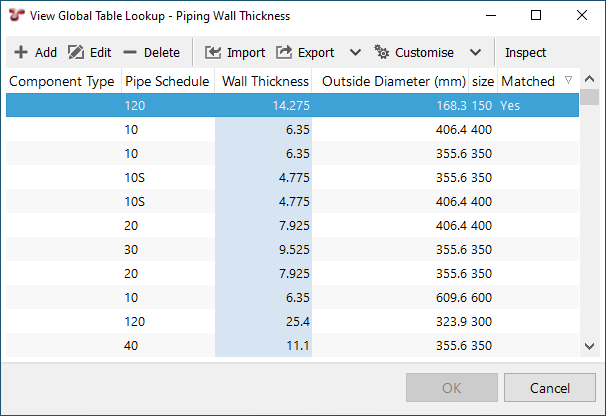
Global Lookup Field
Global Lookup fields are fields whose value is returned from a Global Tables matrix table. Lookup values are passed into the comparison function and the first value which meets the specified criteria is returned as the value for that field. (see section Global Tables for further information on configuring Global Tables.)
Global Lookup fields are identified by the ![]() icon.
icon.
Click on the ![]() icon to launch the View Global Table Lookup dialog. This dialog highlights which row matched the Global lookup criteria and is being displayed in the field. Click the Inspect button to see the Compare function evaluation for the focused row.
icon to launch the View Global Table Lookup dialog. This dialog highlights which row matched the Global lookup criteria and is being displayed in the field. Click the Inspect button to see the Compare function evaluation for the focused row.
Sub-Asset Information Forms
Often you will have a list or table of information to place against a single asset. For example, you might have a list of different kinds of threats that apply to this asset, and their severity, etc.
To represent this, we use a sub-form within the form.
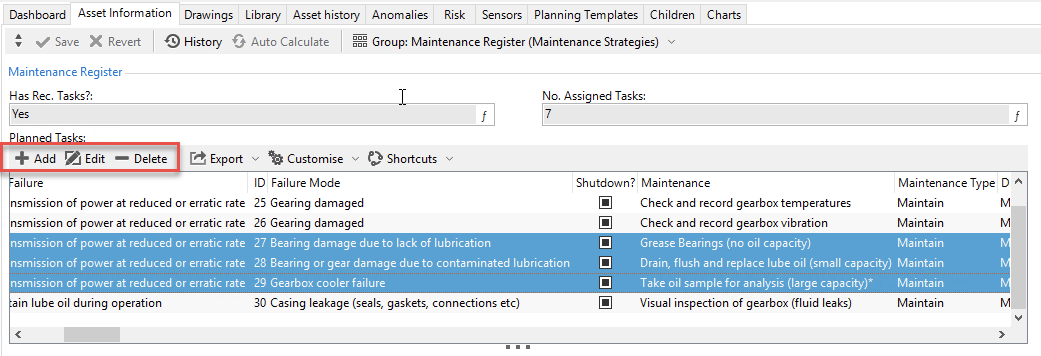
You can use Add, Edit, and Delete to add, edit, or remove rows.
By ctrl-clicking Sub-Asset Information rows, you can edit or remove multiple rows at once. See the screenshot below for an example:
Changes by other users
If a change is made in another copy of NEXUS IC or IC-Inspection to data on a form you are viewing, you will see a message saying that this item has been modified by another user.
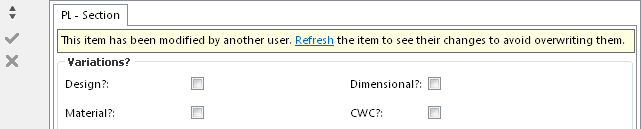
Click Refresh to load their changes into your copy of the application. (This will discard any changes you have made.) Or click the Save button to save your changes. (This will overwrite the changes the other user has made, meaning that they in turn will see this message, and have the opportunity to refresh or save.)
This feature applies generally throughout NEXUS IC and IC-Inspection, but asset information is perhaps the most common place to see it.