Desktops
IC-Inspection Desktops work in the same way as NEXUS IC’s Inspection screen: you can use the View button to drop down a menu which lets you control what panels are visible, and you can drag panels around and “dock” them.
When you are dragging a window over an existing window, you will see a pale blue highlight and/or a set of icons:
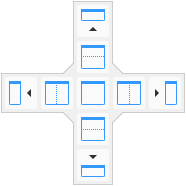
If you drag the window over one of the icons, the pale blue highlight shows where the window will drop, and the new size and shape it will take on. If you drop the window onto one of the icons, the window will dock appropriately: dropping it onto the centre square icon will make this window part of the tab group; dropping it on the left, right, top or bottom icons will split the current window and drop this window to the left, right, top or bottom of it.
If you drop a window outside the main window, they will become “floating” windows.
As far as the “desktop manager” that lets you drag/drop these windows is concerned, areas with no windows present are considered a ‘void’. If you drop a window into the centre of that void , the dropped window fills the void, and subsequent drops can split that window into parts. If you drop a window into the left, right, top or bottom of the void, then the void is split, but the right, left, bottom or top will still contain the void.
You can resize windows with the “splitter” at each edge between two docked windows — when you move the mouse over a splitter the mouse cursor will change to a  or
or  split arrow. Drag the splitter to resize the windows.
(The difference between floating and docked windows is that docked windows will resize together: when you drag a splitter, one window will get bigger while another gets smaller. Thus, docked windows never overlap each other. Typically most or all of your windows will be docked.)
You can close panels with the  at their top right corner, or click on
  to “unpin” panels so that they collapse to an edge of the window. To recover an unpinned panel, click on the panel’s name at the edge of the window, then click on the
  icon.
icon.
In IC-Inspection, three desktop layouts are automatically created for you: Structures, Pipelines, and Setup. NEXUS-IC’s Inspection screen has only one layout automatically created, Default.
You can save and switch desktops: click the Add a new desktop with the current layout button to create an entry in the list of desktops and save your current arrangement of panels into it; or click Save the active desktop to save your current settings. Settings are not automatically saved when you close the program — this is so that if you get into a state you don’t know how to get out of, you can simply close and re-open. You can also choose a different desktop from the Desktops menu to switch to it, and Delete the currently active desktop to delete it. The screenshot below shows the Desktop toolbar buttons, including the active Desktop dropdown menu, and the Save, Add, and Delete buttons.

If you have two monitors, it may be useful to spread across both, either by clicking the “Restore Down” button at the top right of the window if necessary and then dragging the main application window larger, or by floating windows such as Drawings and then dragging the floating windows onto the second monitor.