Upgrading
Upgrading from an earlier v6 version
- Ensure that you have a NEXUS user account which is in the Administrators Security Group, and that the account has read/write access to special permission Upgrade Schema.
- In your current version of NEXUS, perform a backup of the database (we suggest that this backup file is permanently archived).
- Run the installer on the Application Server (or on users’ individual PCs).
- Have one of the users from Administrators security group launch NEXUS IC v6 from the desktop shortcut and click on OK to update the database schema. The schema update will take some time to complete (about 1-10 minutes), so please be patient when the Status dialog appears.
Note
If you are currently using a HASP key license, you will need to switch to Software Based Licensing.
Note
If you’re upgrading from 6.0, 6.1 or 6.2, see this note about SQL Server permissions.
See the relevant What’s News for highlights of changes.
Upgrading from v5
If you are upgrading from NEXUS IC version 5:
- We suggest consulting with us. Email us at support@nexusic.com.
- Ensure that you have used NEXUS 5’s Database Backup feature to take a backup of your version 5 database and have put the backup in a safe place. We suggest that this backup file is permanently archived.
- In NEXUS IC 5, ensure that a user account exists that has permission to upgrade the database. In , check for both the Administrators group and the user account you plan to use. If in doubt, set both to read/write.
- Make another backup.
- In NEXUS IC 5, set the security permission back to forbid the Schema Update permission. The reason for this is to prevent a user who is experimenting with version 6 from accidentally upgrading your live version 5 database. Once a particular database is upgraded to version 6, version 5 software will be unable to open it.
- Restore the database with NEXUS IC 6 from the backup which has its security permissions set to allow the upgrade. We recommend not just connecting to the existing database, because if you do this you will not get an option to set a backup path. This backup path is necessary for the upgrade to work correctly.
You will receive an upgrade prompt. Note that the upgrade is irreversible (which is why you took a backup) and may take some time. (It’s OK to kick it off in the evening and check the results in the morning — it doesn’t need watching.)
At the end of the upgrade, NEXUS IC 6 will have written a log, giving details of its actions. This log is named IntegrityCentre_Trace.log and can be found in C:\Users\[USER_NAME]\AppData\Roaming\NEXUS.
Search this for the word “Warning” or the phrases “Warning[tab]Storage Engine” or “Warning[tab]Schema”. This latter phrase covers the most important issues. All these are warnings, not errors — they are merely here to let you know about changes that were made. Information messages can be safely ignored. Preserve a copy of this log file — otherwise it will be overwritten next time you restart NEXUS IC.
If you run into any problems, contact us with a pre-upgrade backup of the database and/or a copy of the log file.
Traffic lights and report templates will not be ported from version 5 — you will need to recreate these afresh in your new version 6 database. (This is because these features work in a different way in version 6, for speed reasons.)
Upgrading IC-Web to v6.6 (or later)
IC-Web 6.6 is now running a 64-bit rest service ISAPI module. Previous versions were 32-bit.
What needs to change? - You need to ensure that the “Enable 32-bit applications” attribute for the application pool running IC-Web is set to False.
For New Website Setup
- If you are setting up IC-Web for the first time or created a new website for 6.6, the installer will handle this for you just run the installer and install the new site by following the instructions in the installer.
For Existing Website Upgrade
If you have IC-Web 6.5 (or earlier) installed and use the “update” option in the installer, these extra steps need to be undertaken manually when the installer is finished running.
Open IIS and expand node on the left until you see “Applications Pools” and select it.
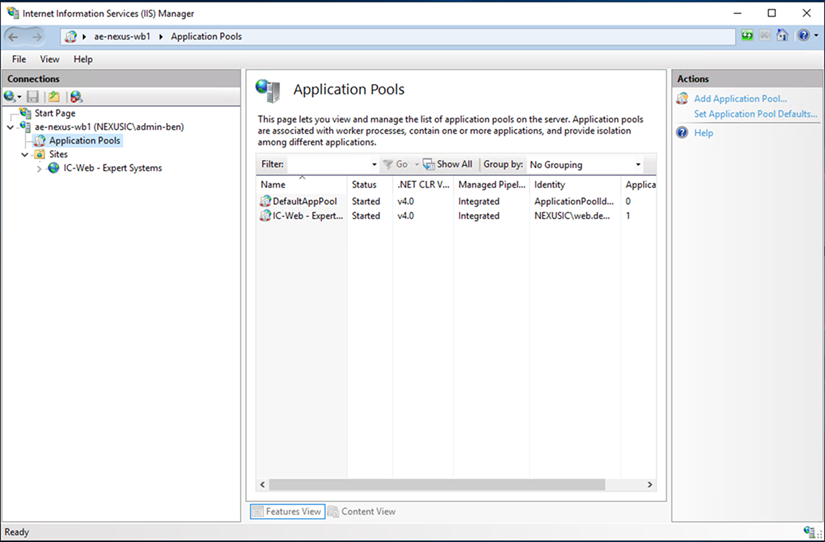
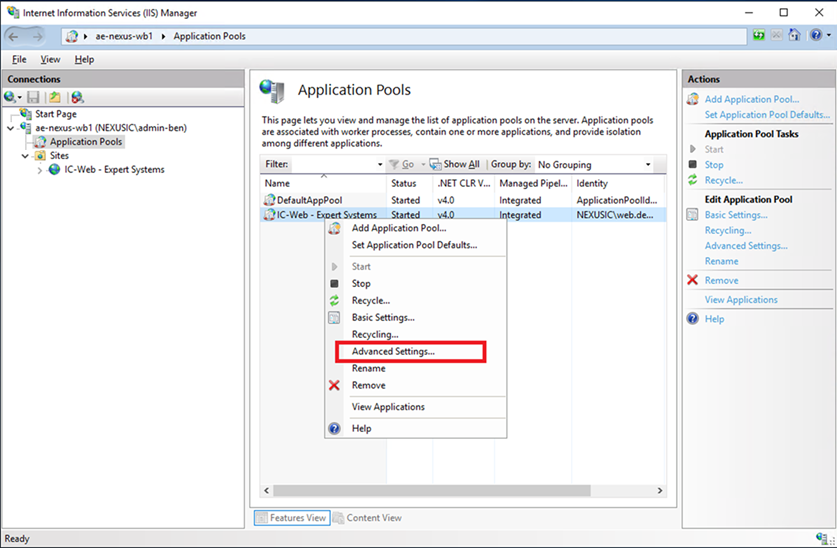
Select the application pool that the IC-Web website is using (default application pool name is “ICWeb”) and right click on this application pool and select “Advanced Settings…”.
Find “Enable 32 Bit Applications” and change the value from True to False.
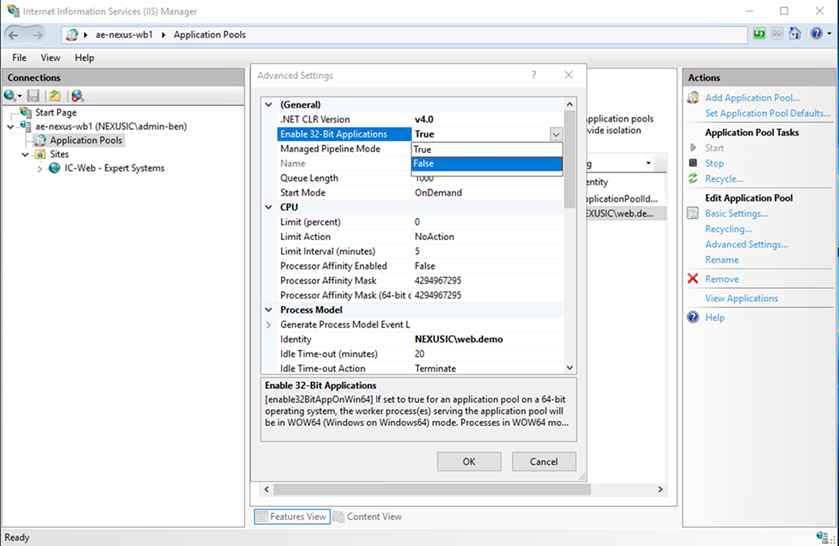
Double check “Enable 32 Bit Applications” is definitely now set to “False” and press “Ok” on the Advanced Settings window to save that change.
Restart your IIS service.