Anomaly Triggers Tool
The Anomaly Trigger utility only checks against the filtered list of events in the Event Listing grid. It only need be run if Anomaly Trigger limits have changed. The Anomaly Triggers utility checks the event data for each event currently shown in the Event Listing grid against pre-configured Anomaly Triggers. The Anomaly Triggers tool will automatically create findings on those events where the event data exceeds specified criteria. Where findings exist and event data no longer exceeds the criteria, then findings will be deleted.
After you click the button, you will be shown an “Are you sure” message.
During the check:
If it fails (meaning data is outside of defined triggers), then it will create a new finding. We first match on the following to see if the finding already exists. It matches on:
- Anomaly Trigger rule (Bound_ID)
- Is Auto Generated = true
In other words, if there is no finding already created from this trigger for this event, NEXUS will create a finding.
If it passes (meaning data is within the defined limits), then we check to see if we need to delete an existing finding. We match the finding based on:
- Anomaly Code (Code_ID)
- Anomaly Severity (Severity_ID)
- Reason (if there is an Error Message provided in the anomaly trigger)
- Anomaly Trigger rule (Bound_ID)
- Is Auto Generated = true
- that it has not been linked to an anomaly (Anomaly_ID is null)
- Anomaly Required is null
In other words, if a finding was automatically generated from a particular Anomaly Trigger rule, and the event data no longer exceeds that rule (because the event data has been changed or because the rule has been changed), and the Error Message in that rule still matches the Reason in this finding, and the finding has not been linked to an anomaly and the user has not marked whether it needs to be linked to an anomaly, NEXUS will delete it.
If you delete an Anomaly Trigger, findings created from it won’t be deleted. If you want to delete all findings created from an Anomaly Trigger, don’t delete the Anomaly Trigger — instead, modify it so that no data will be marked as anomalous (e.g. set it to only flag data between -2 and -1 on a field with no negative values, etc.), then run the Anomaly Triggers tool. Then as a second step you can delete the Anomaly Trigger.
When an anomaly trigger is violated, a yellow exclamation mark ( ) will appear next to the field. You can set lower/upper bounds to be constant values (so a field might trigger if it was outside, say, 1 to 9) or to pull from a field, on this form or on another form. So for example if this field is Measured Wall Thickness, it might trigger if its value is less than Minimum Allowable Wall Thickness.
For Lookup List fields, the comparison is done of the lookup list item’s Value, not its Comment. So if you have a lookup list titled “Anode Depletion”, and its first entry has value “25” and comment “0 to 25% depleted”, NEXUS will use the “25” for purposes of determining whether an anomaly trigger should be fired.
For Yes/No fields you can set the trigger to fire on any combination of Yes, No or blank; but you can’t compare to another field.
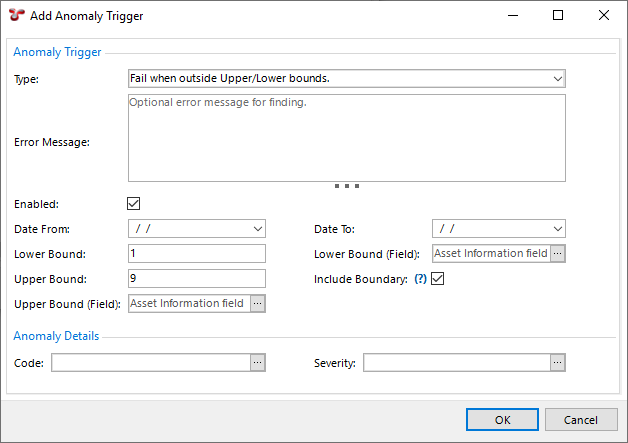
The Include Boundary tickbox controls whether exact matches cause the trigger to fire: if you have set a trigger to “Fail when inside Upper/Lower bounds”, your lower bound is 1 and your upper bound is 9, this is the difference between “1 < x < 9” and “1 <= x <= 9”.
You can optionally give an anomaly trigger a date range. If you set just a Date From, the trigger will apply only to event data from that date forward. If you set just a Date To, the trigger will apply only to event data from that date or earlier. If you set both, the trigger will apply only to event data within the specified range. In this way, you can change triggers to reflect new conditions, without causing spurious warnings on historical data. For example, if you decrease the operating pressure of an asset, this might decrease the minimum allowable wall thickness. Rather than editing the existing anomaly trigger, you can set a “To” date on that old trigger, and add a new trigger with a “From” date.
Caution
In most cases, Findings are generated at the time events are added or imported. There are however some scenarios in which the Anomaly Triggers utility should be run manually. These are 1) whenever anomaly triggers are edited; 2) when anomaly triggers exist on a calculation field; 3) before any Finding review sessions; or 4) after a bulk import of event data (particularly when anomaly triggers rely on events other than itself).
Triggers for a field independent of asset are found in NEXUS IC in Asset Information and Event Types. Anomaly triggers for specific assets can be configured in NEXUS IC by right-clicking on an asset and choosing Anomaly Triggers…. If you have both an asset-specific and a generic anomaly trigger on the same field, for assets with the asset-specific trigger, only the asset-specific trigger will apply. For assets with only a generic trigger, only the generic trigger will apply. Note that asset-specific anomaly triggers are specific to their asset — they do not automatically apply to an asset’s children.
A trigger can have an anomaly Code and a Severity, and you can have several different triggers on a single field, with different codes and/or severities. The dialog may also show a preview chart, showing which triggers apply at which KPs or depths.
See also the Anomaly Triggers section under Event Types.