Worked Examples
Asset Tasks (Static Repeats)
In the following example we will create a UT inspection Planning Template for a subset of CML assets.
Step 1 - Create a Planning Template
Go to and click on the Add toolbar button. Alternatively, go to and click on the Add toolbar button.
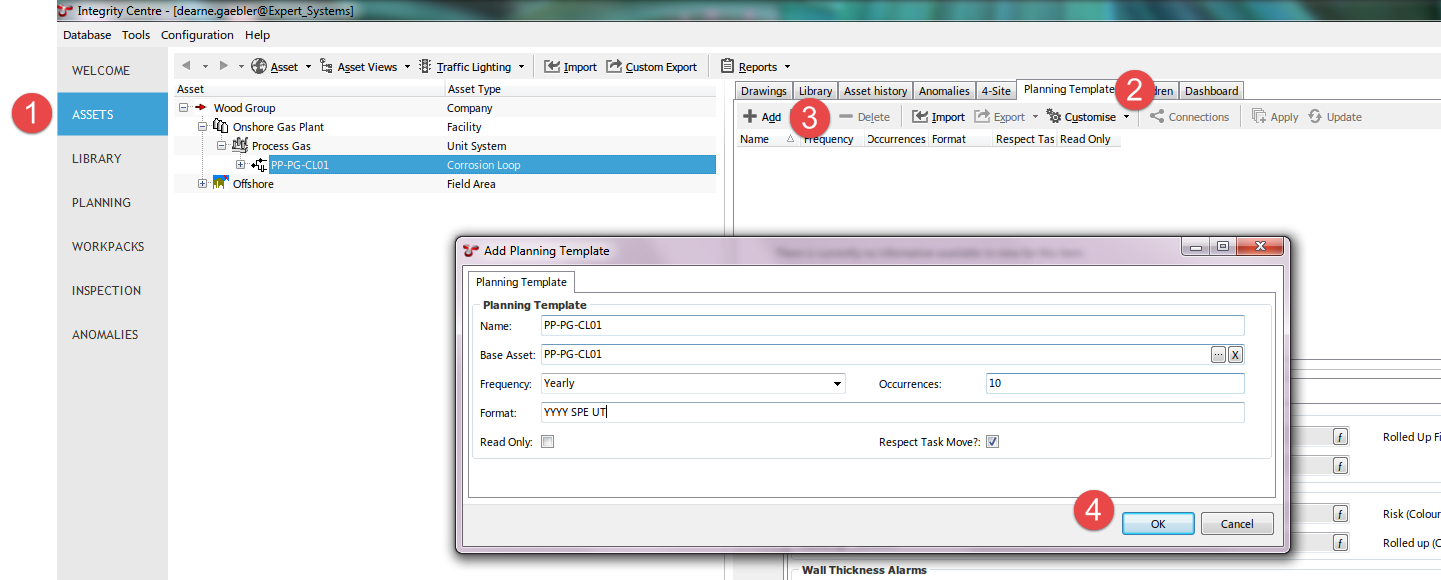
Input requirements for the Planning Template are the Name, Base Asset, Frequency, Occurrences and Format fields. Choose a name which best describes your planning template and a parent asset which will behave as a filter in later screens. In our worked example we have chosen a Yearly Frequency. The Occurrences field is arbitrary, we will be able to view 10 columns in the Summary page (see next step). Entering a Format of YYYY SPE UT means that when the workpacks are automatically generated, they will be named 2019 SPE UT, 2020 SPE UT, 2021 SPE UT and so on.
Step 2 - Create the Planning Template Tasks
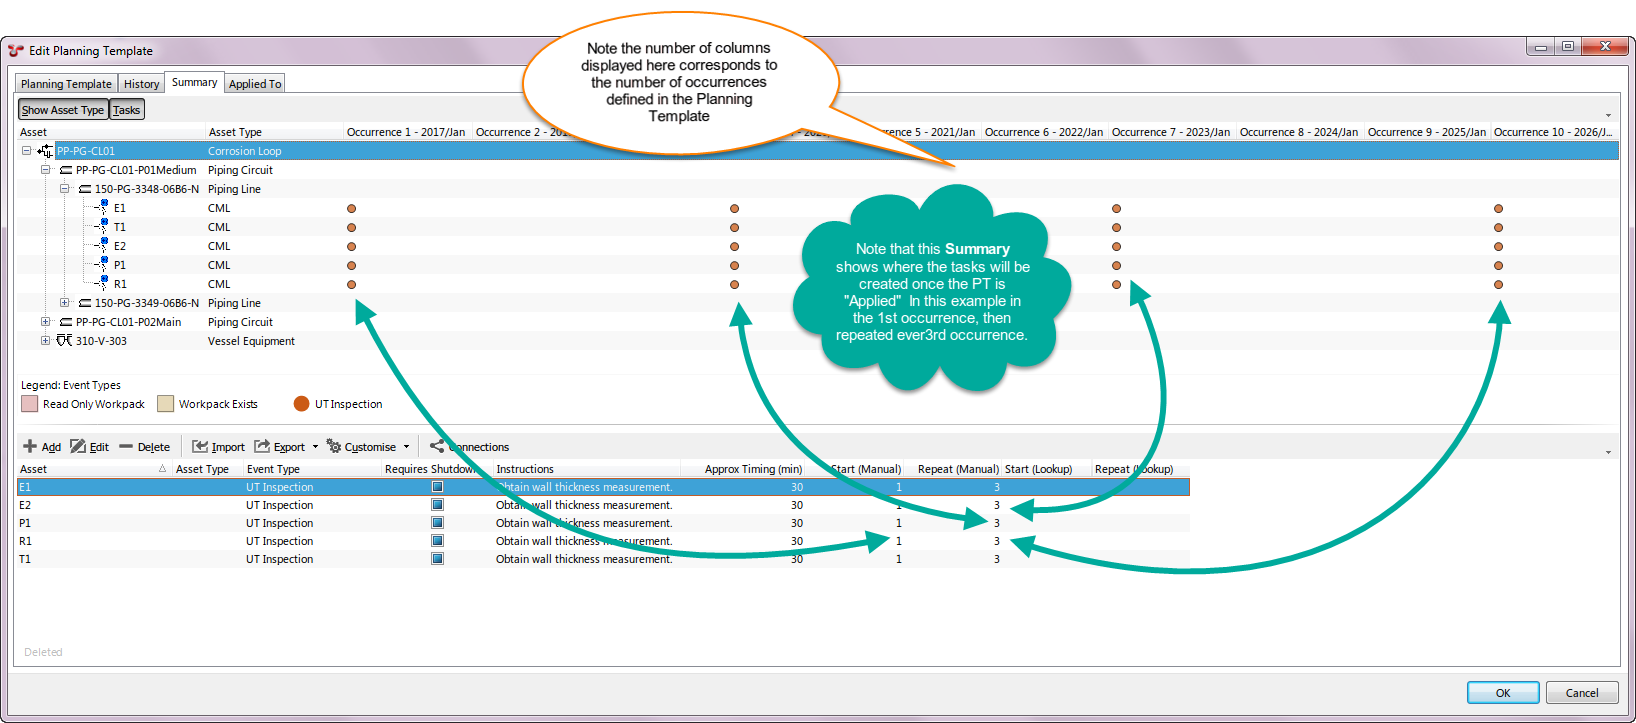
Edit the Planning Template create in Step 1, click on the Summary tabbed page, then click on the Add toolbar button to create a Planning Template Task.

Input requirements for an Asset based planning template task are the Asset, Event Type, Start and Repeat fields.
- Asset - Identifies which asset the task belongs to.
- Event Type - Identifies the inspection method to be scheduled and carried out.
- Start - Identifies the first occurrence that this task should occur, or a lookup to an AIG field.
- Repeat - Identifies the frequency at which this task should be scheduled and can either be a manually entered number or a lookup to an AIG field.
Additional fields such Start KP, End KP, Approximate Timing, Instructions etc. whilst not required fields, can be populated to provide more information on the individual tasks.
As tasks are added, the Summary screen shows where the tasks will be created once the Planning Template is Applied.
Step 3 - Apply the Planning Template
Applying the Planning Template will create the Workpack and Task records.
Go to (alternatively go to ), select the Planning Template from the grid, and click on the Apply toolbar button to launch the Apply Planning Template wizard.
- Occurrences - Allows you to choose how far into the future to create workpacks. Entering a date in the Specific Date field will automatically calculate the Number of Occurrences to apply, or entering a Number of Occurrences will automatically calculate the future Date. In this example we have entered 10, meaning that 10 years of future workpacks will be created. Click Next.
- Specify Workpacks - For each occurrence, either choose an existing workpack or elect to create a new workpack for the tasks to be created in. In this example we are electing to create new workpacks, one in each occurrence (year) for 10 occurrences (years). Click “Apply”.
Step 4 - Check Workpacks
Select the newly created workpack/s in the WORKPACKS screen and view the tasks in that workpack/s. In this example, tasks have been created in 2017 SPE UT and 2020 SPE UT and 2023 SPE UT and 2026 SPE UT workpacks (the 3rd occurrence, then every 3rd occurrence after that).
Step 5 - Edit Planning Template Task
In our example, we want to increase the frequency of the UT inspection campaigns to every second year. To do this, we edit the Planning Template task by editing the Repeat field from 3 to 2, as shown here:

Step 6 - Update Planning Template
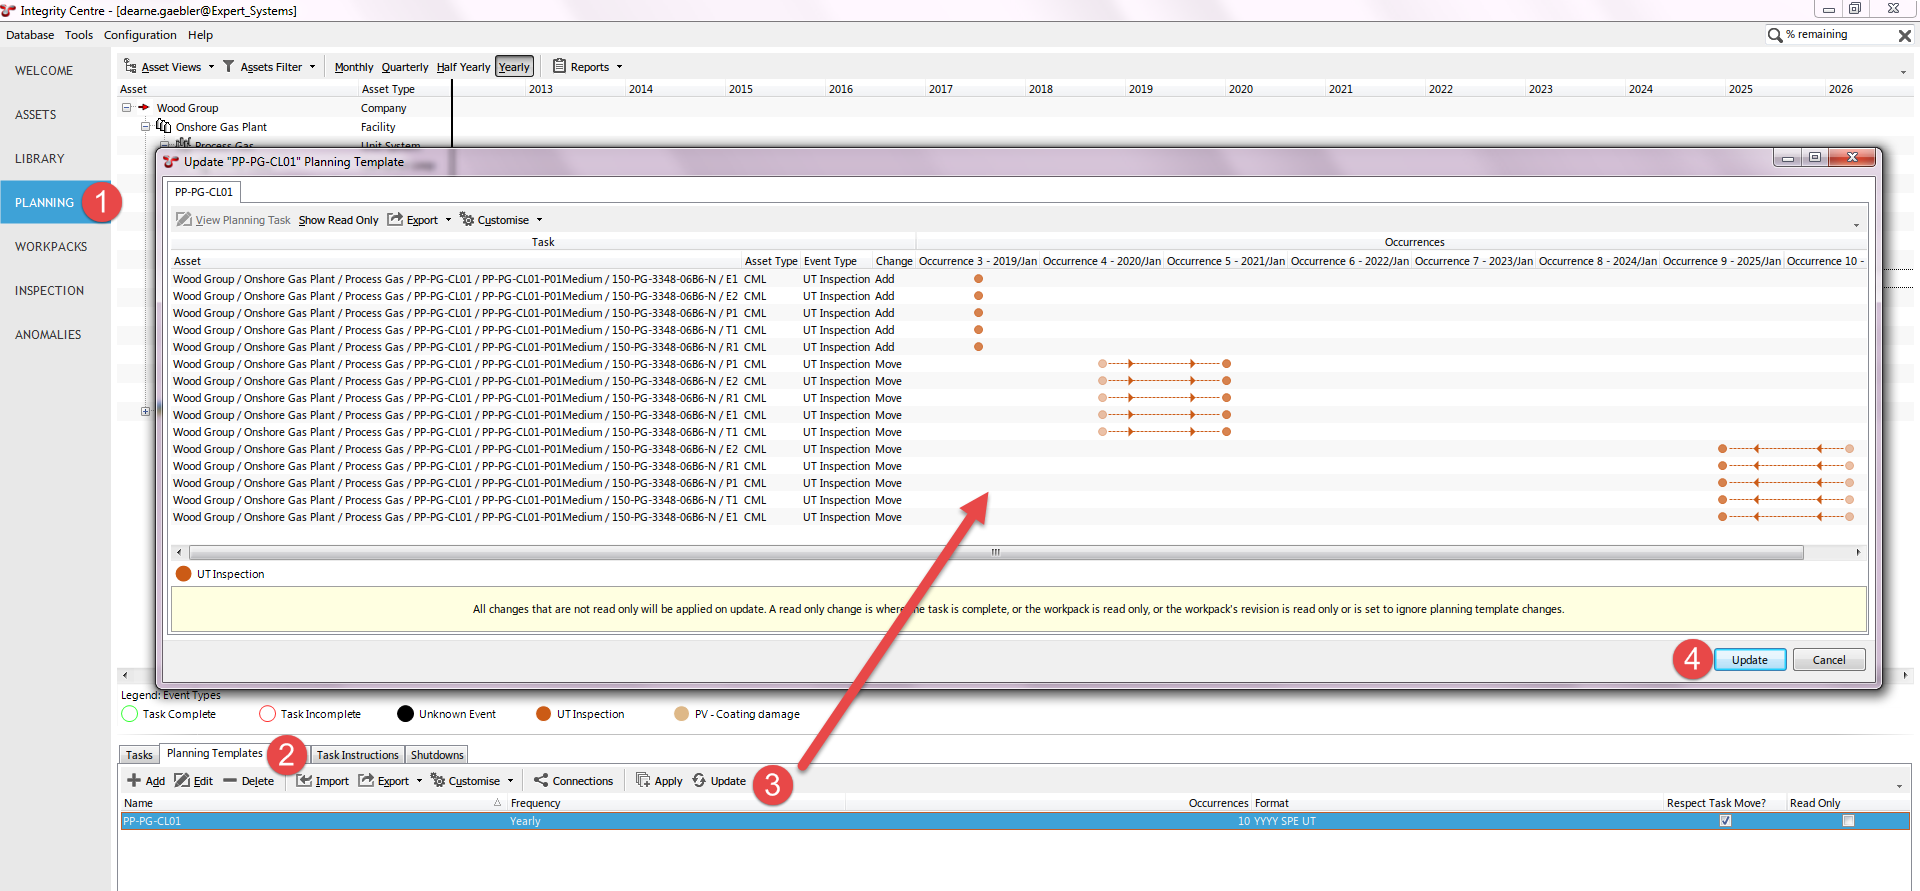
We then need to ensure that previously generated workpacks and tasks are updated with the revised frequency. So new tasks are created in 2019, 2020 tasks moved to 2021, and 2026 tasks moved to 2025 to reflect the new requirement for UT inspection every second year. 2023 tasks are unchanged, and so are not shown.
Go to (alternatively go to ), select the Planning Template from the grid, and click on the Update toolbar button.
This launches the Update “Asset Based Example” Planning Template dialog which details all changes that will be applied once you click on the Update button.
Note
When you click the Update button at the bottom of the Update Planning Template dialog, the changes are made inside a database transaction. This means that changes can be rolled back in the event of a problem (such as loss of database connection partway through the process). But since SQL Server can handle at most one open transaction at a time, any other copy of NEXUS IC that attempts to carry out updates (or potentially other planning template changes) will be blocked until the update process completes.
Asset Tasks (Lookup Repeats)
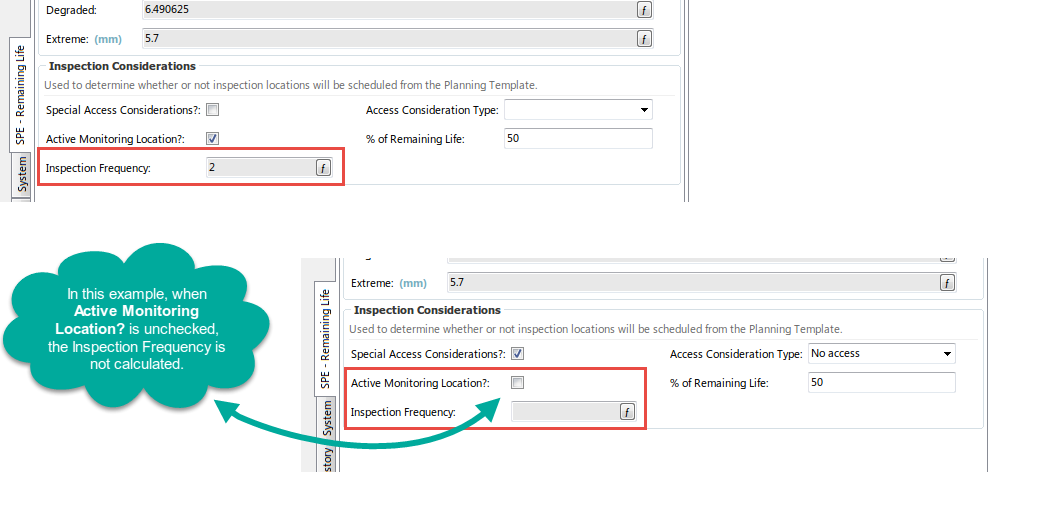
Most commonly, inspection frequencies are a moving target, in that frequencies tend to increase or reduce depending on inspection results. Where corrosion rates are low, then inspection can be less often; when high, then inspection needs to occur more often. To this end, NEXUS IC allows for the frequency (Repeat) field to be an input from a field in an AIG. Using the above example, we will change the Repeat from static 3 to use a field from the Remaining life AIG. Note that frequency will only be calculated calculated if the CML is identified as an Active Monitoring Location.
Step 1 - Edit the Planning Task
Edit the Planning Task as shown here:
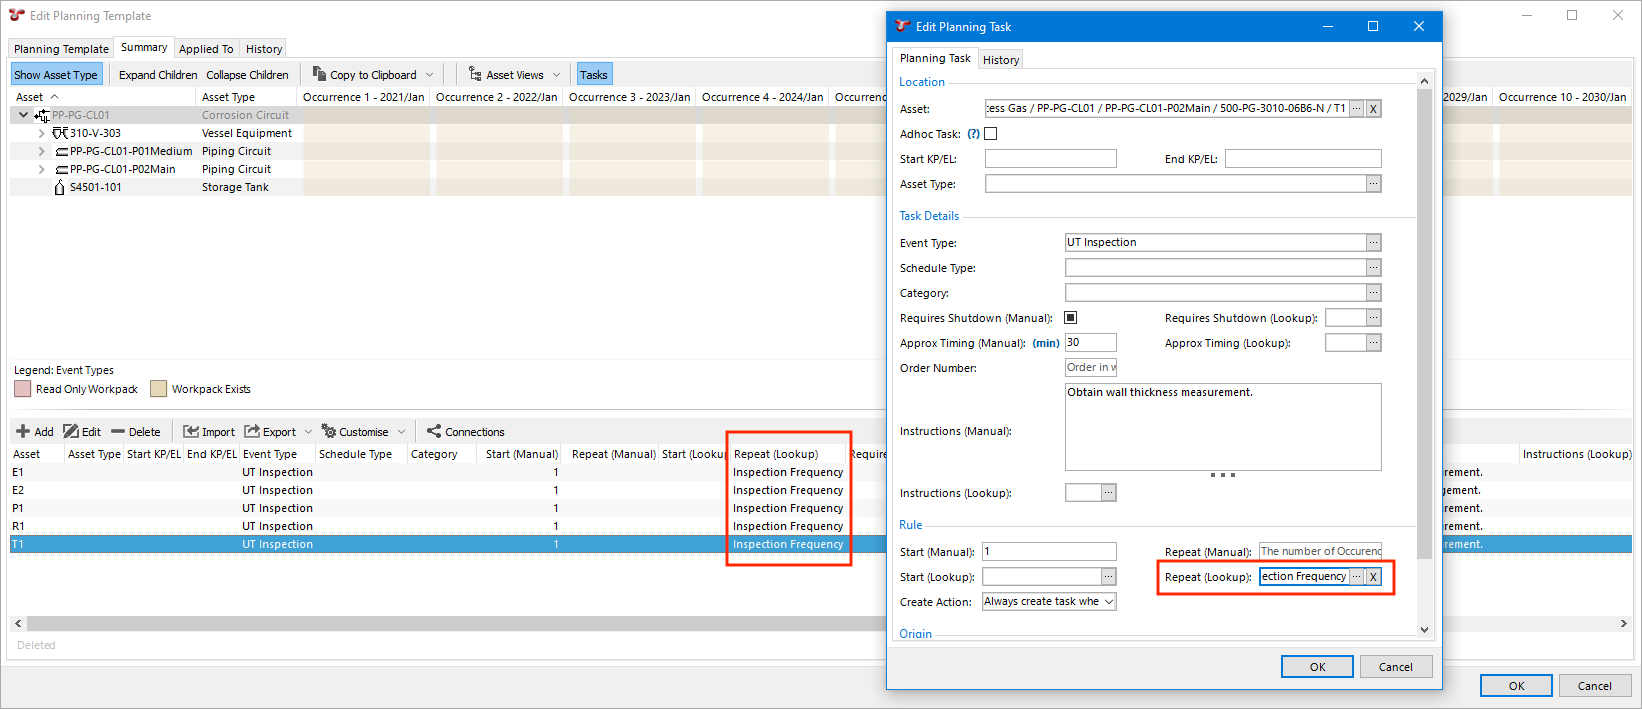
For each of the CMLs, the Frequency has been calculated as follows:
- E1 - 2 (Active Monitoring location is checked)
- T1 - NULL (Active Monitoring location is unchecked)
- E2 - 20 (Active Monitoring location is checked)
- P1 - 5 (Active Monitoring location is checked)
- R1 - 5 (Active Monitoring location is checked)
Step 2 - Update the Planning Template
When the Planning Template is updated the previously created Tasks will be deleted and/or moved or new tasks created based on the revised frequency. Performing an Update allows you to view the proposed changes to existing tasks and view new tasks. Our Update is shown here:

Asset Type Tasks (Lookup Repeats)
Planning Tasks can be configured by Asset Type, so that instead of defining the particular asset, you define the asset type, and tasks will be created for all assets of the specified type using the frequency.
Step 1 - Create the Planning Task
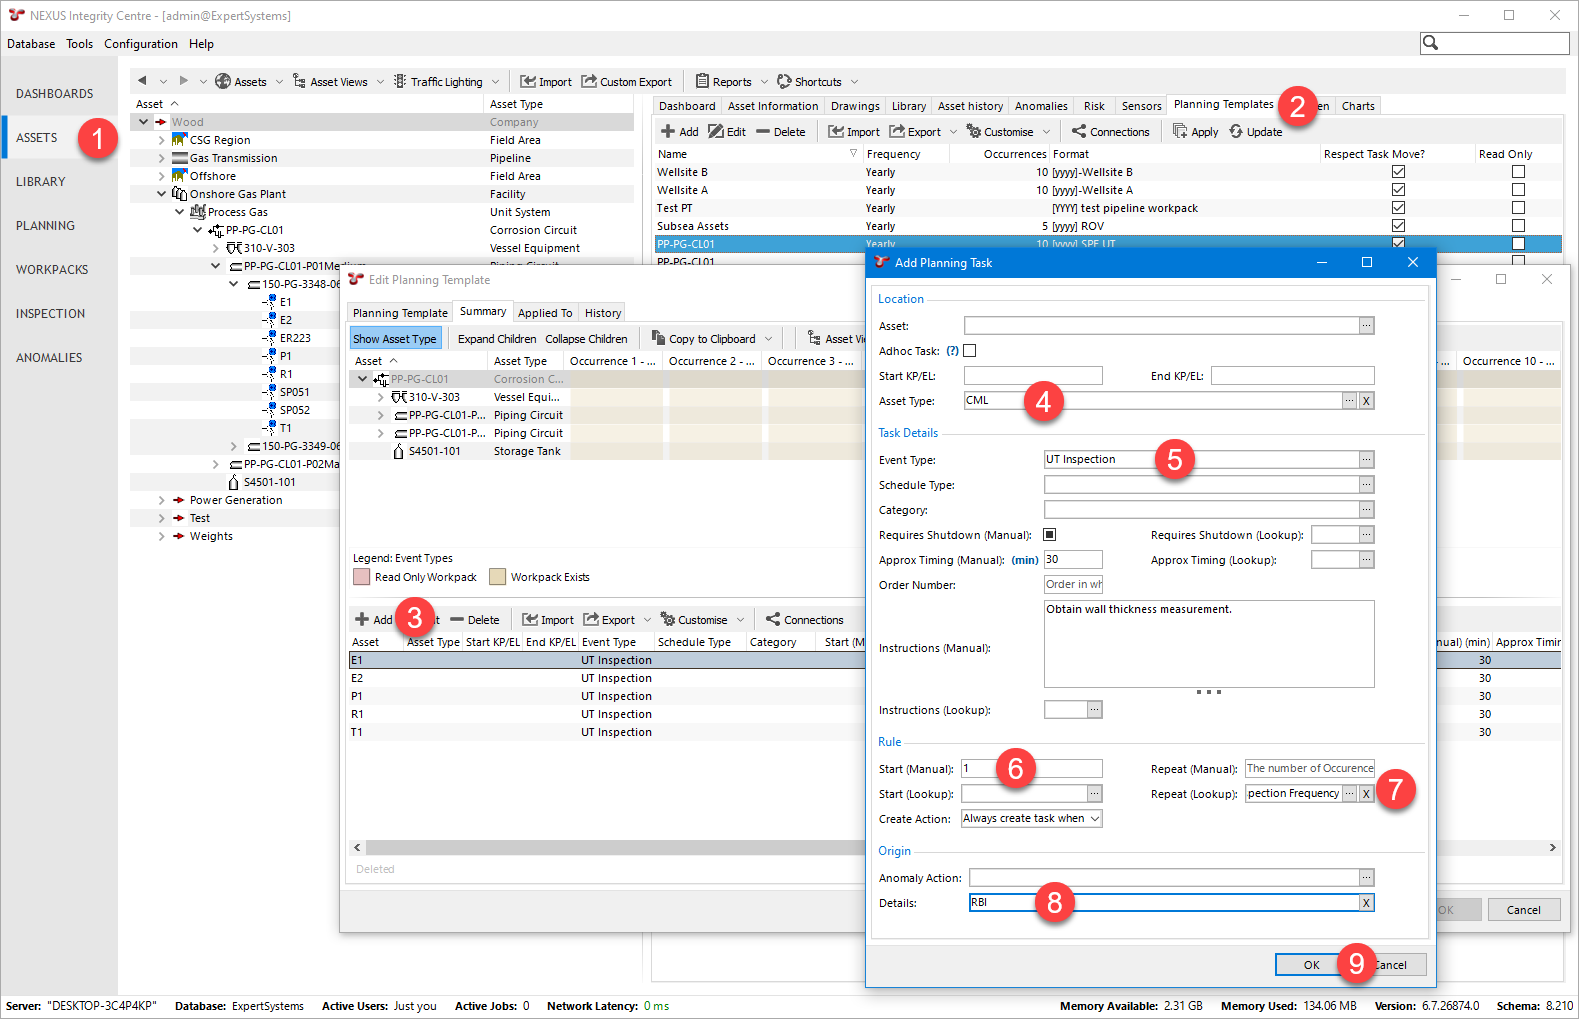
Here we are creating a single Planning Task, and setting its Asset Type to CML. Thus, every CML under our planning template’s Base Asset (PP-PG-CL01) will have a UT Inspection task created in the first occurrence, and frequency set according to the function. That’s the same function shown in the previous example, Asset Tasks (Lookup Repeats), and so relies on the same Remaining life AIG fields already filled in for that example. In this way, a single asset type planning task can potentially configure tasks for thousands of individual assets, based on the data in each one of those assets.
Deleting a Planning Task
Deletion of a planning task works slightly differently to deletion of other entities within NEXUS. For all other types of thing in NEXUS, clicking the Delete button deletes that thing. But for a Planning Task, if you have applied that Planning Task to create one or more Tasks, we want NEXUS to still know that those Tasks were created from this Planning Task. So instead, we simply set an under-the-hood Is_Deleted flag on the Planning Task. Once all the Tasks that were created from that Planning Task are deleted, the Planning Task will also be removed from the underlying database table.
Consider the case where you want to delete an event definition. First, you must delete everything that depends on that event definition. This includes Planning Tasks which use this event definition, but the way to remove those Planning Tasks is to remove the Tasks that in turn relied on that Planning Task. Once this is done you should be able to delete the event definition (which will delete all events of that type, etc).