IC-Web Deployment Guide
Requirements
IC-Web Supported Browsers
- Chrome 54.0 or above
- Microsoft Edge 79 or above
- Safari 9.1 or above
- Firefox 53.0 or above. 3D drawings may be slower in Firefox.
IC-Web Server
Processor: Core i5 / i7
Memory: 4GB RAM
Hard Disk: 30GB
Server OS: Microsoft Windows Server 2016 (or higher) supported.
Web server software: Microsoft Internet Information Services (IIS) 8.5 with
- ISAPI Extensions
- IIS Management Studio (highly recommended)
ODBC Drivers: Version 17 required. (https://www.microsoft.com/en-us/download/details.aspx?id=56567)
Connection to SQL server running a NEXUS IC database
Installation
On the web server:
Run ICWebSetup.exe
Accept the License Agreement.
If you don’t have Internet Information Service (IIS) installed then select Yes, otherwise select No.
Select New Website.
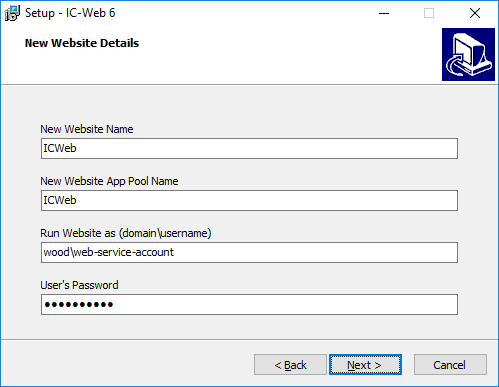
On the New Website Details page:
- New Website Name - this is the name of the website in IIS.
- New Website App Pool Name - this is the name of the Application Pool the website will use.
- Run Website as - this needs to be the username of an account with rights to connect to the SQL server and DB_OWNER of the NEXUS IC database. (Note if a domain account it must be in the format domain\username.)
- User’s Password - the password of that account specified above.
On the destination page - IC-Web Path is the path where the website will be installed to.
On the Website Bindings page:
- Website Binding URL Name - lets you set the URL of the website binding (Normally it is fine to leave as *.)
- Port - this should be left as port 80 unless your web server listens on a non-standard port.
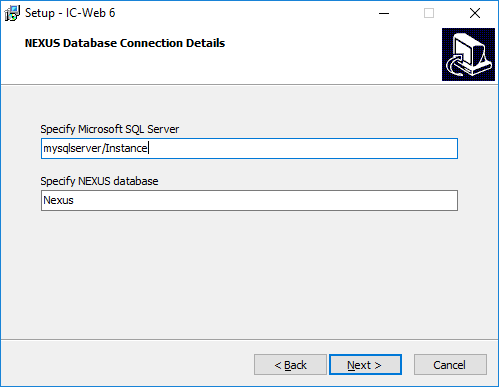
On the NEXUS Database Connection page:
- Specify Microsoft SQL Server - this should be the IP address or domain name, and database server instances.
- Specify NEXUS Database - this is the name of the NEXUS IC database hosted on the SQL server.
Click install and the file and configuration will be setup.
The last step contains a link to a driver for ODBC Driver 17 for SQL Server (https://www.microsoft.com/en-us/download/details.aspx?id=56567). This must be downloaded and installed on the server before you run IC-Web.
Updating
If you have installed IC-Web once and just want to update to a new version without having to reconfigure the web server,
On the web server:
Stop the World Wide Web Publishing Service via services.msc.
Run ICWebSetup.exe
Accept the License Agreement.
Select No to install IIS (as you already have IIS installed).
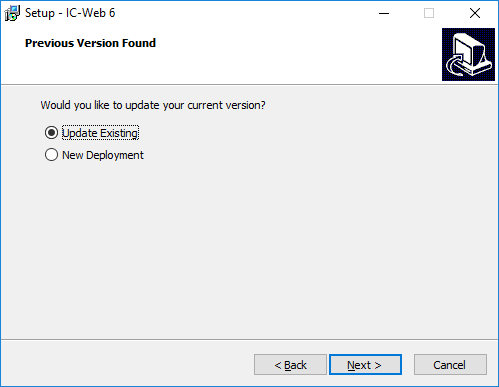
Select Update Existing when asked if you want to update you existing version
Click Next
Click install
This will install the new version of IC-Web but will leave the web server settings and configurations settings as they are.
Start the World Wide Web Publishing Service via services.msc.
Configure IIS
Once installed, IIS should be set up and IC-Web should be running on the HTTP protocol on port 80 of your web server. Running IIS on HTTP should only be done for initial testing. As soon as you are happy with the deployment you must modify the IC-Web website to use Secure HTTP (HTTPS) and stop the IC-Web HTTP protocol or redirect it to HTTPS. Not doing this step is a security risk and will exposes users’ passwords so it is vital that this is done straight away.
HTTPS Configuration
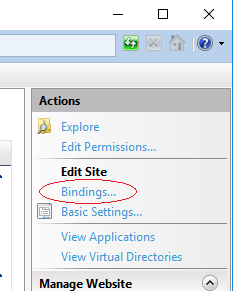
- Open IIS Manager, expand out the website tree and select the IC-Web website.
- On the Actions section on the right of IIS Manager click on Bindings….
- Remove the HTTP item. (NB you may leave this if you intend to redirect HTTP to HTTPS and understand the security ramifications — not covered by this deployment guide.)
- Add an HTTPS item. (This will require at least one SSL certificate on your server to do this without errors.)
- Your bindings should now look like:
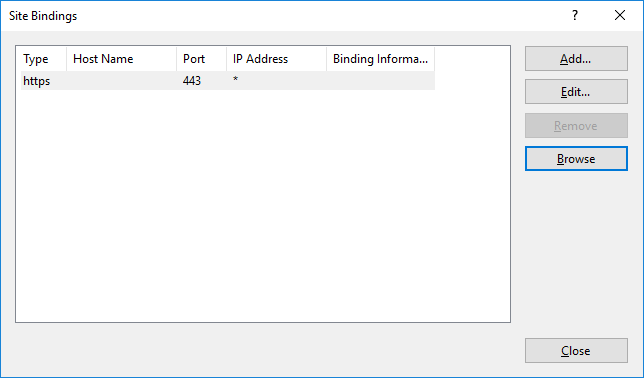
- You should now be able to browse to your website via https://<your site>, and http://<your site> should give you a 404 file not found error.
If you wish to manually check server settings:
Web server
- Open IIS Manager, open the ISAPI and CGI Restrictions. Make sure there is an entry for <the_path_you_set_in_step_6_of_the_install>\webroot\data\ICWeb.dll
- Double click Feature Delegation. Make sure Handle Mapping is set to Read/Write.
- Select the Application Pools and select the ICWeb application pool click on the Advanced Settings. Make sure “Enable 32-Bit Application” is set to false.
- Check the “Identity” in the application pool advanced settings is set to the correct username and password.
- Open the ICWeb website in the IIS tree. Expand out the tree and select the data directory under the ICWeb website. Open Handle Mappings. Click on Edit Feature Permissions on the right. Make sure Execute is ticked.
Website
The installer should do this for you but if you want to check the settings:
- Select the IC-Web website and select the Advanced Settings in IIS Manager.
- Check the Physical Path is correct - note this should be what ever you specified in step 6 of the install wizard with “\webroot” added; e.g. if it was “c:\Websites\ICWeb” the physical path should be “c:\Websites\ICWeb\webroot”.
- Check the Physical Path credentials.
Configure IC-Web
The installer should do this for you but if you want to check the settings:
Open the ICWeb website in the IIS tree. Expand out the tree and select the data directory under the ICWeb website. Double Click the Configuration Editor. Open the Collection. It should contain 6 entries:
Server- This is the domain name or IP address and instance of the SQL server.DatabaseName- This is the name of the NEXUS IC database on the SQL server.Username- This attribute contains the username of a NEXUS account that exists and is enabled in the Database.InstallPath- This is the directory location of the directory that holds the IC-Web \webroot directory.LogLevel- (optional) Allows you to specify the log level of the ICWeb.dll.TokenUrl- (optional) The URL address of the ICWeb homepage - this is used by email/token authentication methods.sqlUserName- (optional) Can be used to authenticate to a database server if you want to use SQL authentication instead of Windows authentication for the SQL connection between IIS and the SQL server.sqlPassword- (optional) As above.
Note, these values are case sensitive
Authentication
Authentication can be via local NEXUS account or Single Sign On account.
If your IC-Web account is a local NEXUS IC account, just enter this as the username and password.
If your account has been set up in NEXUS as a SSO account then your username must be in full UPN format
username@domain. Your password is just your normal SSO password.
Common Errors and Troubleshooting
Test the REST service
Test the REST services is working:
Turn on Error Pages by opening IIS manager selecting the web server and open Error Pages.
Click Edit Feature Settings and set it to Detailed Errors.
Open the ICWeb.dll by browsing to your website address and adding /data/ICWeb.dll to the end of the address URL. This should bring up a default page for the ICWeb.dll rest service similar to the image below. If there are any errors with the DLL they should show here.
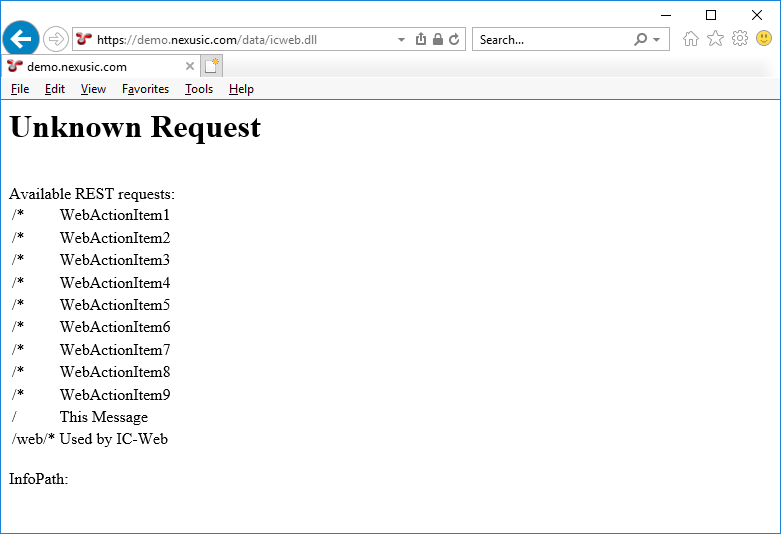
If you get a completely blank screen here please ensure you have installed the ODBC Driver 17 for SQL Server (https://www.microsoft.com/en-us/download/details.aspx?id=56567).
If the ICWeb.dll tries to download instead of run please ensure the web server is configured to execute ISAPI extensions. See the last item under Configure IIS -> Web server.
File Size Errors
If you are unable to upload files and you are seeing an “File Size Error”

You might need to adjust a setting on your IIS server to allow your users to upload larger files. On the web server if you go to location you installed IC-Web too. In the <installedLocation>webrootdatadirectory is a web.config file. Open this file with a text editor and make sure this line circled below appears in there. If not add you will need to add it in.
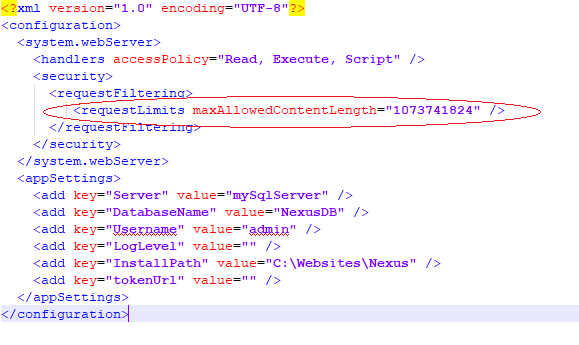
The number you enter for the maxAllowedContentLength represents the maximum size of the file allowed to by loaded to the server and thus inserted into the NEXUS IC database in Bytes. So in the example above this is 1073741824 Bytes (which is 1GB).
IIS Server Modules
Ensure the following modules are installed and running in IIS through the Add Roles and Features sections of your server:
- Default Document
- HTTP Errors
- Static Content
- Static Content Compression
- HTTP Logging
- ISAPI Extensions
- IIS Management Console
Check the Application Pool and the website account have rights to run the website and connect to the SQL server and NEXUS Database.