Import
The Import functionality gives the user the ability to bulk update data stored in the database. There are numerous Import buttons throughout NEXUS IC — the Import button on the Assets screen allows you to import assets and Asset Information; the Import button on the Library screen allows you to import Library Types; the Import button on the Library tab within the Library screen allows you to import Library items; etc.
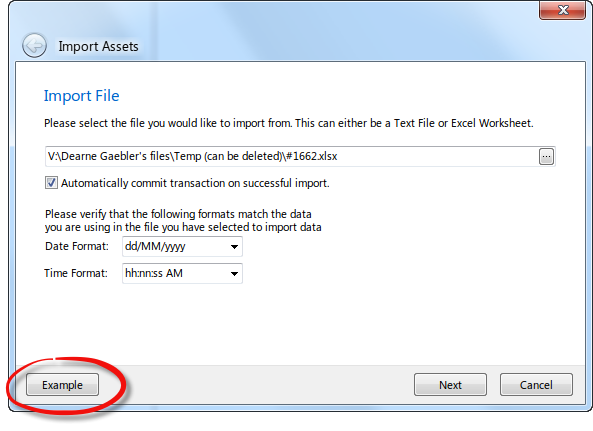
The format of the Excel workbook needs to be very specific. It is recommended that you use the Example button (shown below) to generate an Excel template in a format suitable for importing data.
The Import Template generated from the Example button will highlight fields which have been flagged as Required fields, setup lookup lists and provide information on the format and field type in the grey rows as shown here:

Caution
It is important to note that as the Importer is importing rows, the SQL server creates Row and Table Locks. This may mean that to other users accessing NEXUS IC, the application may appear unresponsive. When the import has finished and the data committed, then the Row and Table locks are released and the other users will be able to continue using NEXUS IC as normal.
The Import Wizard
- Import Filename - Navigate to the Excel or Text file which has been prepared for import. If you uncheck the “Automatically commit transaction on successful import”, the wizard will present you with a summary of the Import actions, and will prompt you to commit changes. Please note that the database will still be in a Transaction state until you Commit or Cancel the import.
- Configure Import - If you are using the Excel output from the Example template, then the destination Fields will be pre-populated. If you would like to make changes to the Destination fields or elect to ignore some fields, then click on the column heading titled Field: and choose from the options presented in the pop up menu. Finally, ensure that the correct Asset View is selected from the Required Fields selection box and that the number of Header Rows and worksheet are correct (by default this will be 1 or 2 rows).
- Import Complete - This page summarises the import, advising the user how many rows have been added to various forms/tables and whether or not any new assets have been created as part of the import. It is important that you scrutinise this summary to ensure that the import has performed the actions that you expected.
Tip
When importing inspection event data, anomaly triggers are checked during the import and findings created automatically from data which falls outside the data bounds.
Note
If you are importing a sheet designed for use with NEXUS IC 5, it may have one or more columns titled ‘Component.Location’. In the Configure Import page, you should select ‘Asset Location.Full Location’ for these columns.