Video
The Video window allows playback of centrally stored video which is linked via datetime stamp from the currently selected event.
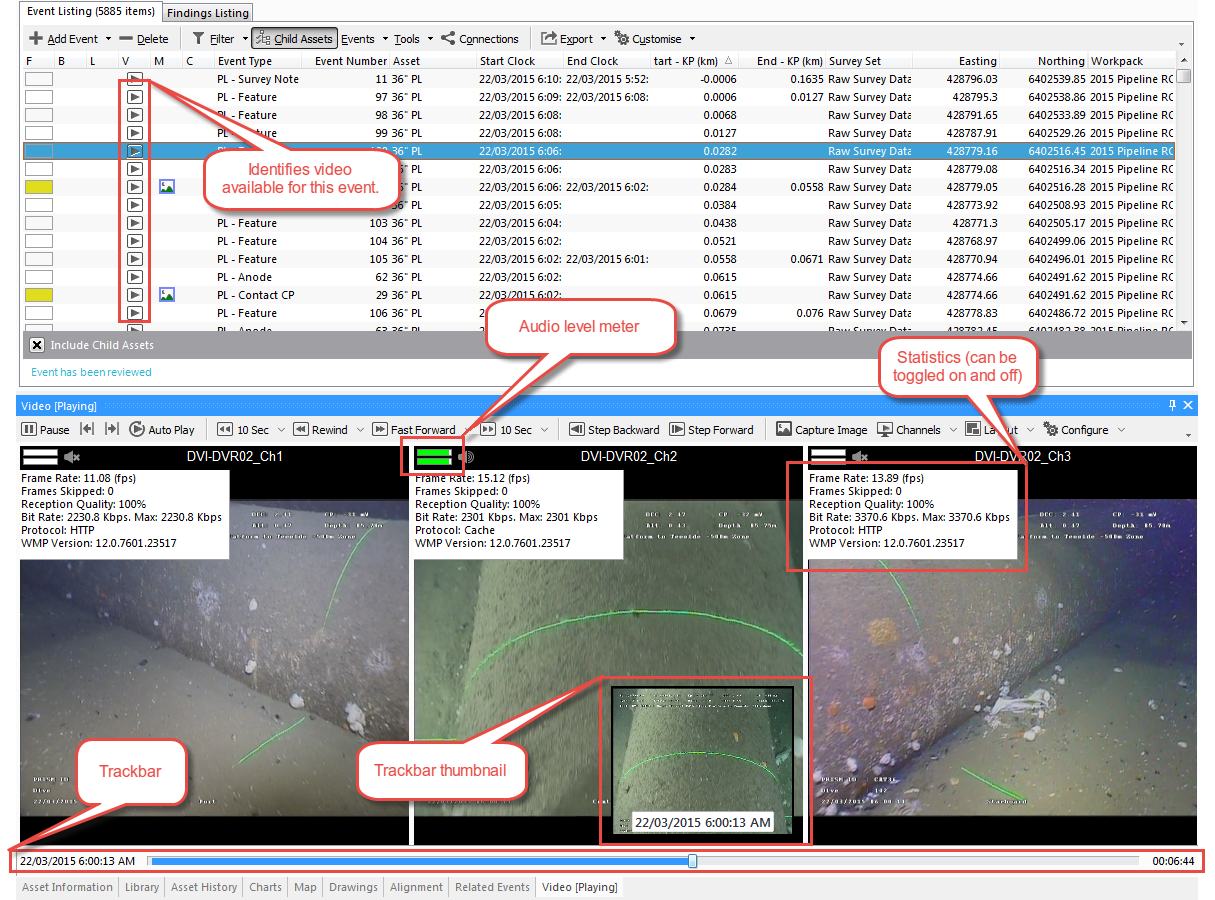
Events with associated video are identified with a small play icon in the Event Listing window as shown here:
Tip
If you are experiencing degradation of video quality due to frame dropouts caused by insufficient bandwidth, then disable one or more channels.
Video Toolbar
- Starts playback at the current point in time. The video can be paused by pressing this button again.
- Plays video for the event selected in the Event Listing.
- Plays video for the event selected in the Event Listing, starting at that event’s End Clock.
- The Auto Play toolbar button has two states, Up and Down. When Up, you will be required to click on the Play Event or Play toolbar buttons to start video playback. When Down, then video playback will automatically start when an event becomes active in the Event Listing.
- Steps back in the video by the selected timeframe. Choose the timeframe from 1 second, 5 seconds, 10 seconds, 30 seconds, 1 minute or 5 minutes from the sub menu.
- Rewinds the video with preview using the selected speed. Choose the speed from -1 x, -1.5 x, -2 x, -2.5 x, -3 x, -4 x and -8 x from the sub menu. Depending on how the video has been encoded, some speeds may not be available. When the desired position is reached, the video can be played by pressing the Play button. (You can also set fast forward/rewind speed by putting the mouse cursor over the video window and using the mouse wheel.)
- Fast forwards the video with preview using the selected speed. Choose the speed from 1.5 x, 2 x, 2.5 x, 3 x, 3.5 x, 4 x and 8 x from the sub menu. Depending on how the video has been encoded, some speeds may not be available. When the desired position is reached, the video can be played by pressing the Play button. (You can also set fast forward/rewind speed by putting the mouse cursor over the video window and using the mouse wheel.)
- Steps forward in the video by the selected timeframe. Choose the timeframe from 1 second, 5 seconds, 10 seconds, 30 seconds, 1 minute or 5 minutes from the sub menu.
- Steps backward in the video by one frame. Depending on how the video has been encoded, this button may step the video back to the previous key frame, which might be several seconds back.
- Steps forward in the video by one frame.
- Captures an image from each of the playing video channels and attaches it/them to the currently selected event as a multimedia item. Multimedia can be viewed from the Multimedia pane. Within the Capture Image dialog, you can select/unselect and crop images. To crop, click the Crop button or Ctrl-X, then click and drag a rectangle on the image. To complete the crop, click the
 button, or Crop To Selection, or Ctrl-Shift-X.
- Where multiple channels of video exist for a selected event, they will be listed in this sub menu. For each channel you may enable/disable the Video and/or Audio. To disable the audio or video, uncheck the video or audio from the sub menu. You can also enable/disable audio each channel’s audio by clicking the speaker icon next to the audio level meter.
- This option will automatically size and position the channels (minimising unused space) based on the size and proportions of the video pane.
Tip
Note that the Video pane can be undocked, resized and placed outside of the NEXUS application, on another monitor for example.
- The channels will be displayed horizontally by checking this option.
- The channels will be displayed vertically by checking this option.
- The channels will be displayed in square shape by checking this option.
- When Maintain Playback Rate is checked, the current video playback speed will be maintained when a new video loads.
- When Show Thumbnails is checked, hovering over the video trackbar will show a Thumbnail grab of the video at that position.
- The statistics for each video will be displayed on the top left side of the video by checking the Show Statistics.
- This option affects what is shown on the Thumbnail when hovering over the trackbar. When checked, the actual date and time of the video will be shown, when unchecked, the current video position will be shown (in minutes).
- When Enable Time Sync is checked, it will ensure that all the channels are in sync (at the same date/time in the video) when playing multiple channels.
Note
You can tell NEXUS IC where to look for video by setting Global Video Path and/or Temporary Video Path on the Database Properties dialog. See also How does video playback work?