IC-Web Deployment Guide
Requirements
Server Side:
Microsoft Windows Server 2008 R2 (or above)
IIS 8.0 (or above). Running:
- ISAPI Extensions
- IIS Management Studio (is highly recommended)
Connection to SQL server running a NEXUS IC database
Client Side:
A Modern web browser. The following have been tested to work:
- Microsoft Internet Explorer 11
- Microsoft Edge
- Mozilla Firefox (60.0.2)
- Google Chrome (68.0.3440.106)
- Safari (11.1.2)
Installation
On the web server:
Run ICWebSetup.exe
Accept the License Agreement.
If you don’t have Internet Information Service (IIS) installed then select Yes, otherwise select No.
Select New Website.
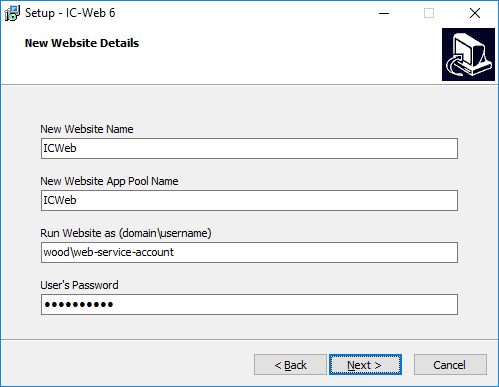
On the New Website Details page:
- New Website Name - this is the name of the website in IIS.
- New Website App Pool Name - this is the name of the Application Pool the website will use.
- Run Website as - this needs to be the username of an account with rights to connect to the SQL server and DB_OWNER of the NEXUS IC database. (Note if a domain account it must be in the format domain\username.)
- User’s Password - the password of that account specified above.
On the destination page - IC-Web Path is the path where the website will be installed to.
On the Website Bindings page:
- Website Binding URL Name - lets you set the URL of the website binding (Normally it is fine to leave as *.)
- Port - this should be left as port 80 unless your web server listens on a non-standard port.
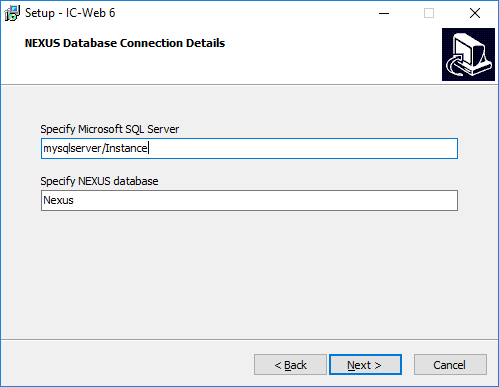
On the NEXUS Database Connection page:
- Specify Microsoft SQL Server - this should be the IP address or domain name and database server instances.
- Specify NEXUS Database - this is the name of the NEXUS IC database hosted on the SQL server.
Click install and the file and configuration will be setup.
The last step contains a link to a drivers for ODBC for SQL server (https://www.microsoft.com/en-gb/download/details.aspx?id=36434). This must be downloaded and installed on the server before you run IC-Web.
Configure IIS
If all has gone according to plan then you should not need to configure IIS at all.
If you wish to manually check server settings:
Web server
- Open IIS Manager, open the ISAPI and CGI Restrictions. Make sure there is an entry for <the_path_you_set_in_step_6_of_the_install>\webroot\data\ICWeb.dll
- Double click Feature Delegation. Make sure Handle Mapping is set to Read/Write.
- Select the Application Pools and select the ICWeb application pool click on the Advanced Settings. Make sure “Enable 32-Bit Application” is set to true.
- Check the “Identity” in the application pool advanced settings is set to the correct username and password.
- Open the ICWeb website in the IIS tree. Expand out the tree and select the data directory under the ICWeb website. Open Handle Mappings. Click on Edit Feature Permissions on the right. Make sure Execute is ticked.
Website
The installer should do this for you but if you want to check the settings:
- Select the IC-Web website and select the Advanced Settings in IIS Manager.
- Check the Physical Path is correct - note this should be what ever you specified in step 6 of the install wizard with “\webroot” added; e.g. if it was “c:\Websites\ICWeb” the physical path should be “c:\Websites\ICWeb\webroot”.
- Check the Physical Path credentials.
Configure IC-Web
The installer should do this for you but if you want to check the settings:
Open the ICWeb website in the IIS tree. Expand out the tree and select the data directory under the ICWeb website. Double Click the Configuration Editor. Open the Collection. It should contain 6 entries:
Server- This is the domain name or IP address and instance of the SQL server.DatabaseName- This is the name of the NEXUS IC database on the SQL server.Username- This is set to an account that exists in NEXUS IC - usually.InstallPath- This is the directory location of the directory that holds the IC-Web \webroot directory.LogLevel- (optional) allows you to specificy the log level of the ICWeb.dll.TokenUrl- (optional) the URL address of the ICWeb homepage - this is used by email/token authentication methods.
Authentication
Authentication can be via local NEXUS account or Single Sign On account.
If your IC-Web account is a local NEXUS IC account, just enter this as the username and password.
If your account has been set up in NEXUS as a SSO account then your username must be in full UPN format
username@domain. Your password is just your normal SSO password.
Common Errors and Troubleshooting
Test the REST service
Test the REST services is working:
Turn on Error Pages by opening IIS manager selecting the web server and open Error Pages.
Click Edit Feature Settings and set it to Detailed Errors.
Open the ICWeb.dll by browsing to your website address and adding /data/ICWeb.dll to the end of the address URL. This should bring up a default page for the ICWeb.dll rest service similar to the image below. If there are any errors with the DLL they should show here.

If you get a completely blank screen here please ensure you have install the ODBC for SQL server (https://www.microsoft.com/en-gb/download/details.aspx?id=36434).
If the ICWeb.dll tries to download instead of run please ensure the web server is configured to execute ISAPI extensions. See the last item under Configure IIS -> Web server.
IIS Server Modules
Ensure the following modules are installed and running in IIS through the Add Roles and Features sections of your server:
- Default Document
- HTTP Errors
- Static Content
- Static Content Compression
- HTTP Logging
- ISAPI Extensions
- IIS Management Console
Check the Application Pool and the website account have rights to run the website and connect to the SQL server and NEXUS Database.